# Swit Store App 가이드
# 테스트를 위한 간편 환경 설정
# 개요
개발과 테스트에 필요한 간단한 설정을 합니다.
# 무료 온라인 서비스를 사용
## 1. **[replit](http://replit.com/)** 사이트
> - 회원가입
> - Repl을 두개 생성 합니다.
> - python 리플
> - flask 리플
### 1.1. 리플 생성
- 리플 사이트 에서 로그인
- Create Repl을 클릭합니다. [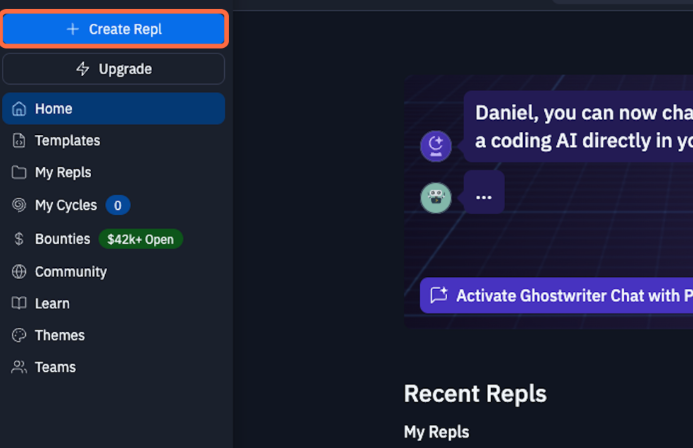](https://tech-support.swit.io/uploads/images/gallery/2024-01/6AGPf4rakljNmXbG-image-1704687871721-click-on-create-repl.png)
- Flask Templates을 선택합니다. [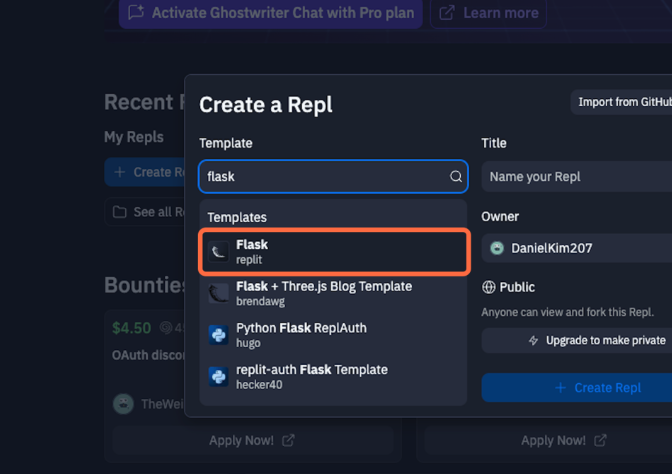](https://tech-support.swit.io/uploads/images/gallery/2024-01/IDiUanWHE2NvBxrE-image-1704686839161-choose-flask-templates.png)
- 원하는 제목을 입력합니다. [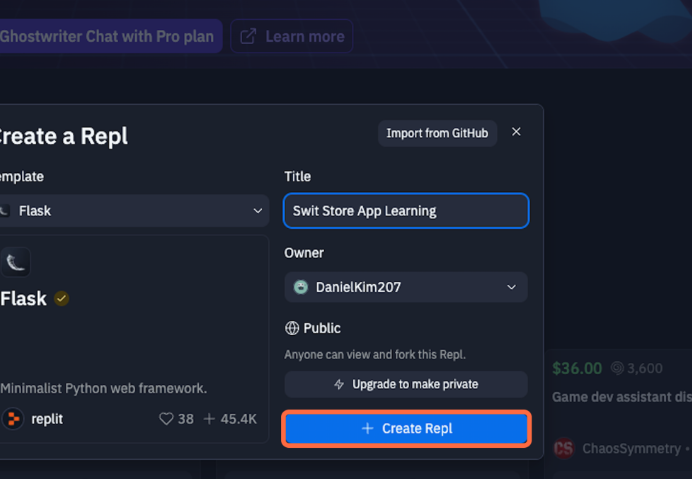](https://tech-support.swit.io/uploads/images/gallery/2024-01/P8trdoaJPP0MCoMa-image-1704686893468-enter-the-title-you-want.png)
- 실행을 클릭하면, 웹뷰 창에서 메시지를 확인한 후 확인을 클릭합니다. [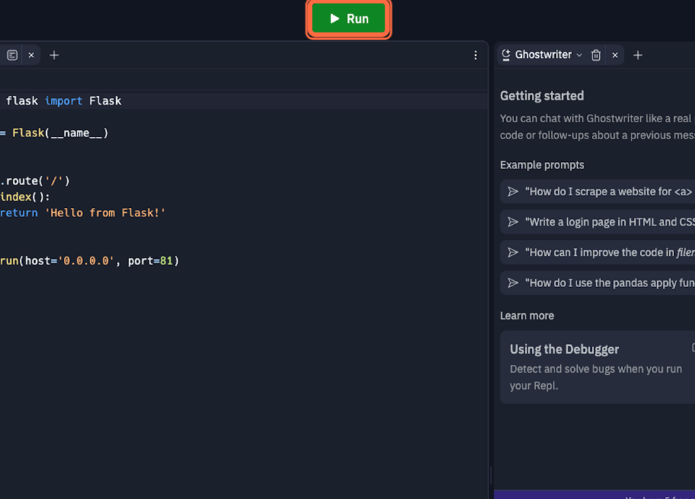](https://tech-support.swit.io/uploads/images/gallery/2024-01/l33MHGG99nEEPFVl-image-1704687909806-click-run-check-message-in-webview-window-and-click-stop.png)[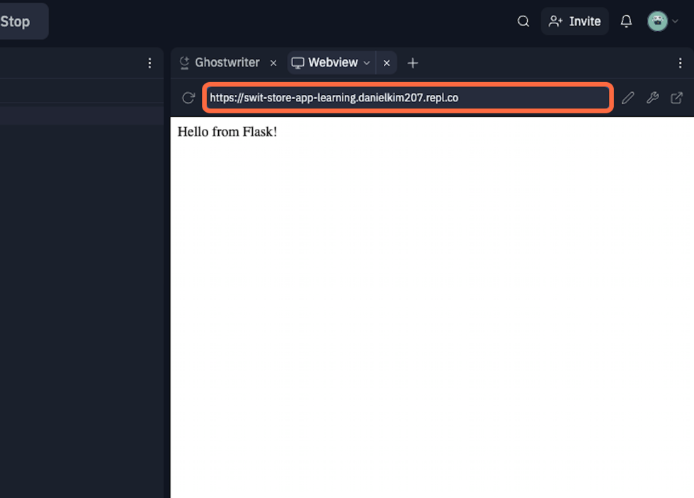](https://tech-support.swit.io/uploads/images/gallery/2024-01/1qoNpnJ9OQat0J3y-image-1704686910964-click-run-check-message-in-webview-window-and-click-stop2.png)
- 표시된 곳을 클릭하고 Create 버튼을 클릭합니다. [](https://tech-support.swit.io/uploads/images/gallery/2024-01/s61WWV12SZR23QNp-image-1704686921778-click-on-highlight-and-new-create.png)[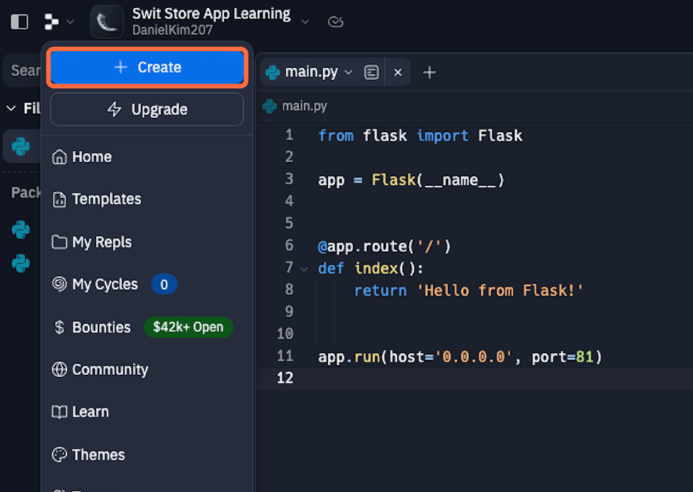](https://tech-support.swit.io/uploads/images/gallery/2024-01/LgqKqUI0PoU8Mfln-image-1704686928370-click-on-highlight-and-new-create2.png)
- Python Templates을 선택한 후 원하는 제목을 입력하고 Create Repl 버튼을 클릭합니다. [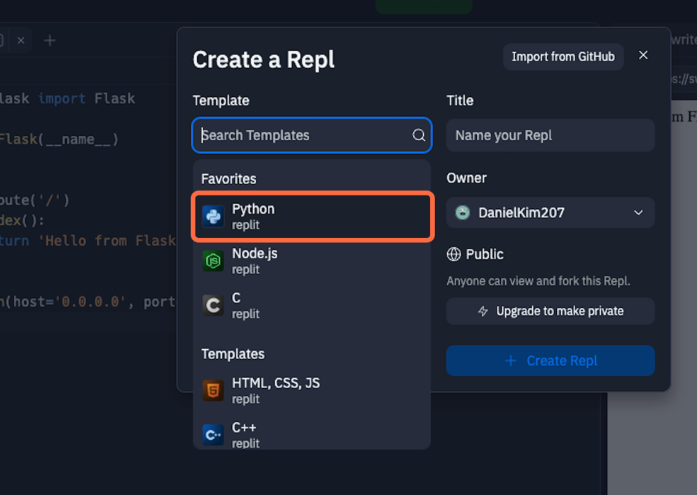](https://tech-support.swit.io/uploads/images/gallery/2024-01/QX5eFT7XqqPNmSyG-image-1704686937305-choose-python-templates-enter-the-title-you-want-and-create.png)[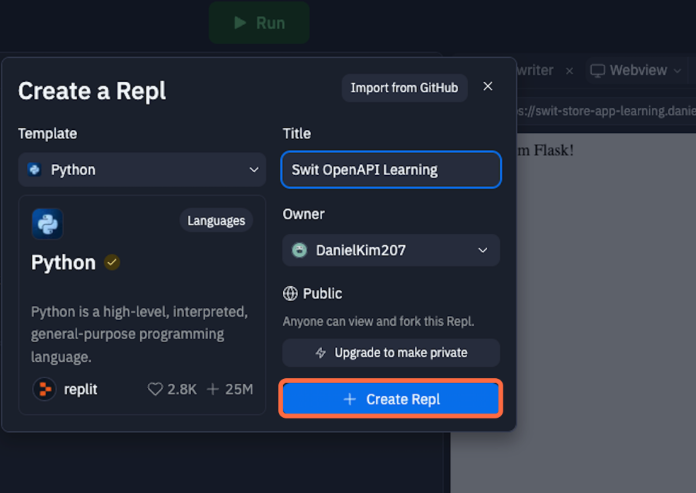](https://tech-support.swit.io/uploads/images/gallery/2024-01/YzIfxZ5Tsltg81q8-image-1704686945700-choose-python-templates-enter-the-title-you-want-and-create2.png)
---
## 2. **[swit.io](http://swit.io/)** 사이트
> - Free/Standard 플랜으로 로그인 합니다.
> - 실습용 워크스페이스를 하나 생성 합니다.
> - **[초대링크 클릭](https://invite.swit.io/share_link/0563692212aff907f89f33d097ed9a84)** 하여 가입합니다.
### 2.1. Swit Standard Workspace 생성 및 하나 더 가입하기
- swit.io 접속 후 Free/Standard 선택
- Google 로그인
- Workspace 생성
- 초대 링크로 추가 가입 하기 **[(링크)](https://invite.swit.io/share_link/0563692212aff907f89f33d097ed9a84)**
---
## 3. **[Swit Developers](http://developers.swit.io/)** 사이트
> - Free/Standard 플랜으로 로그인 된 상태에서 실습용 앱을 하나 생성합니다.
> - 권한(scope)을 두개 설정 합니다.
> - app:install
> - message:write
> - callback url
> - http://127.0.0.1:5000/callback
> - 반드시 앱을 활성화 (Active) 합니다.
### 3.1. 해당 워크스페이스에 App 한개 생성하기
- **[Swit Developers](http://developers.swit.io/)** 사이트로 이동
- Swit apps 선택 [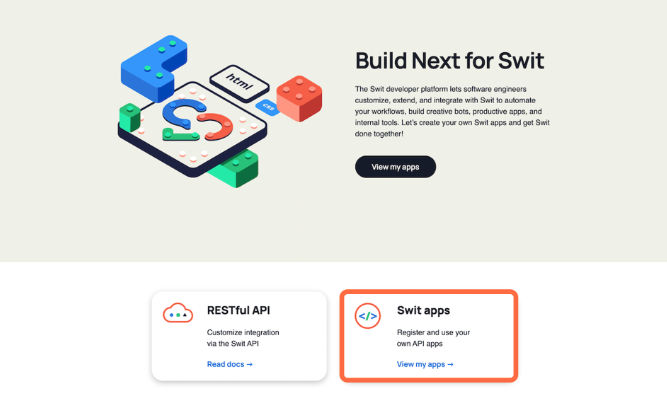](https://tech-support.swit.io/uploads/images/gallery/2024-01/cixHDp360Q33rqwQ-image-1704686992137-swit-apps.png)
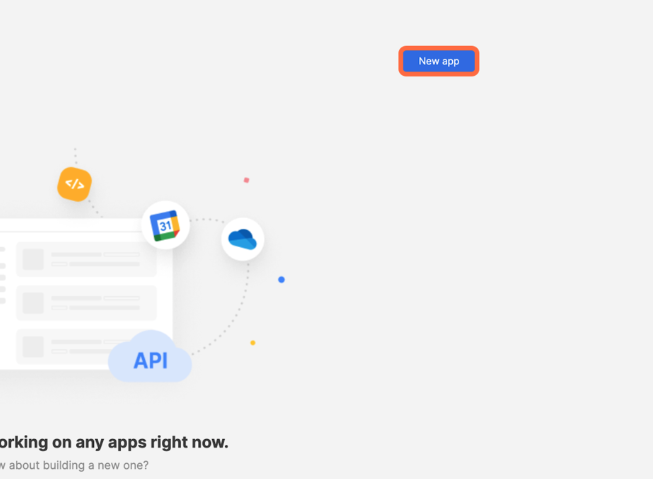
- New app 선택
[](https://tech-support.swit.io/uploads/images/gallery/2024-01/EKFzqmrVI8CMTX68-image-1704687001510-new-app.png)
- App name 작성 및 생성해놓은 워크스페이스 선택 후 Create [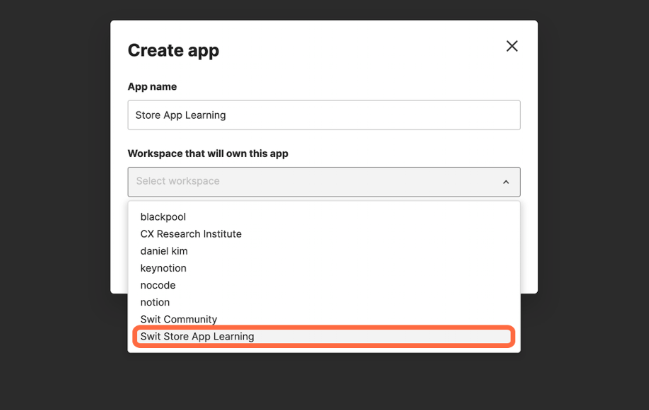](https://tech-support.swit.io/uploads/images/gallery/2024-01/cYzX2zLspMTVTk7B-image-1704687008033-app-name-create.png)
- 만든 App 선택
[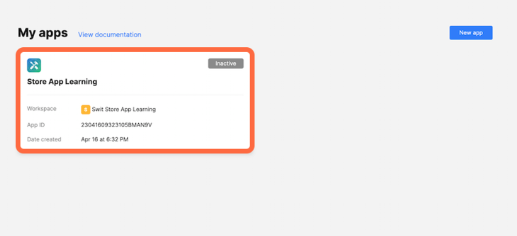](https://tech-support.swit.io/uploads/images/gallery/2024-01/VxrDJxEuyTOfXXsK-image-1704687019617-app.png)
- Authentication 메뉴에서 Allowed redirect URLs 에 http://127.0.0.1:5000/callback 기입 후 Add [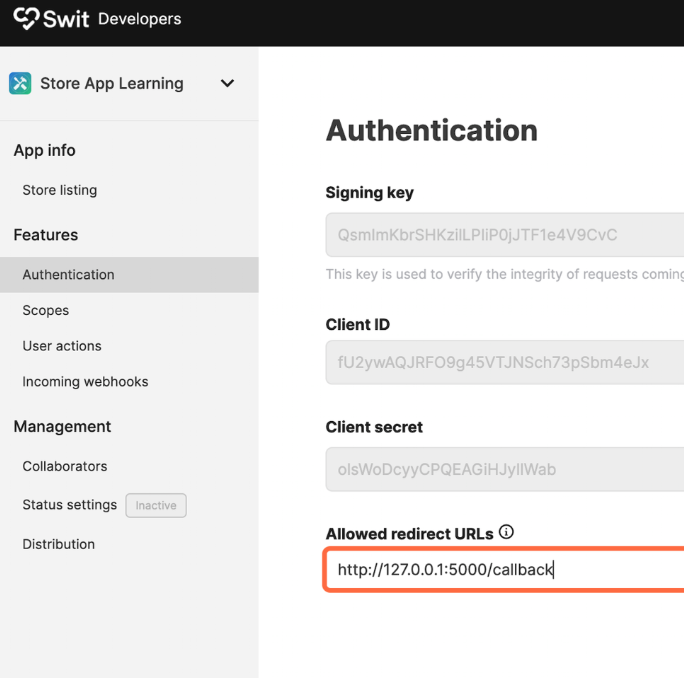](https://tech-support.swit.io/uploads/images/gallery/2024-01/V3hiAHTEPSfFyWZX-image-1704687028446-authentication-allowed.png)[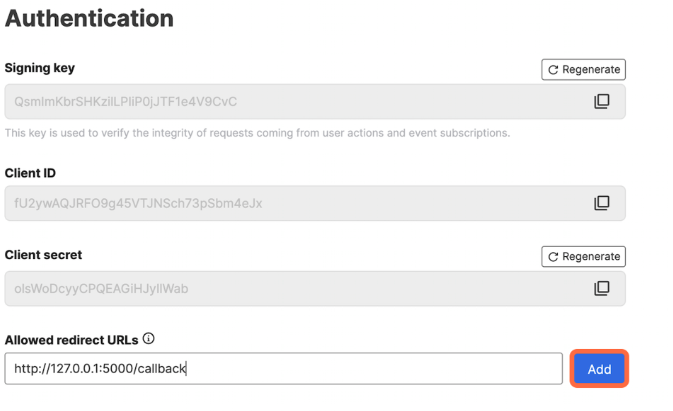](https://tech-support.swit.io/uploads/images/gallery/2024-01/gUUlgy1GhtPf5aCw-image-1704687036816-authentication-allowed-2.png)
- Scopes 메뉴에서 Add scopes 선택 [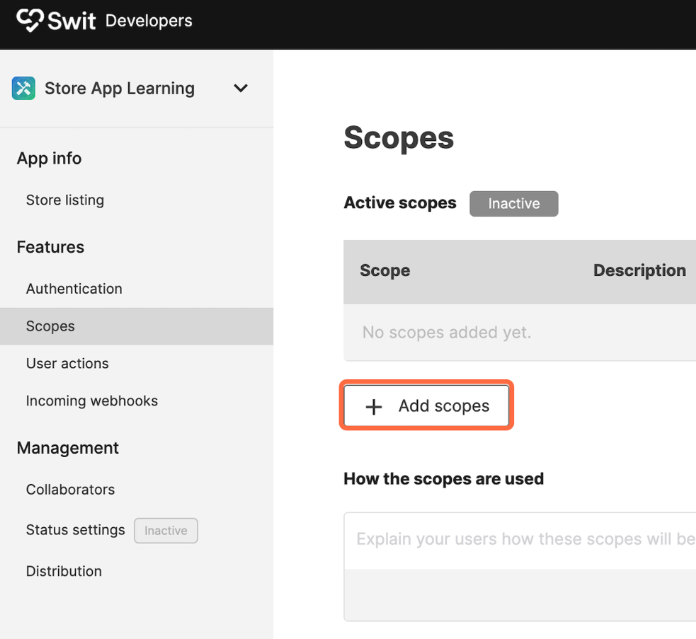](https://tech-support.swit.io/uploads/images/gallery/2024-01/D9cKwIN3RZJKWYIL-image-1704687057667-scopes-add-scopes.png)
- app:install 과 message:write 선택 후 Update [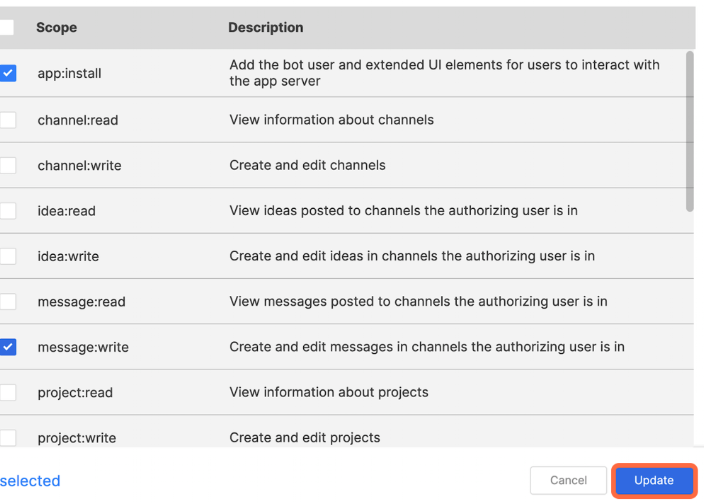](https://tech-support.swit.io/uploads/images/gallery/2024-01/5D0rHvhF4zAWOAnd-image-1704687062904-install-write-update.png)
- Status settings 메뉴에서 Activate 클릭 [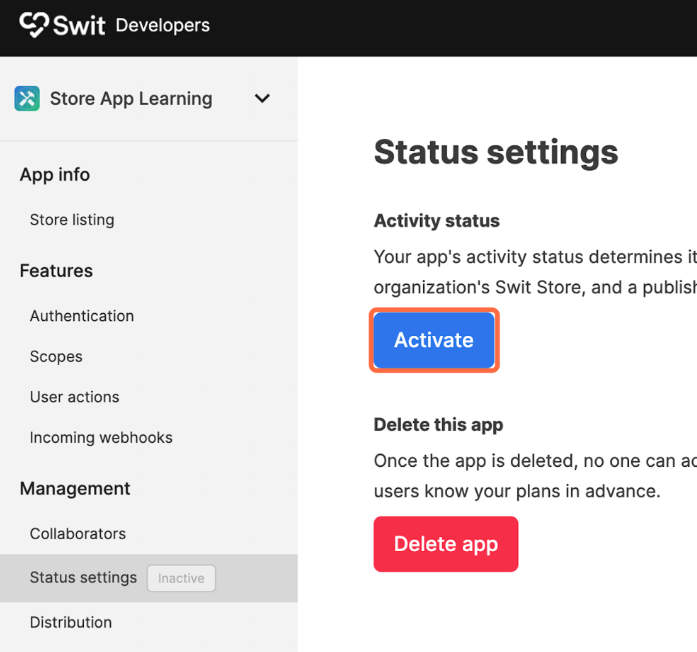](https://tech-support.swit.io/uploads/images/gallery/2024-01/qbq67O0dlFnDpZYJ-image-1704688001210-status-settings-activate.png)[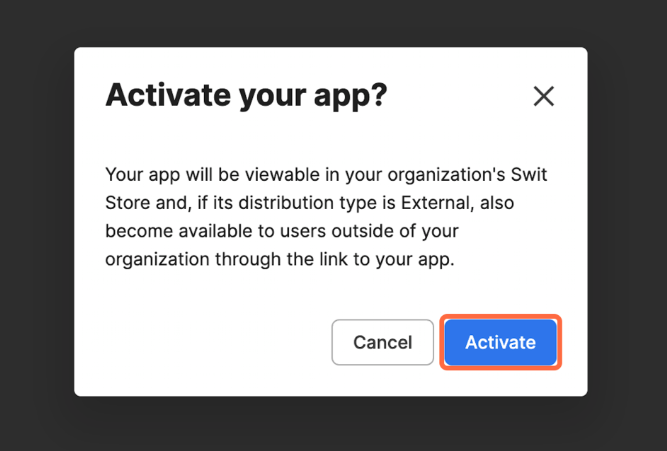](https://tech-support.swit.io/uploads/images/gallery/2024-01/9A1Wqjy35Va84NRZ-image-1704687072457-status-settings-activate-2.png)
---
초기 설정을 완료하였습니다.
다음으로 Swit OpenAPI를 사용해 채팅을 보내는 예제를 해보도록 하겠습니다.
# SwitAPI 토큰 발급
#### SwitAPI 사용을 위한 토큰 발급
> - 브라우저 창에서 오류가 났어요
> - 정상입니다. 127.0.0.1:5000 뒤 code값을 사용합니다.
##### 1. Swit.io 사이트 Free/Standard 로그인
##### 2. **[developers.swit.io](http://developers.swit.io/)** 사이트에서 My app 클릭 > 앱 선택
##### 3. Authentication 메뉴 진입
##### 4. replit 사이트에서, main.py (Python리플) 에 기존 내용 모두 지우고 아래 내용 복사 붙여넣기
```Python
import requests, json
from urllib import parse
api = 'https://openapi.swit.io'
redirect = 'http://127.0.0.1:5000/callback'
clientid = 'STEP1. 클라이언트아이디'
secret = 'STEP1. 클라이언트시크릿'
scope = 'message:write'
get_ep = '/oauth/authorize'
get_params = {
'client_id': clientid,
'redirect_uri': redirect,
'response_type': 'code',
'scope': scope
}
code = 'STEP2. 코드값'
post_ep = '/oauth/token'
r = requests.post(
url = f"{api}{post_ep}",
headers = {
'Content-Type': 'application/x-www-form-urlencoded'},
data = {
'grant_type': 'authorization_code',
'client_id': clientid,
'client_secret': secret,
'redirect_uri': redirect,
'code': code}
)
if r.ok:
print(r)
print(json.dumps(json.loads(r.text), indent=2))
else:
print(f"{api}{get_ep}?{parse.urlencode(get_params)}")
```
##### 5. 붙여놓은 코드중 6,7번째 라인의 clientid 와 secret 에 3. Authentication 페이지의 Client ID 와 secret 각각 복사 붙여넣기
[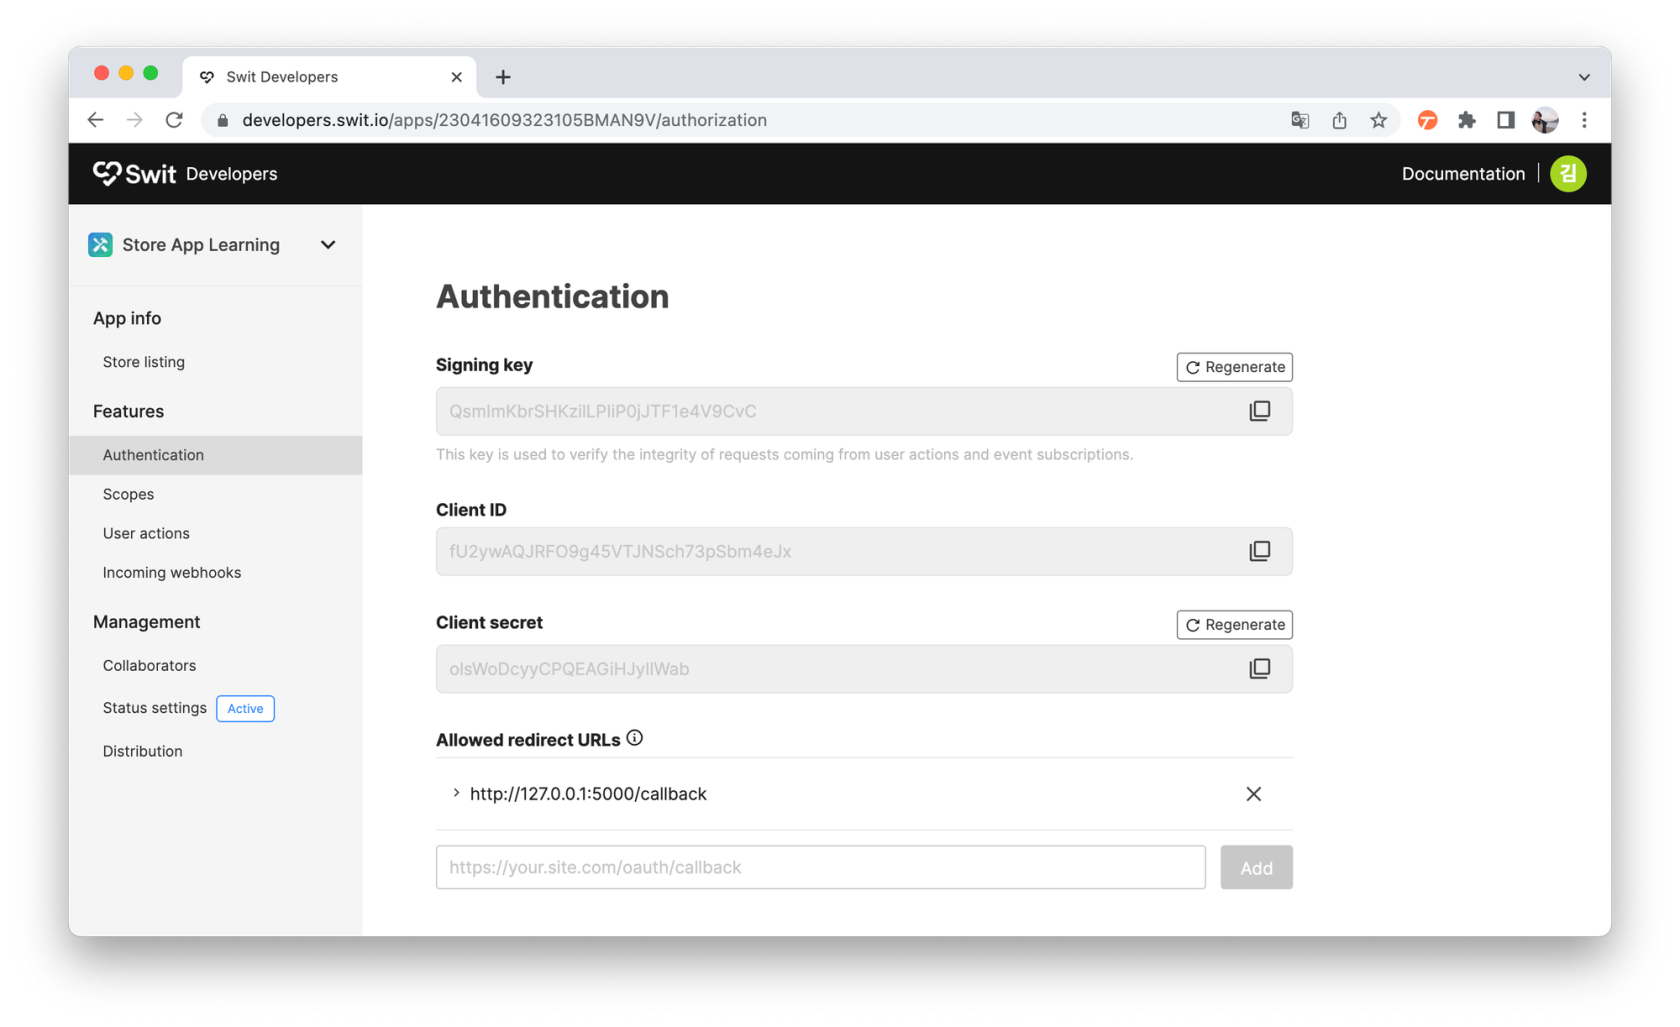](https://tech-support.swit.io/uploads/images/gallery/2024-01/yAHGF4SOO3jjLGgX-image-1704687119977-67-clientid-secret-3-authentication-client-id-secret.png)
##### 6. replit 사이트의 Run 버튼 클릭
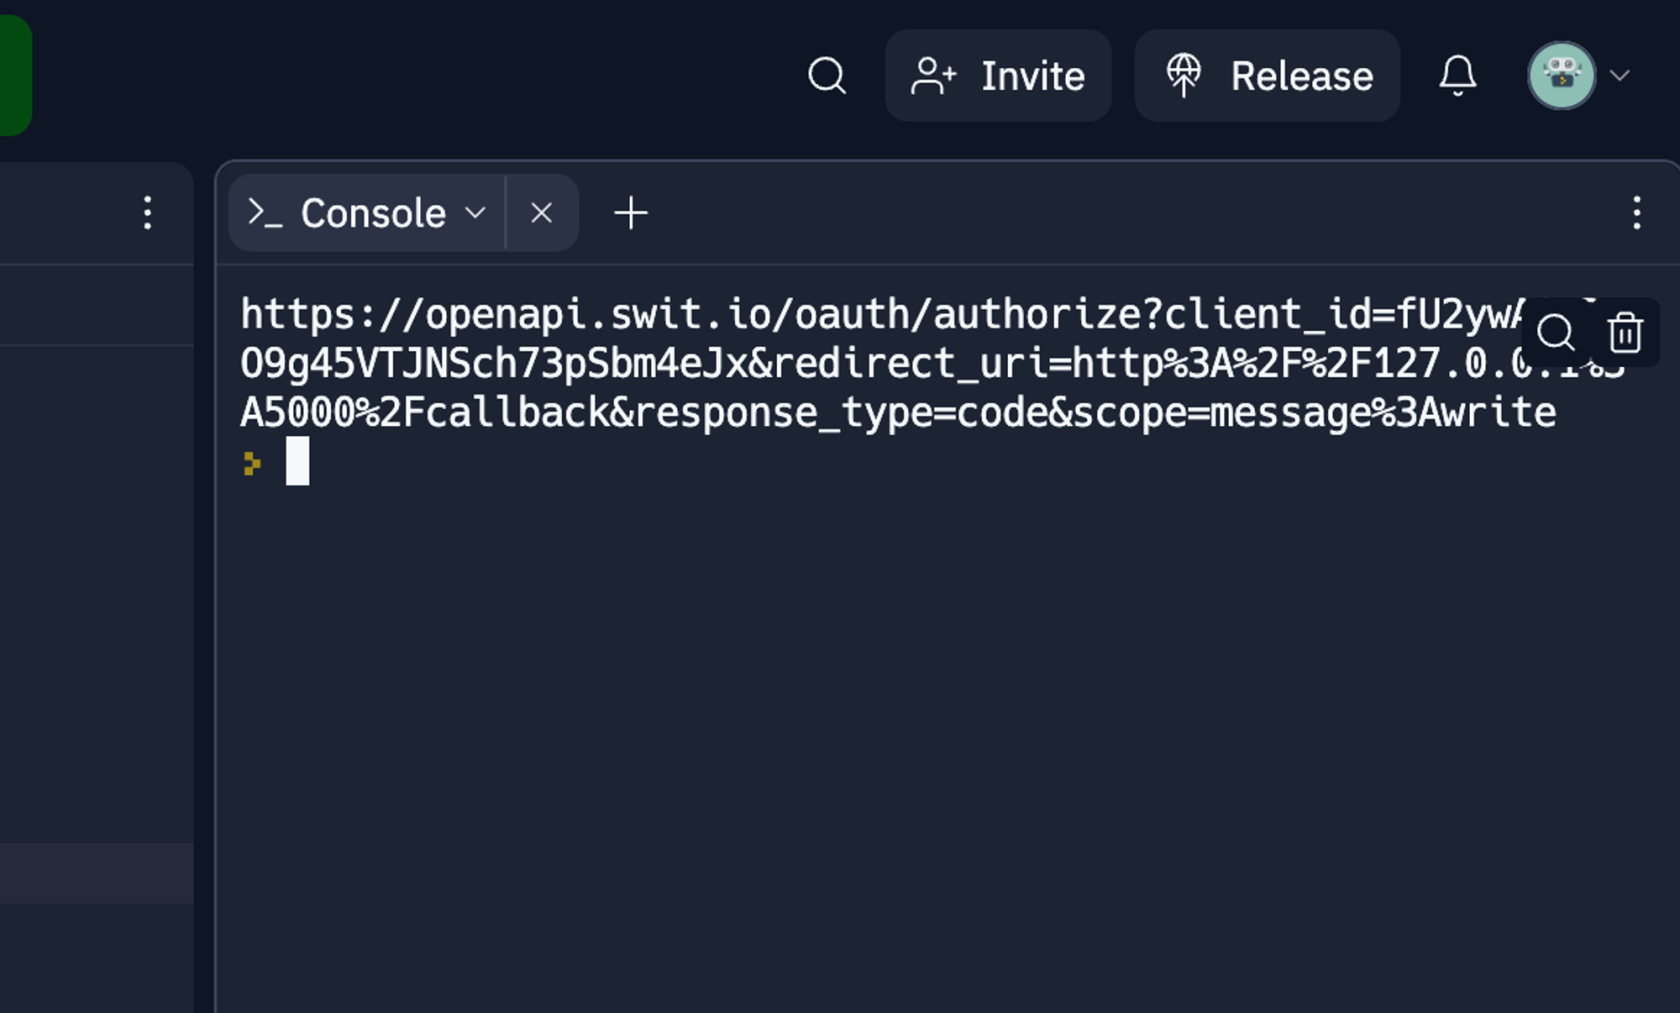
##### 7. Console 탭에 나타난 복잡한 형태의 링크 클릭
[](https://tech-support.swit.io/uploads/images/gallery/2024-01/1Ggwe2qN9ObKgIEX-image-1704687125497-console.png)
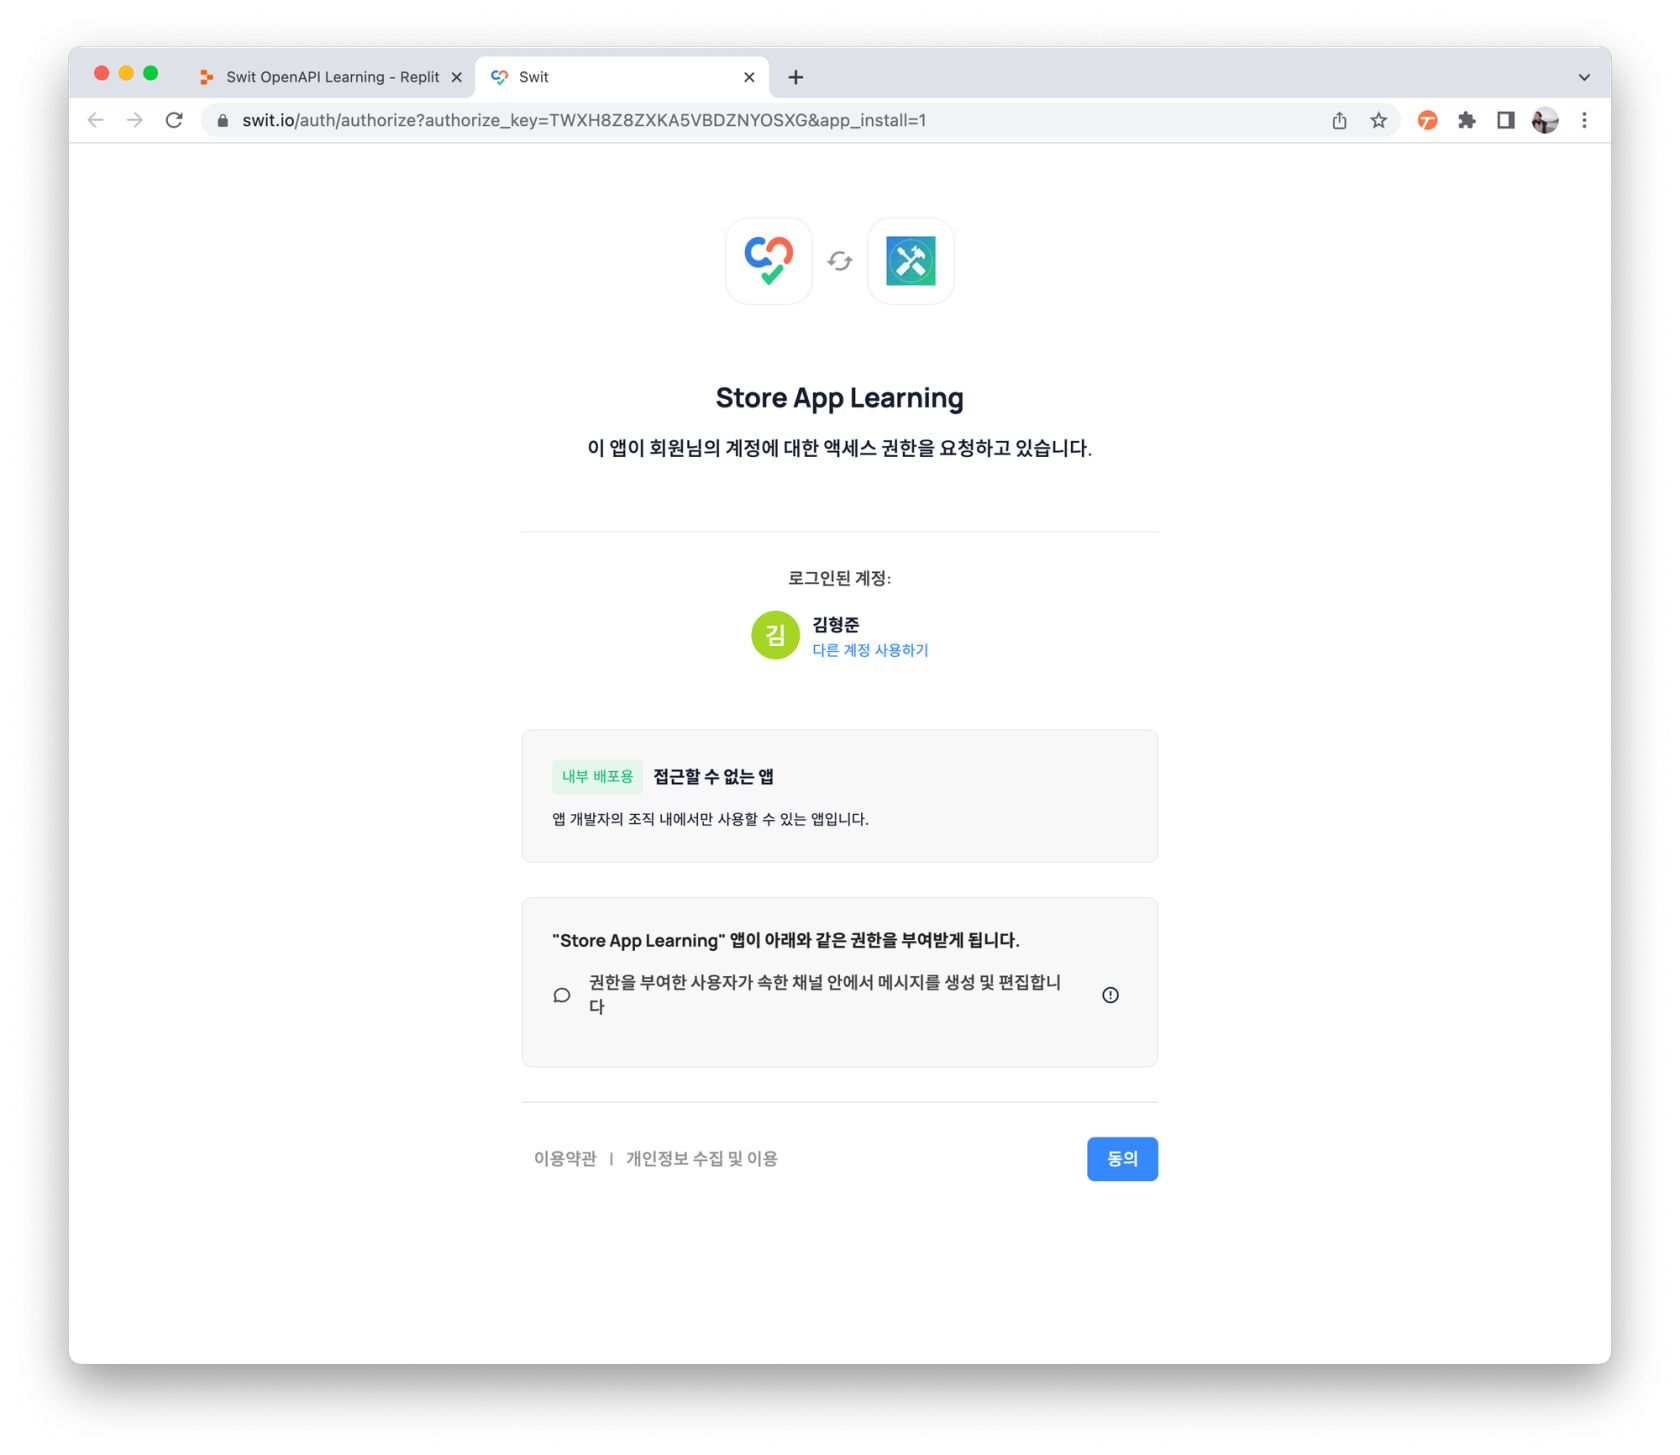
##### 8. Swit App 액세스 권한 요청 탭에서 맨 아래 오른쪽 "동의" 버튼 클릭
[](https://tech-support.swit.io/uploads/images/gallery/2024-01/qBmFBhMLzyR0Ns8O-image-1704687133358-swit-app-2222.png)
##### 9. 오류 화면의 URL에서 127.0.0.1:5000/callback?code=” 뒷 부분만 선택하여 복사 (코드 복사)
[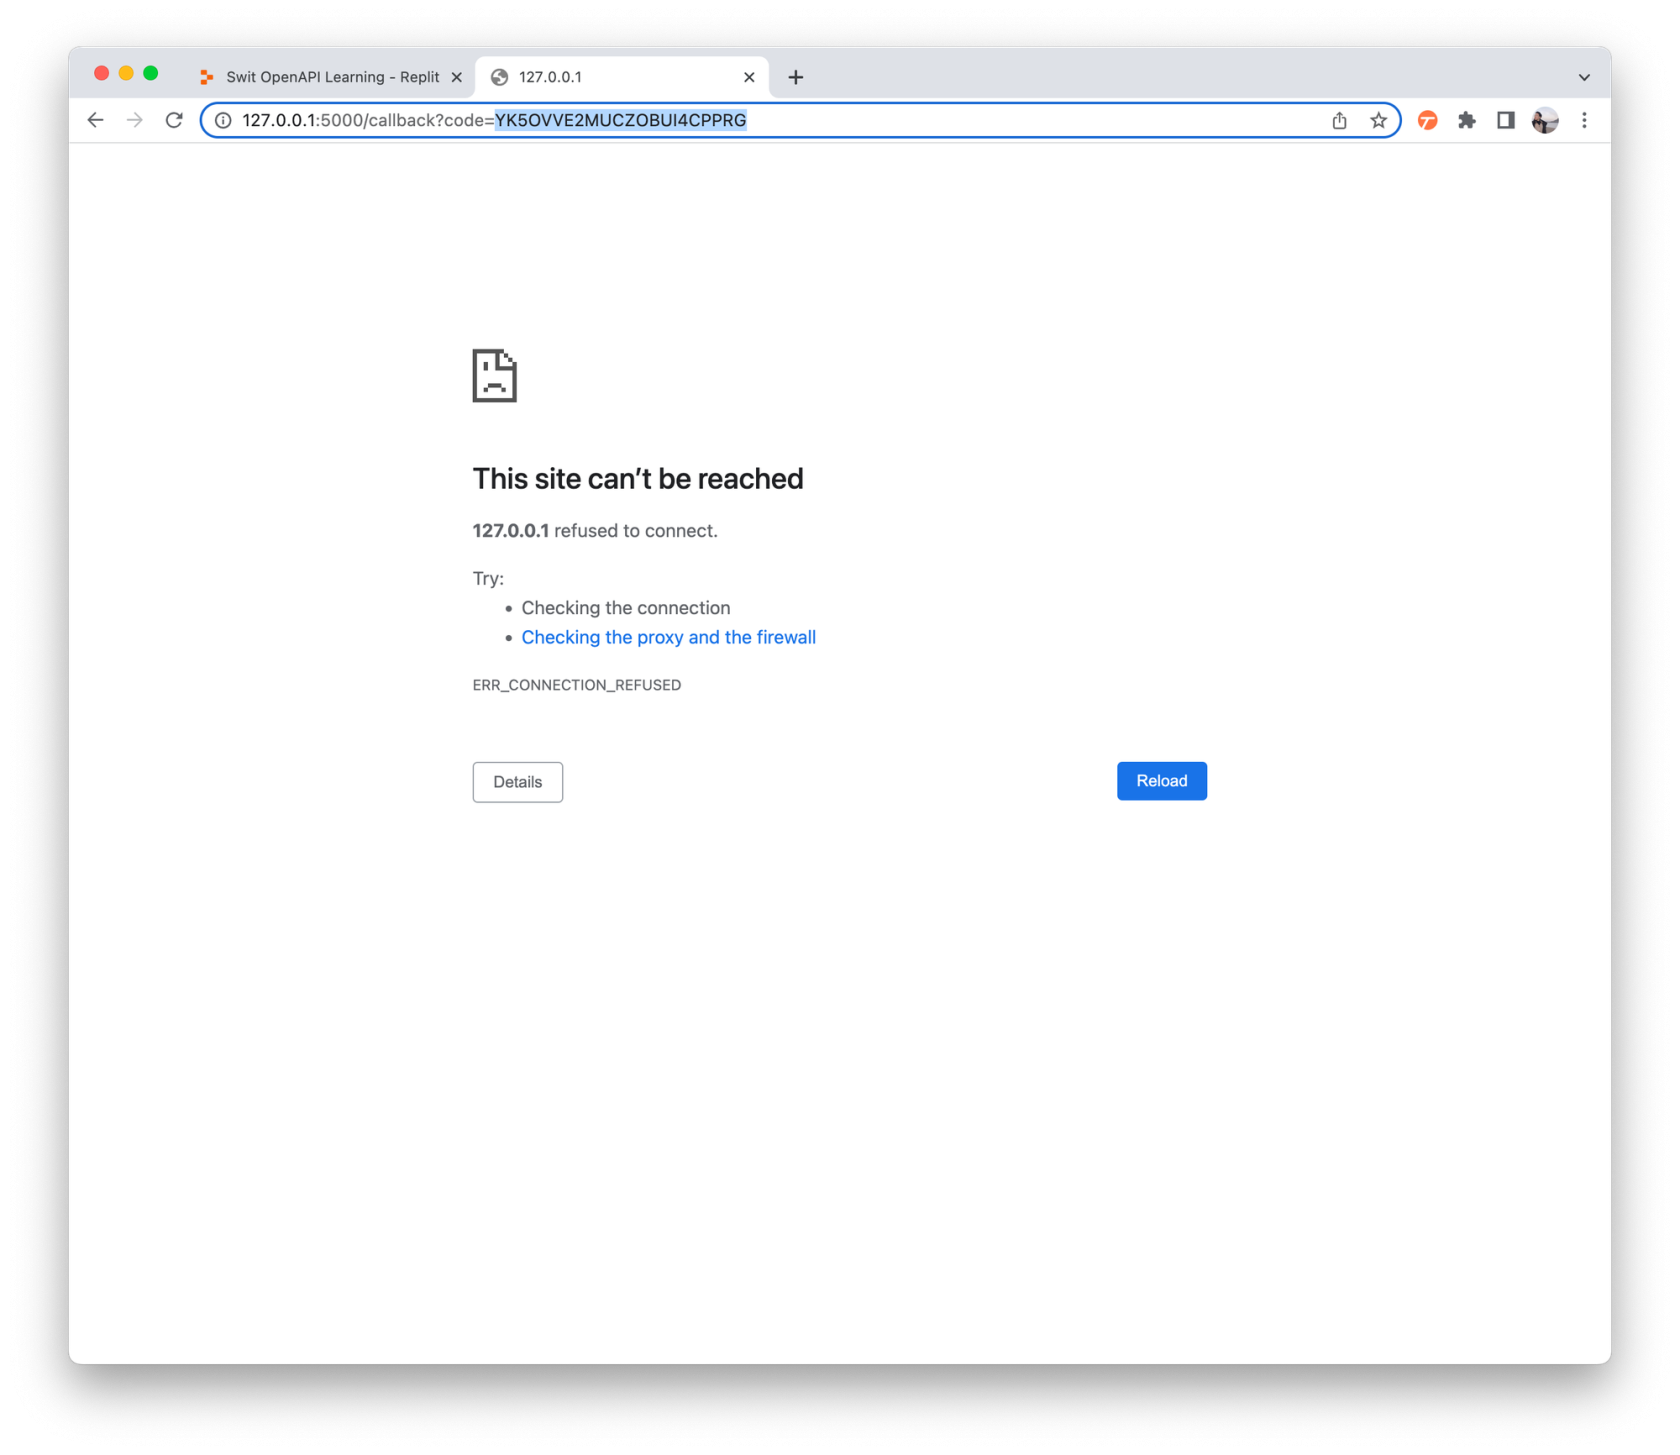](https://tech-support.swit.io/uploads/images/gallery/2024-01/zv94LWRiSVKJHS2H-image-1704687272294-url.png)오류페이지 나오는것이 정상입니다!
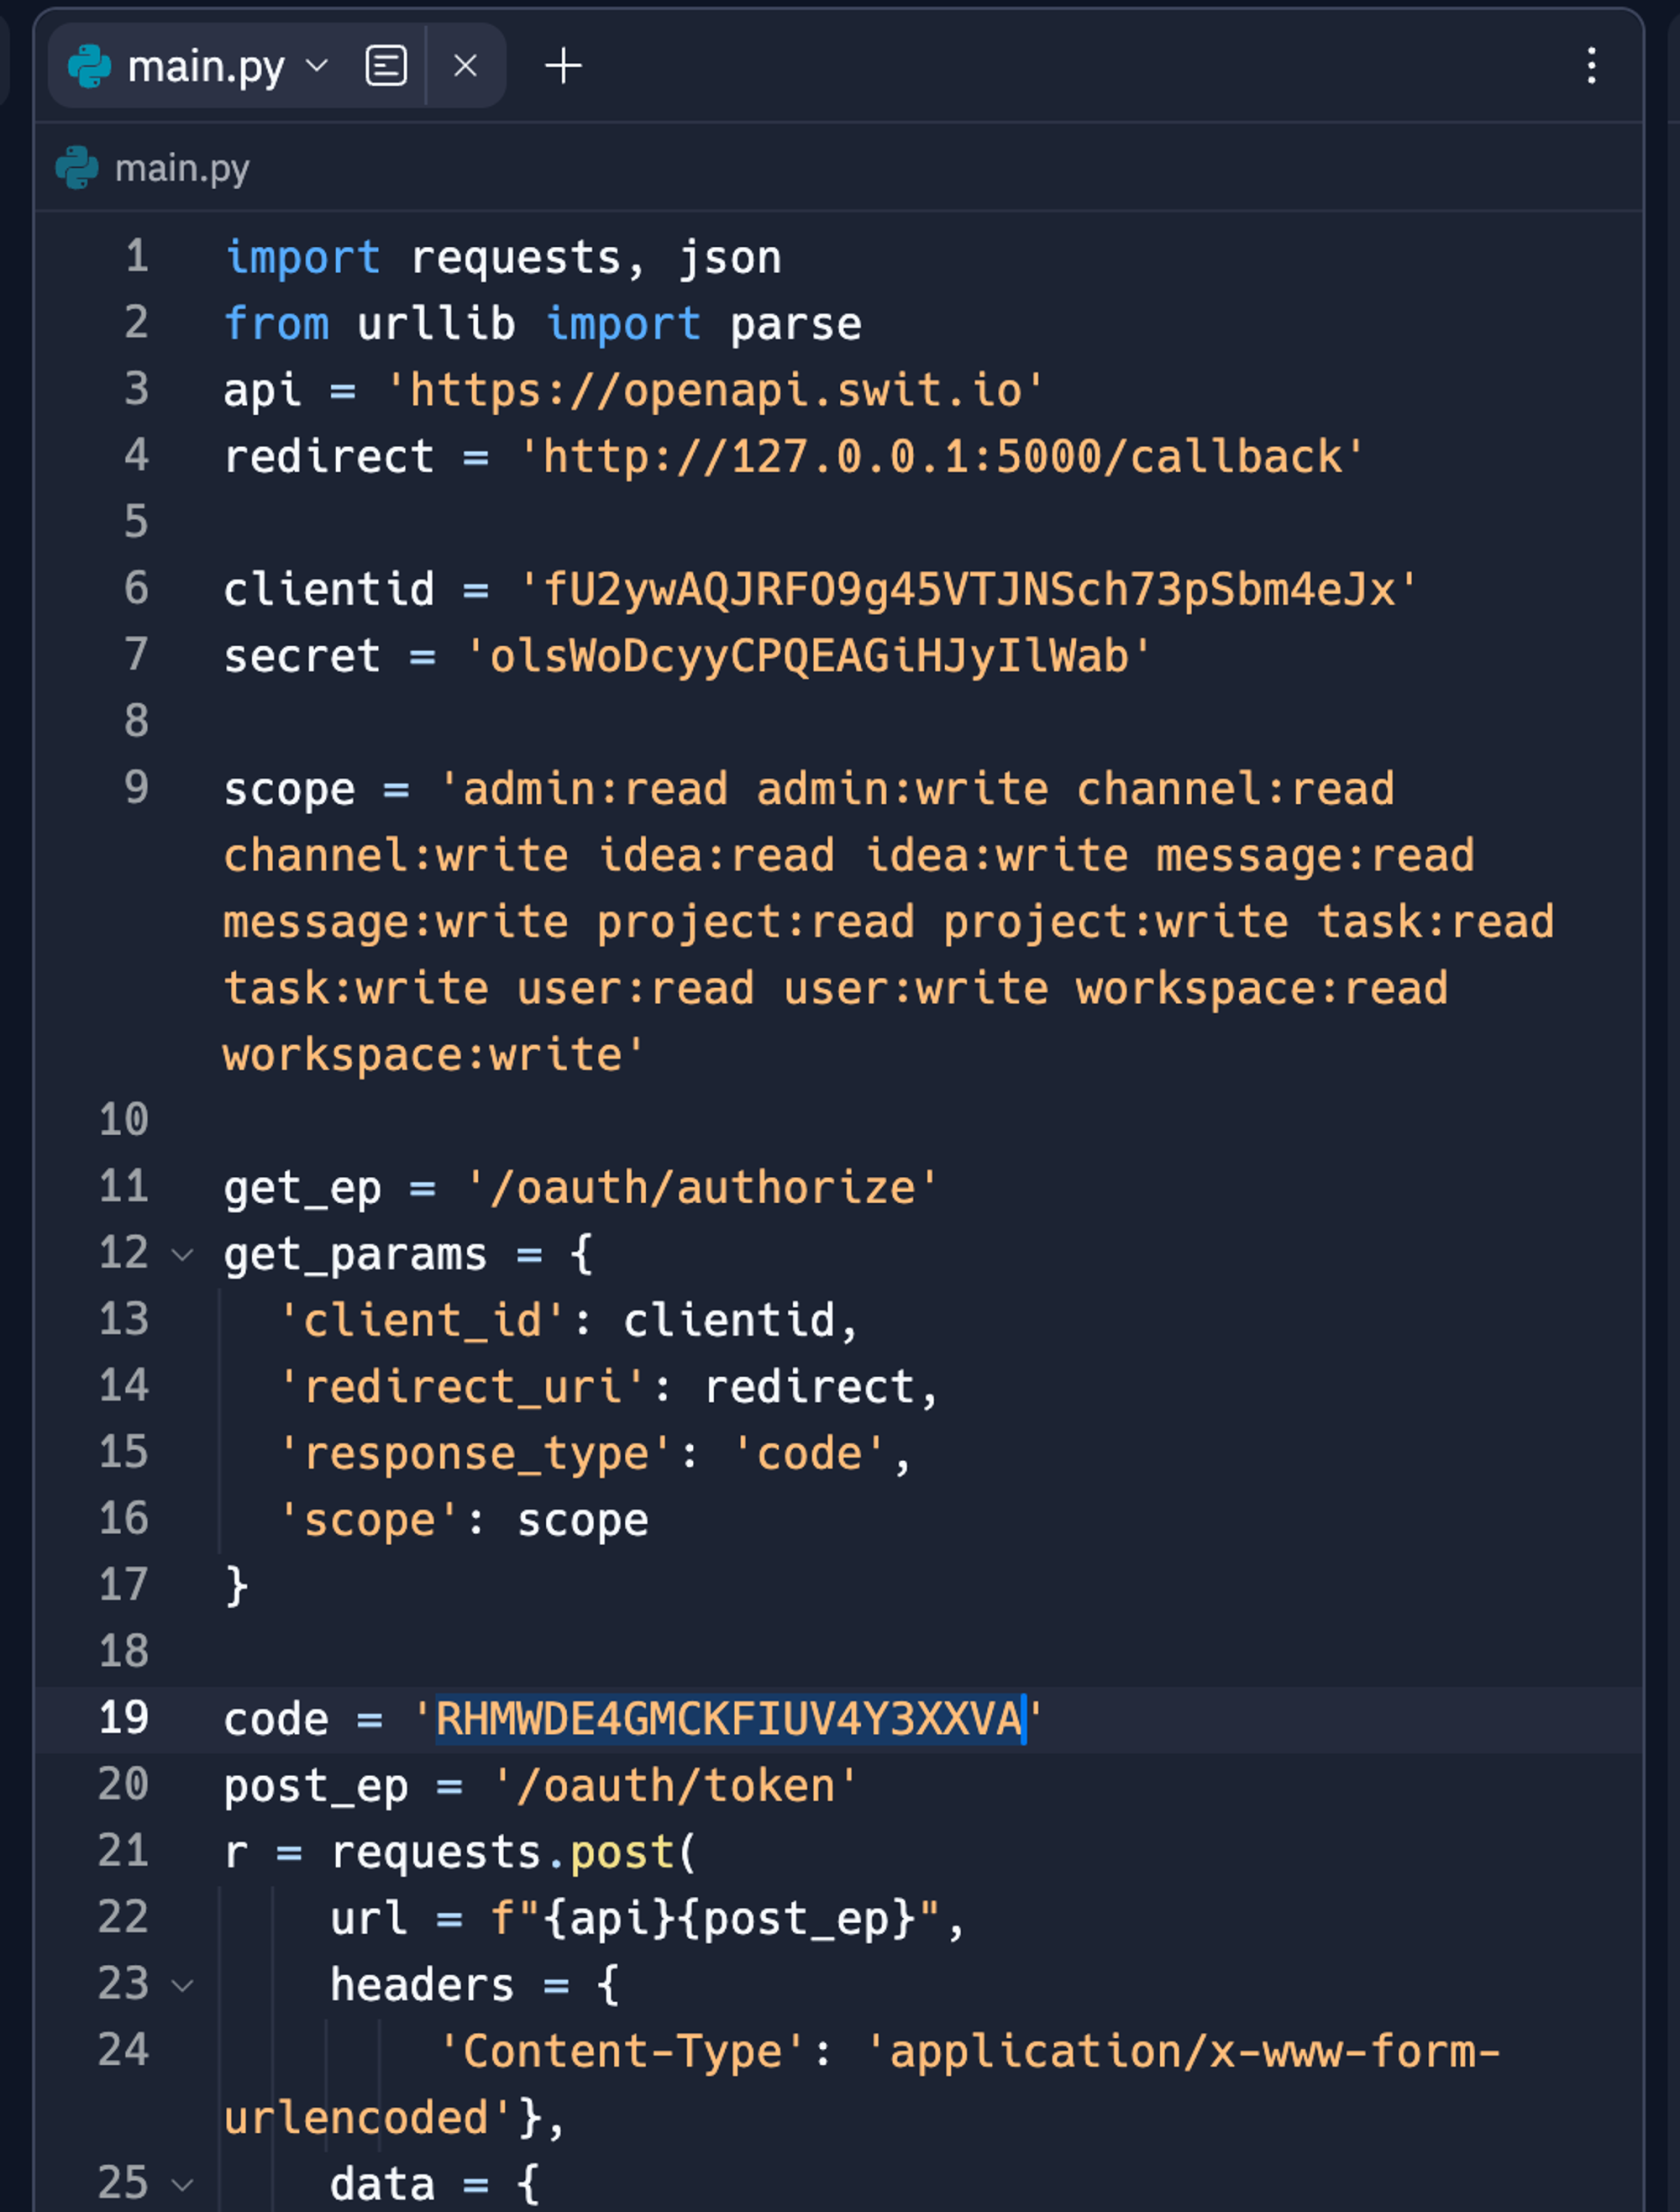
##### 10. replit 사이트 에서 19번째 code 값에 복사한 값 붙여넣기
[](https://tech-support.swit.io/uploads/images/gallery/2024-01/hCUyan97iBF9Kzik-image-1704687289648-replit-19-code.png)
##### 11. replit 사이트의 Run 버튼 클릭
##### 12. 성공시 Console 탭 내용중 access\_token 값 복사하여 메모장 등
[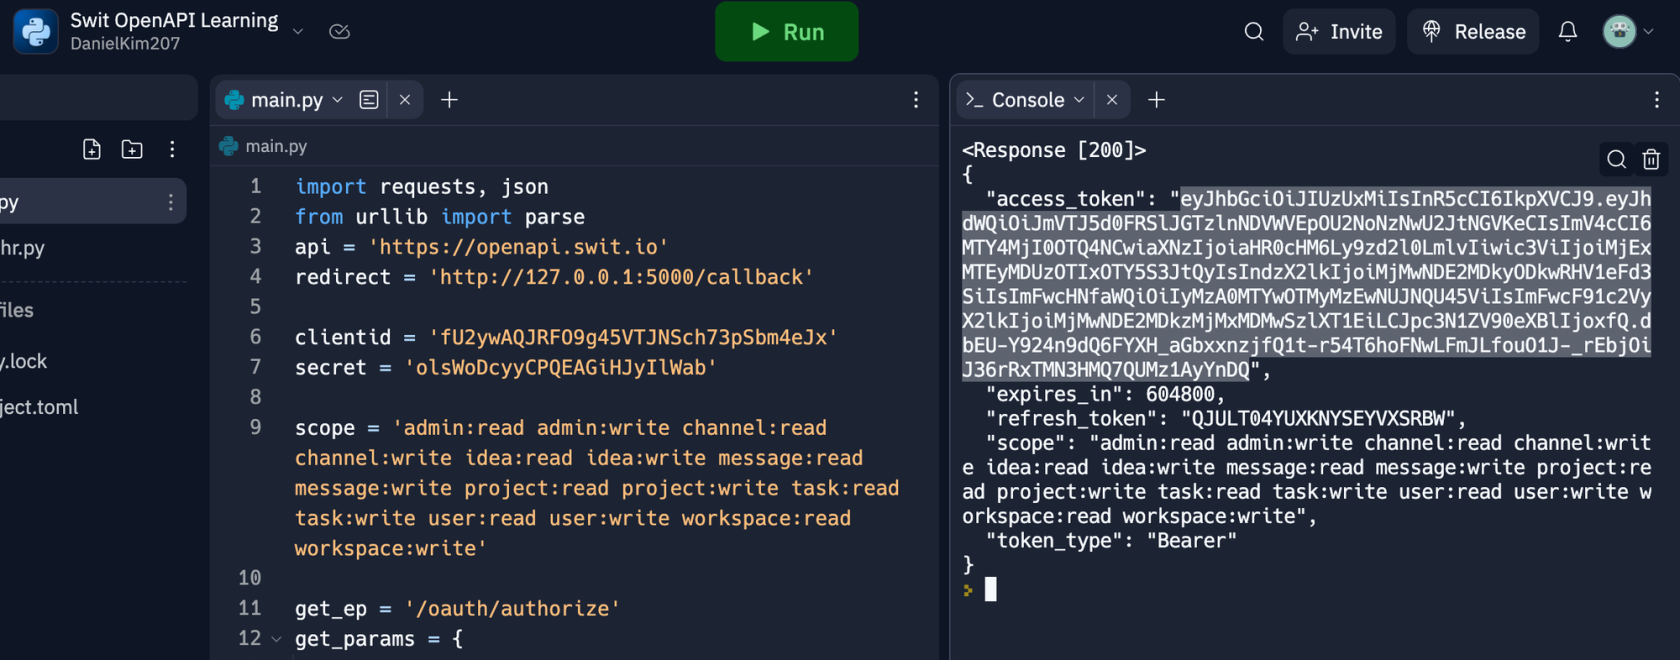](https://tech-support.swit.io/uploads/images/gallery/2024-01/XSgN5biob2JyAPnF-image-1704687254552-console-access-token.png)
---
토큰발급이 끝났습니다.
다음으로는 API를 활용하여 SWIT에 채팅 메세지를 보내보도록 하겠습니다.
# SwitAPI를 이용하여 메세지 보내기
#### OpenAPI 문서를 사용하여 메세지 보내기
> - API실습에는 토큰이 필요합니다.
> - 앞의 **[토큰발급](http://34.64.168.32:8000/books/swit-store-app/page/switapi)** 을 꼭 선행해 주시기 바랍니다.
---
##### 1. Developers 사이트의 **[Create a message](https://devdocs.swit.io/docs/core1/ref%2Foperations%2Fcreate-a-api-message-create)** 들어가기
##### 2. 생성한 토큰값을 message.create 문서의 Token 영역에 붙여넣기
( 주의! "Bearer" + 띄워쓰기 + 토큰값 형태로 작성해야합니다 )[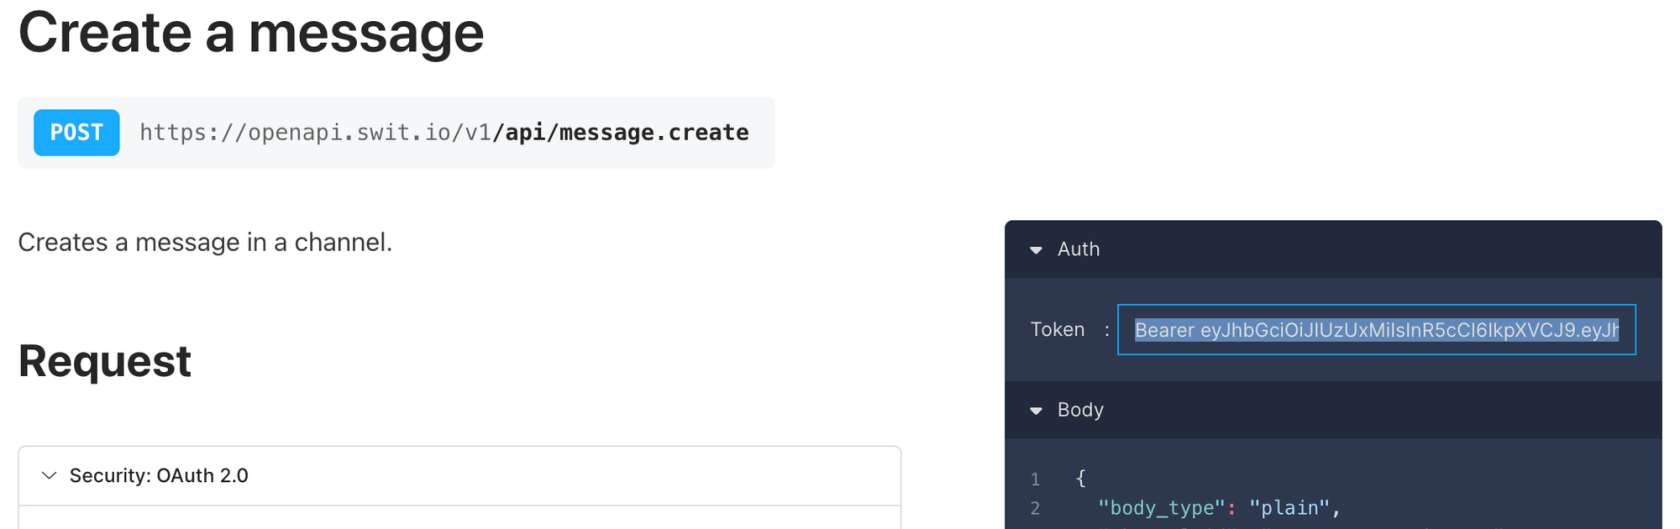](https://tech-support.swit.io/uploads/images/gallery/2024-01/bbswMM1woS2IheBM-image-1704687309915-message-create-token.png)
##### 3. 필수 파라미터 정보를 입력 후 Send API Request 클릭
###### 3.1 channel\_id 는 Free/Standard 에 만들어 두었던 워크스페이스에 진입하여 General 채널 id 확인
> - 주소창의 /channel/"channel\_id 값"/chat 에서 확인 ( 채널이 여러개라면 channel/\*\*\*\*\*\*\*/"channel\_id"/chat 확인 )
> - 앱에서는 콘솔창 띄워 확인
> - 맥 : option + command + shift + d 커맨드
> - 윈도우 : ctrl + alt + shift + d 커맨드 [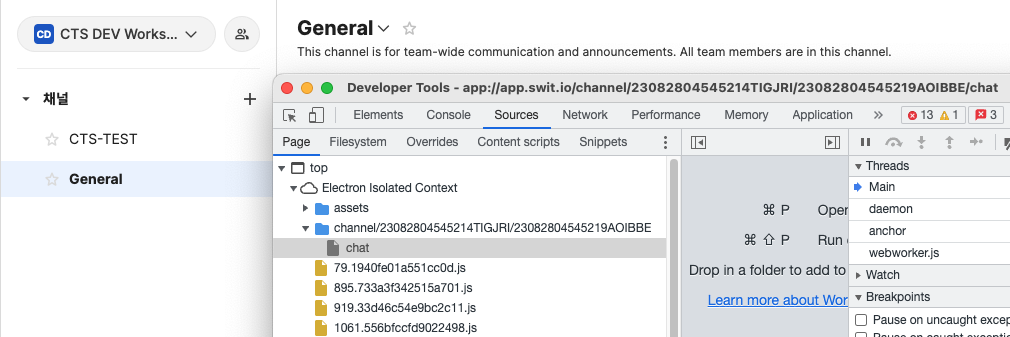](https://tech-support.swit.io/uploads/images/gallery/2024-01/AzGzDOtfeOx5Tl1o-image-1704687320710-1-channel-id-freestandard-general-id.png)
###### 3.2 content 에는 올리고 싶은 테스트 메세지 입력 ( ex. 이 메세지는 API로 테스트 해보는 메세지 입니다 )
##### 4. 요청 후 응답 성공 확인 ( 200 OK , 채팅에 메세지 확인 ) 및 message\_id 값 복사
[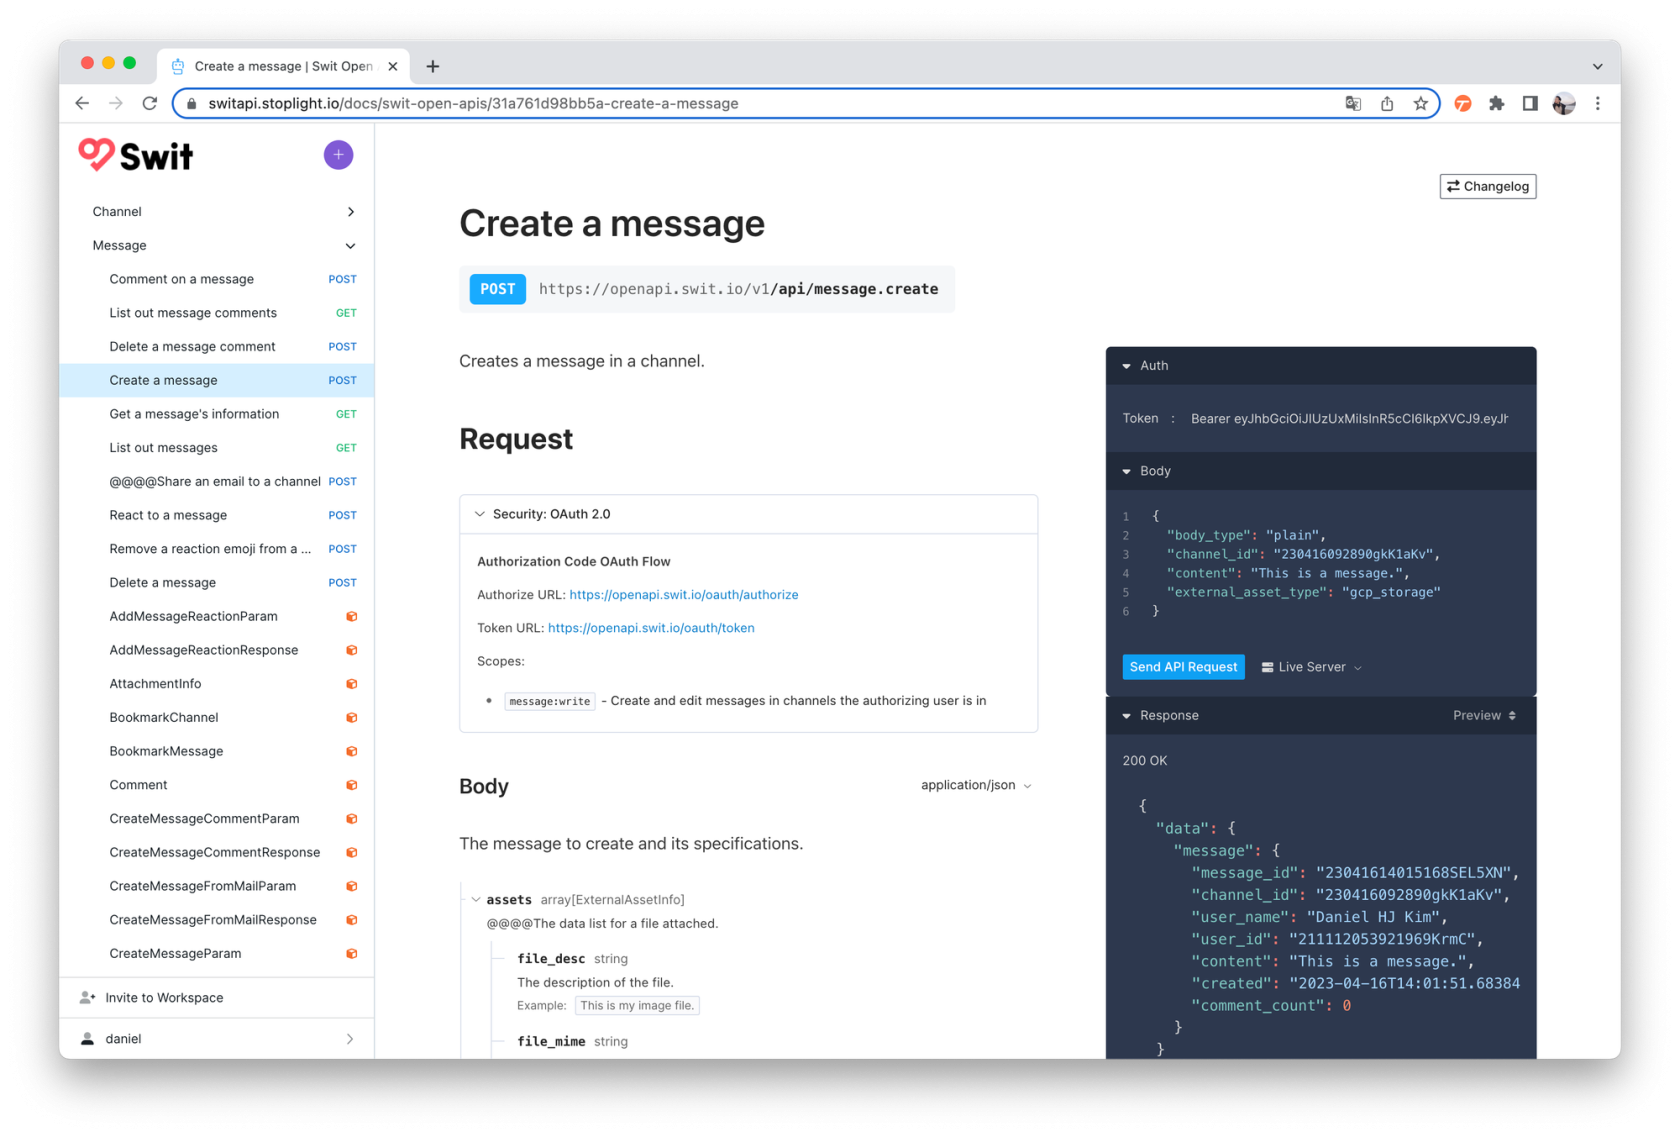](https://tech-support.swit.io/uploads/images/gallery/2024-01/mK7sjHkSM8K7Vhyo-image-1704687326472-200-ok-message-id.png)
---
#### OpenAPI 문서를 사용하여 메세지 댓글 보내기
##### 1. Developers 사이트의 **[Comment a message](https://devdocs.swit.io/docs/core1/ref%2Foperations%2Fcreate-a-api-message-comment-create)** 들어가기
##### 2. 토큰값 잘 입력되어 있는지 확인 (자동입력 되어 있음) 없으면 토큰값 복사 붙여넣기
##### 3. 필수 파라미터 정보를 입력 후 Send API Request 클릭
###### 3.1 message\_id 는 위 메세지 요청후 복사해 놓은 message\_id 붙여넣기
###### 3.2 content 에는 올리고 싶은 테스트 메세지 입력 ( ex. 이 댓글은 API로 테스트 해보는 댓글 입니다 )
##### 4. 요청후 응답 성공 확인 ( 200 OK , 채팅 메세지에 댓글 확인 )
---
다음으로는 생생해놓은 App 을 이용하여 Swit 에서 모달 팝업을 띄워보도록 하겠습니다.
# Swit App 을 이용한 모달팝업 띄우기
#### App을 활용하여 Swit에서 모달팝업 실습해보기
> - UI 디자인 요소는 **[Swit builder](http://builder.swit.io/)** 를 통해 만들수 있습니다.
> - 기능적 요소는 **[SwitAPI](https://switapi.stoplight.io/)** 에 API가 있어야 합니다.
> - 이 실습은 **[테스트를 위한 간편 환경설정](http://34.64.168.32:8000/books/swit-store-app/page/f61d6)** 이 선행되어야 합니다.
---
##### 1. Swit 워크스페이스에 앱 설치 하기
###### 1.1 **[replit사이트](http://replit.com/)** 에서 main.py 파일에 지난 실습내용 확인 ( 없다면 **[토큰생성](http://34.64.168.32:8000/books/swit-store-app/page/switapi)** 참조 )
###### 1.2 9번째 라인의 scope 를 app:install 로 수정후 Run
[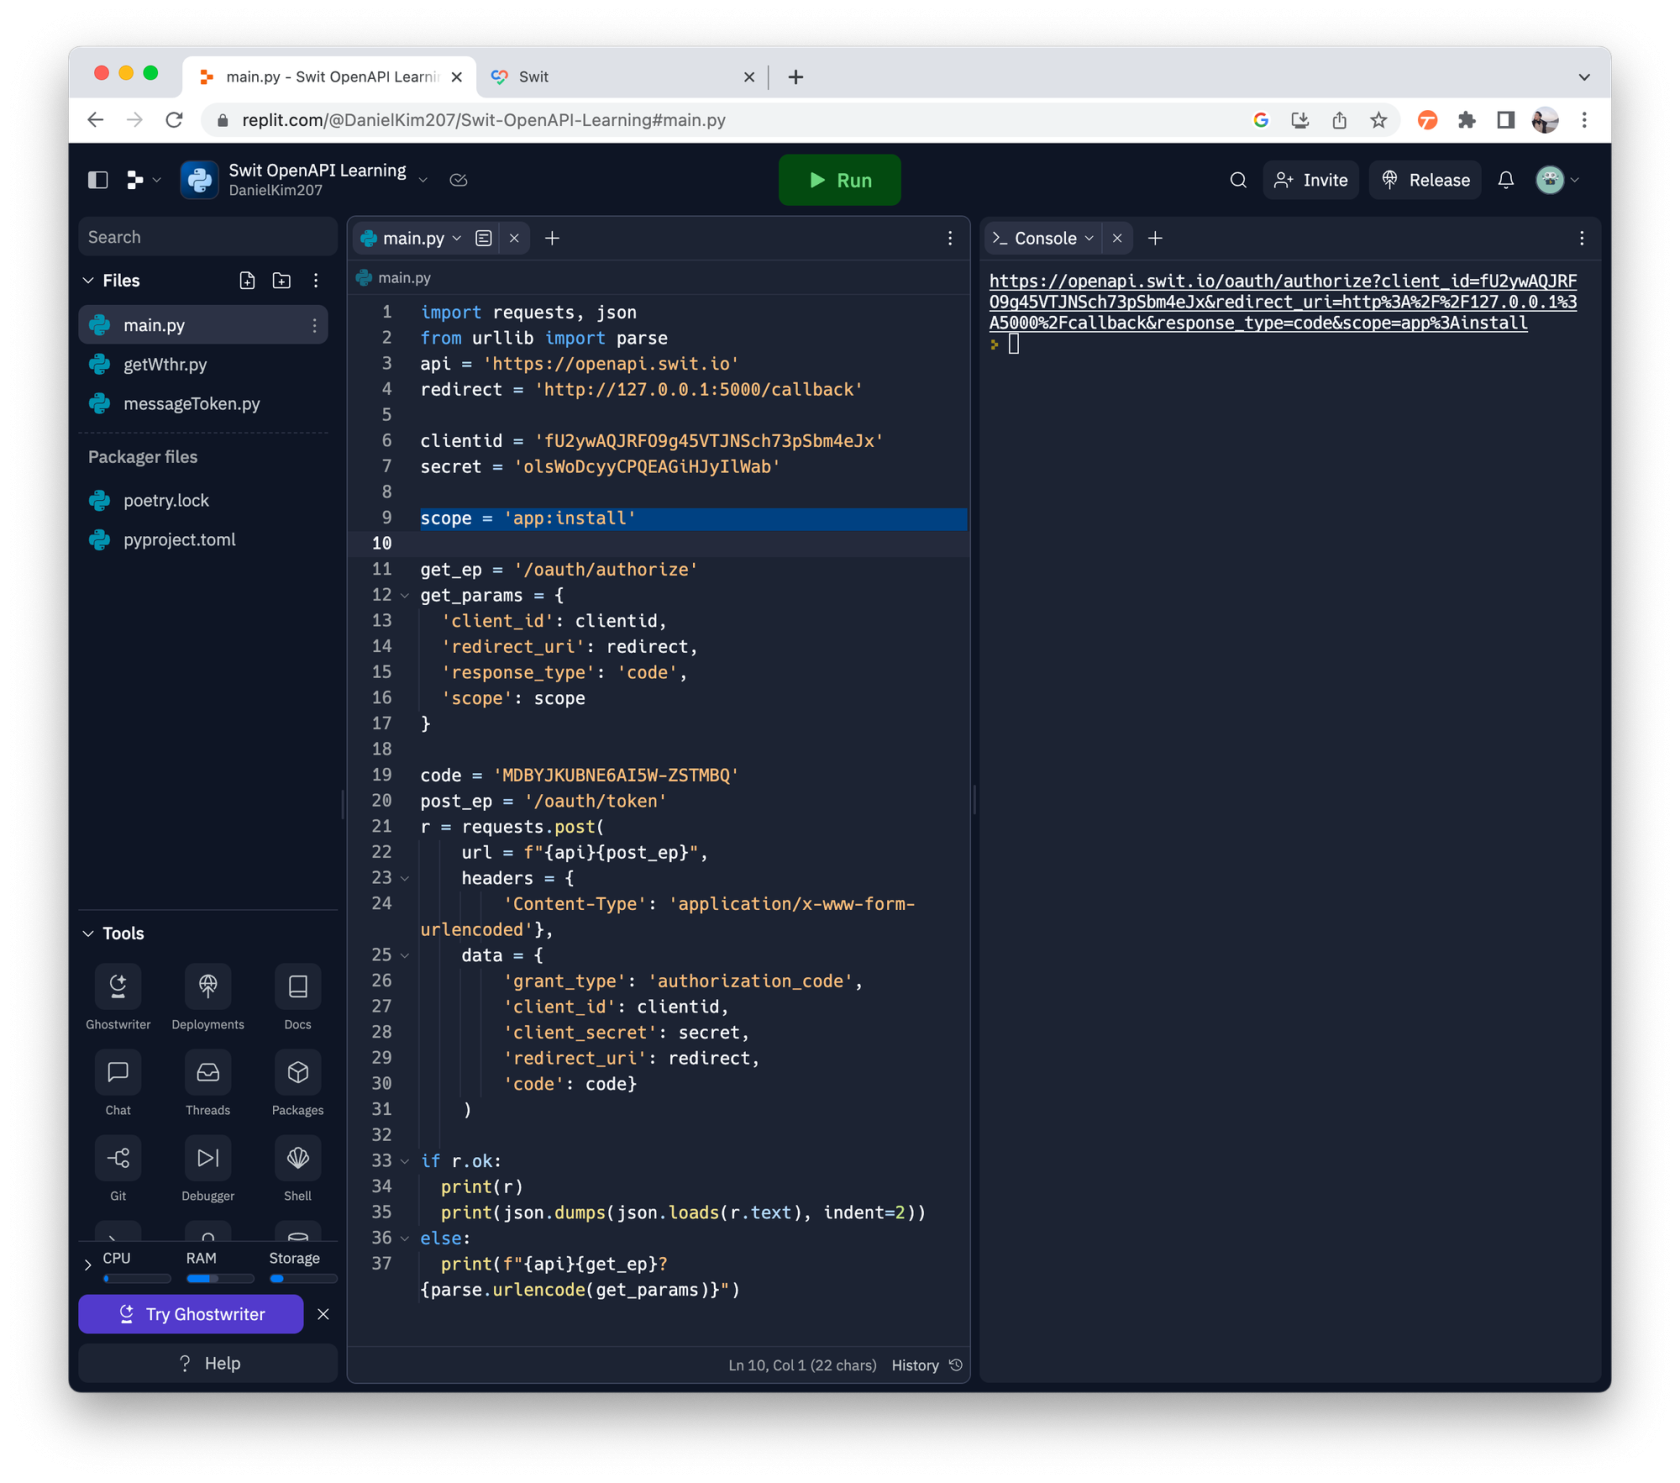](https://tech-support.swit.io/uploads/images/gallery/2024-01/OJzciJGE7H0pWrlM-image-1704687369680-2-9-scope.png)
###### 1.3 Console 창의 링크 클릭
###### 1.4 허용하고 설치하기 클릭
[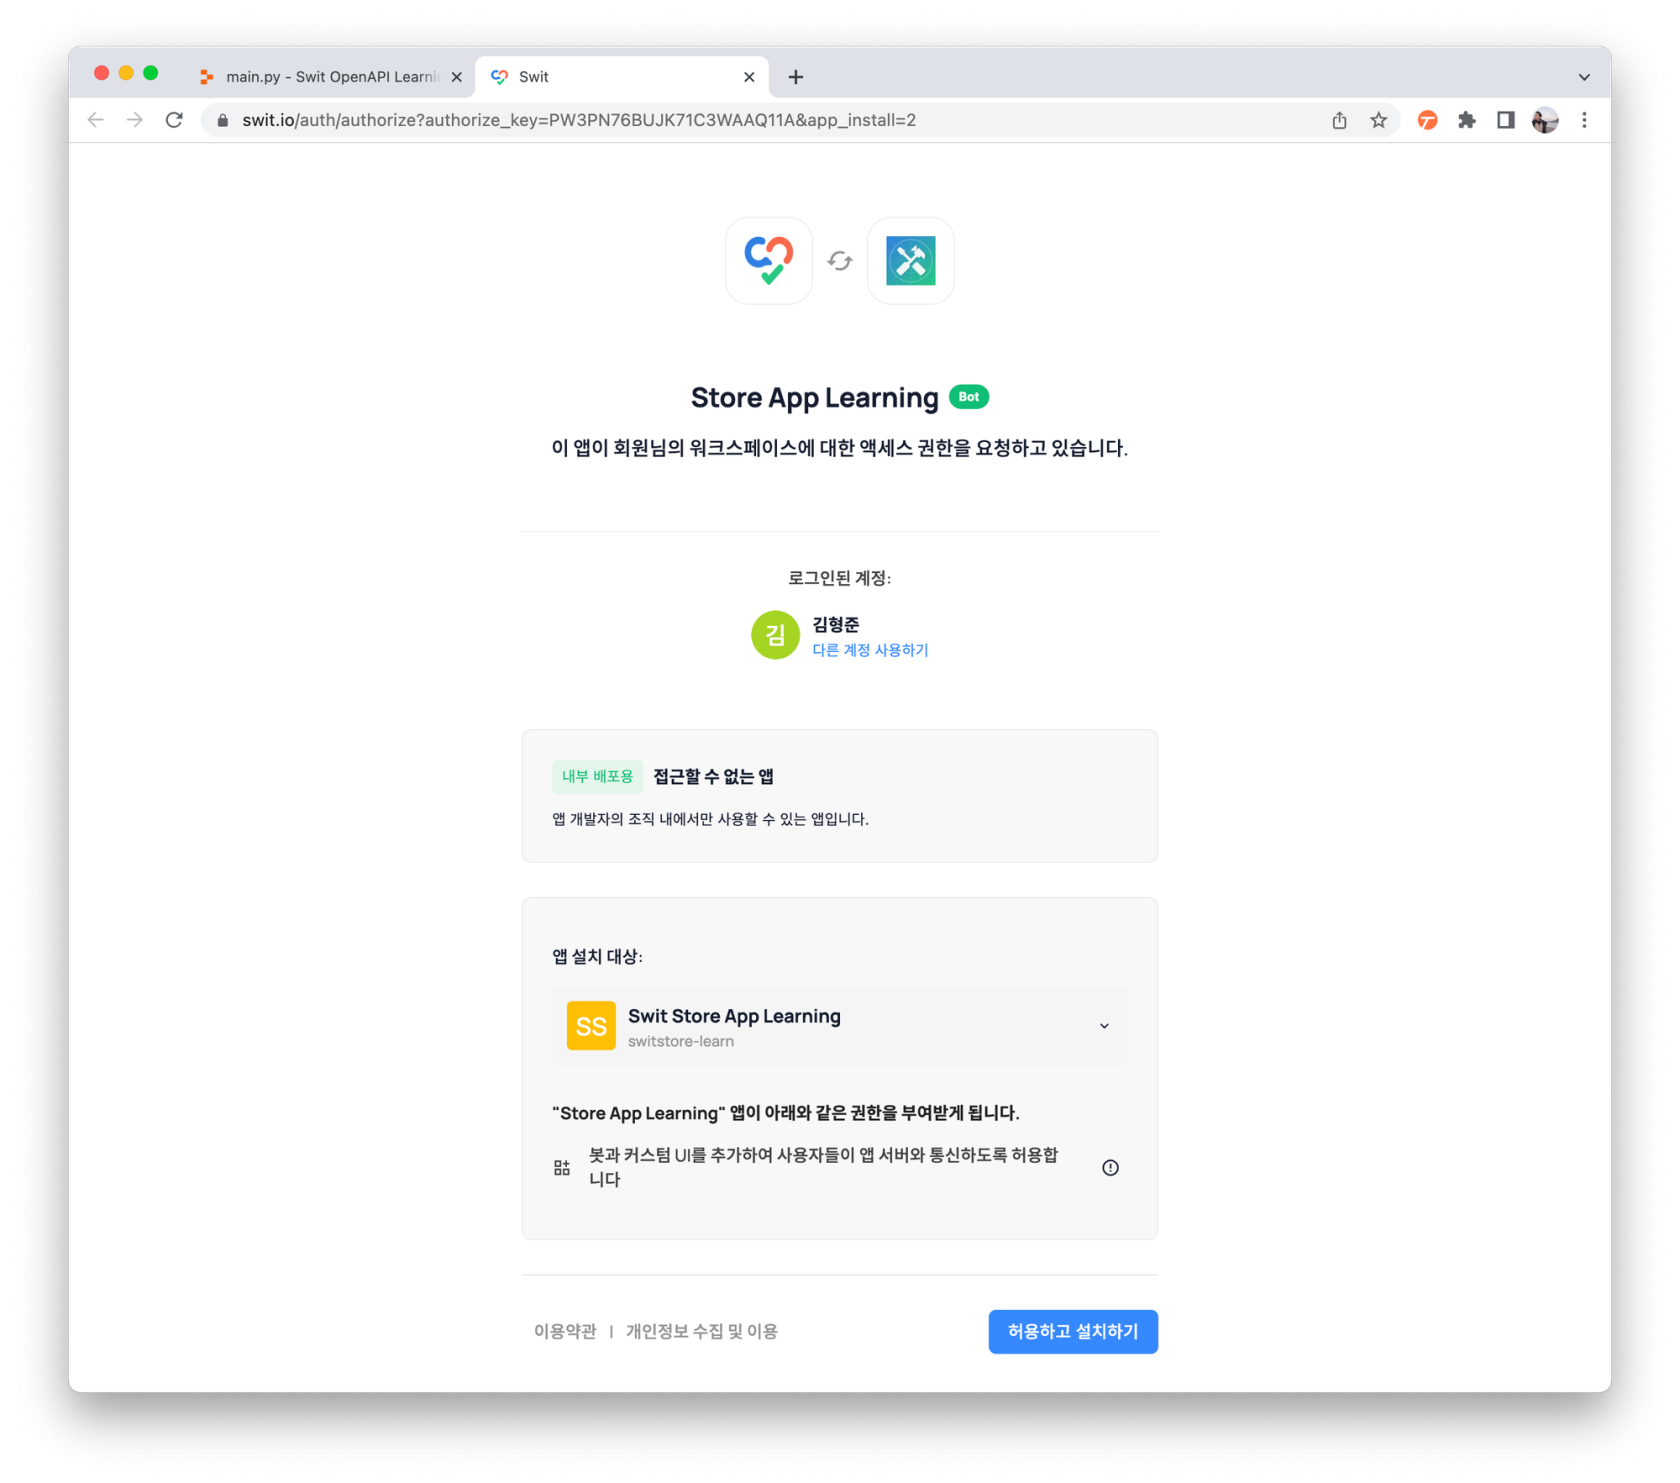](https://tech-support.swit.io/uploads/images/gallery/2024-01/3OwTAqgVVusAN4Px-image-1704687374836-4.png)
###### 1.5 오류 창 URL 에서 맨뒤 code값만 복사 ( 오류가 아닙니다! )
[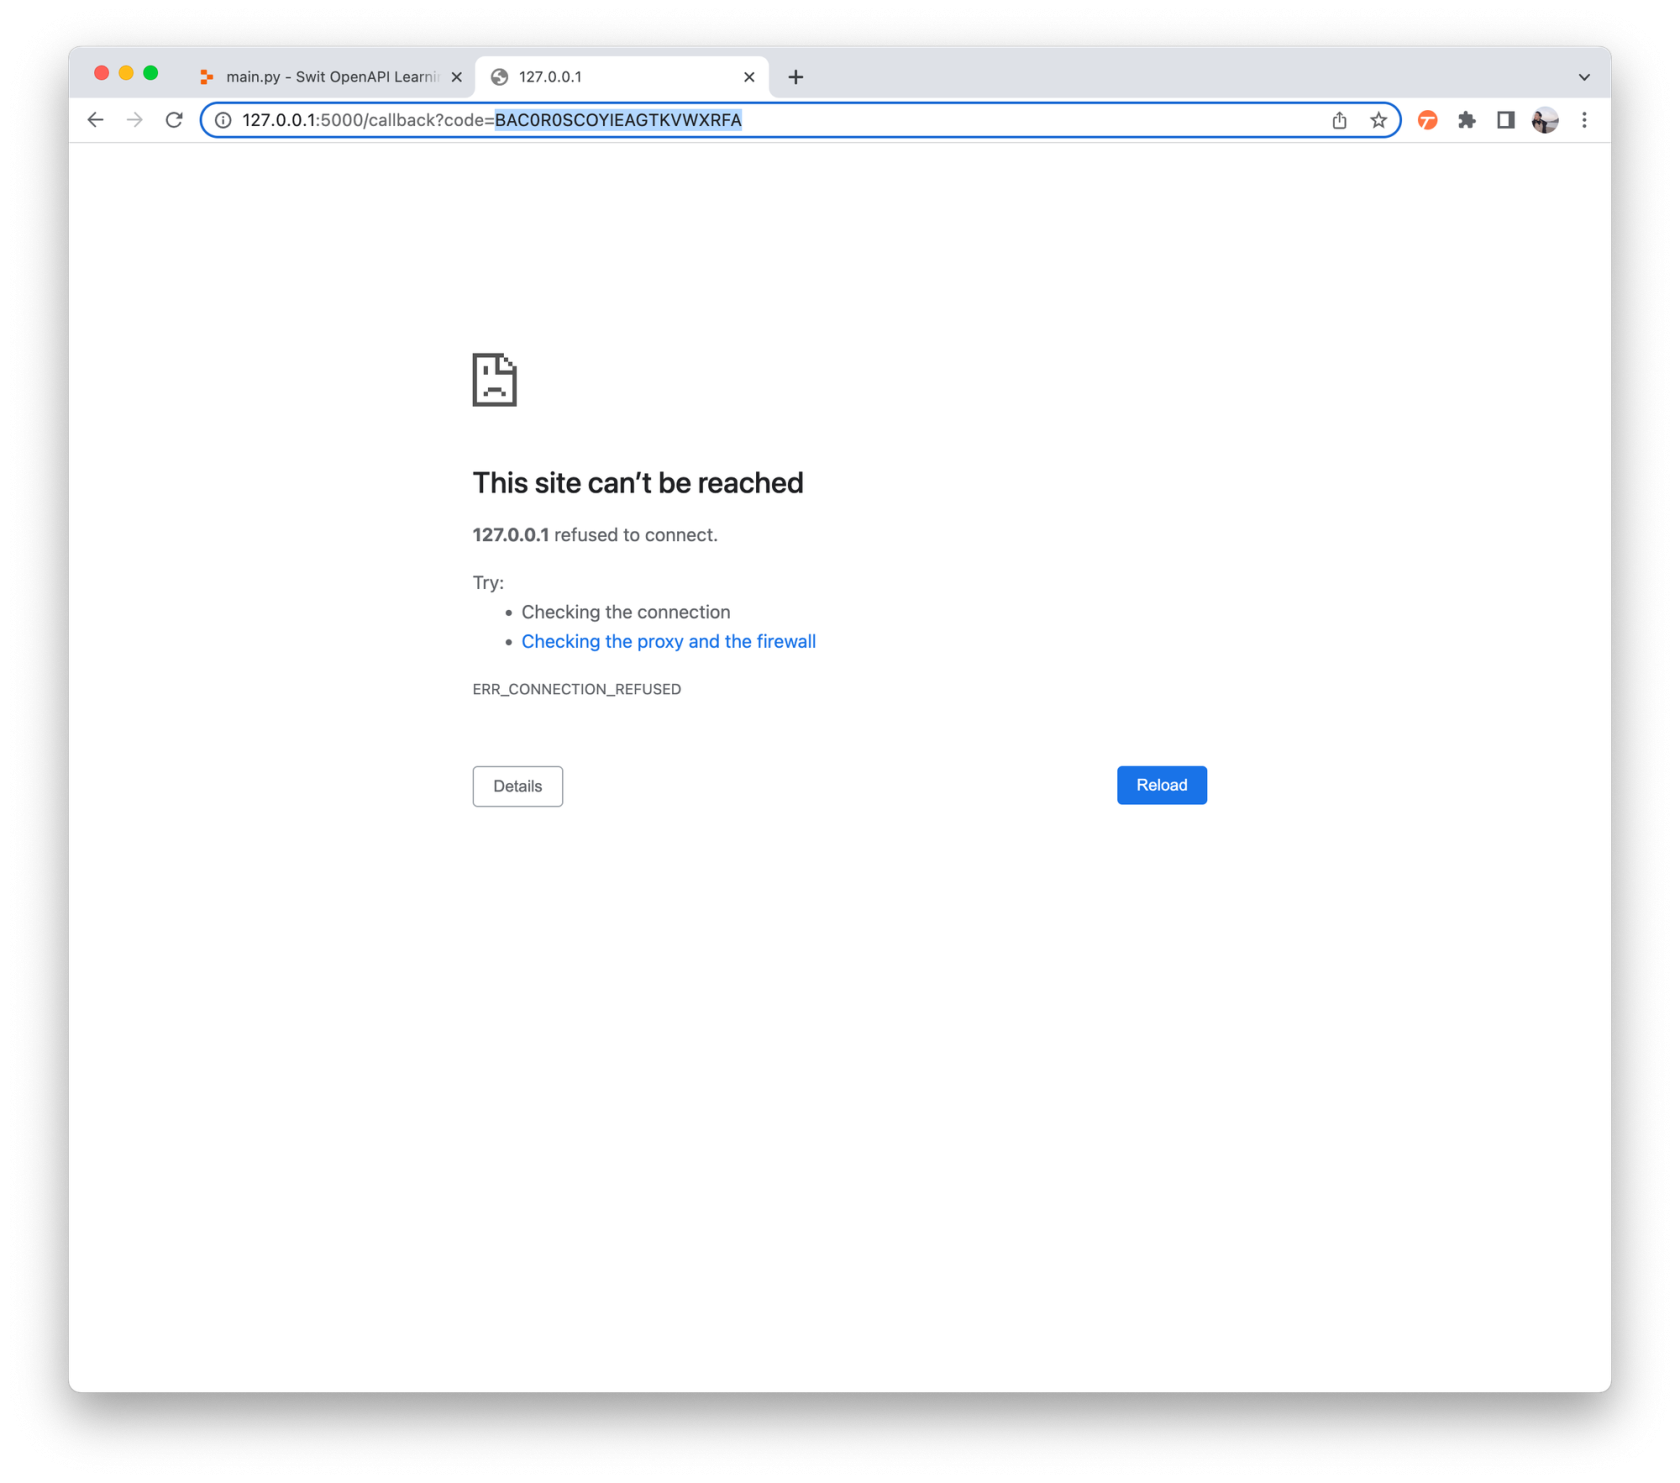](https://tech-support.swit.io/uploads/images/gallery/2024-01/jQ2pnZbDTT8r5LxN-image-1704687380837-5-url-code.png)
###### 1.6 replit사이트 에서 code 값에 붙여넣고 Run
[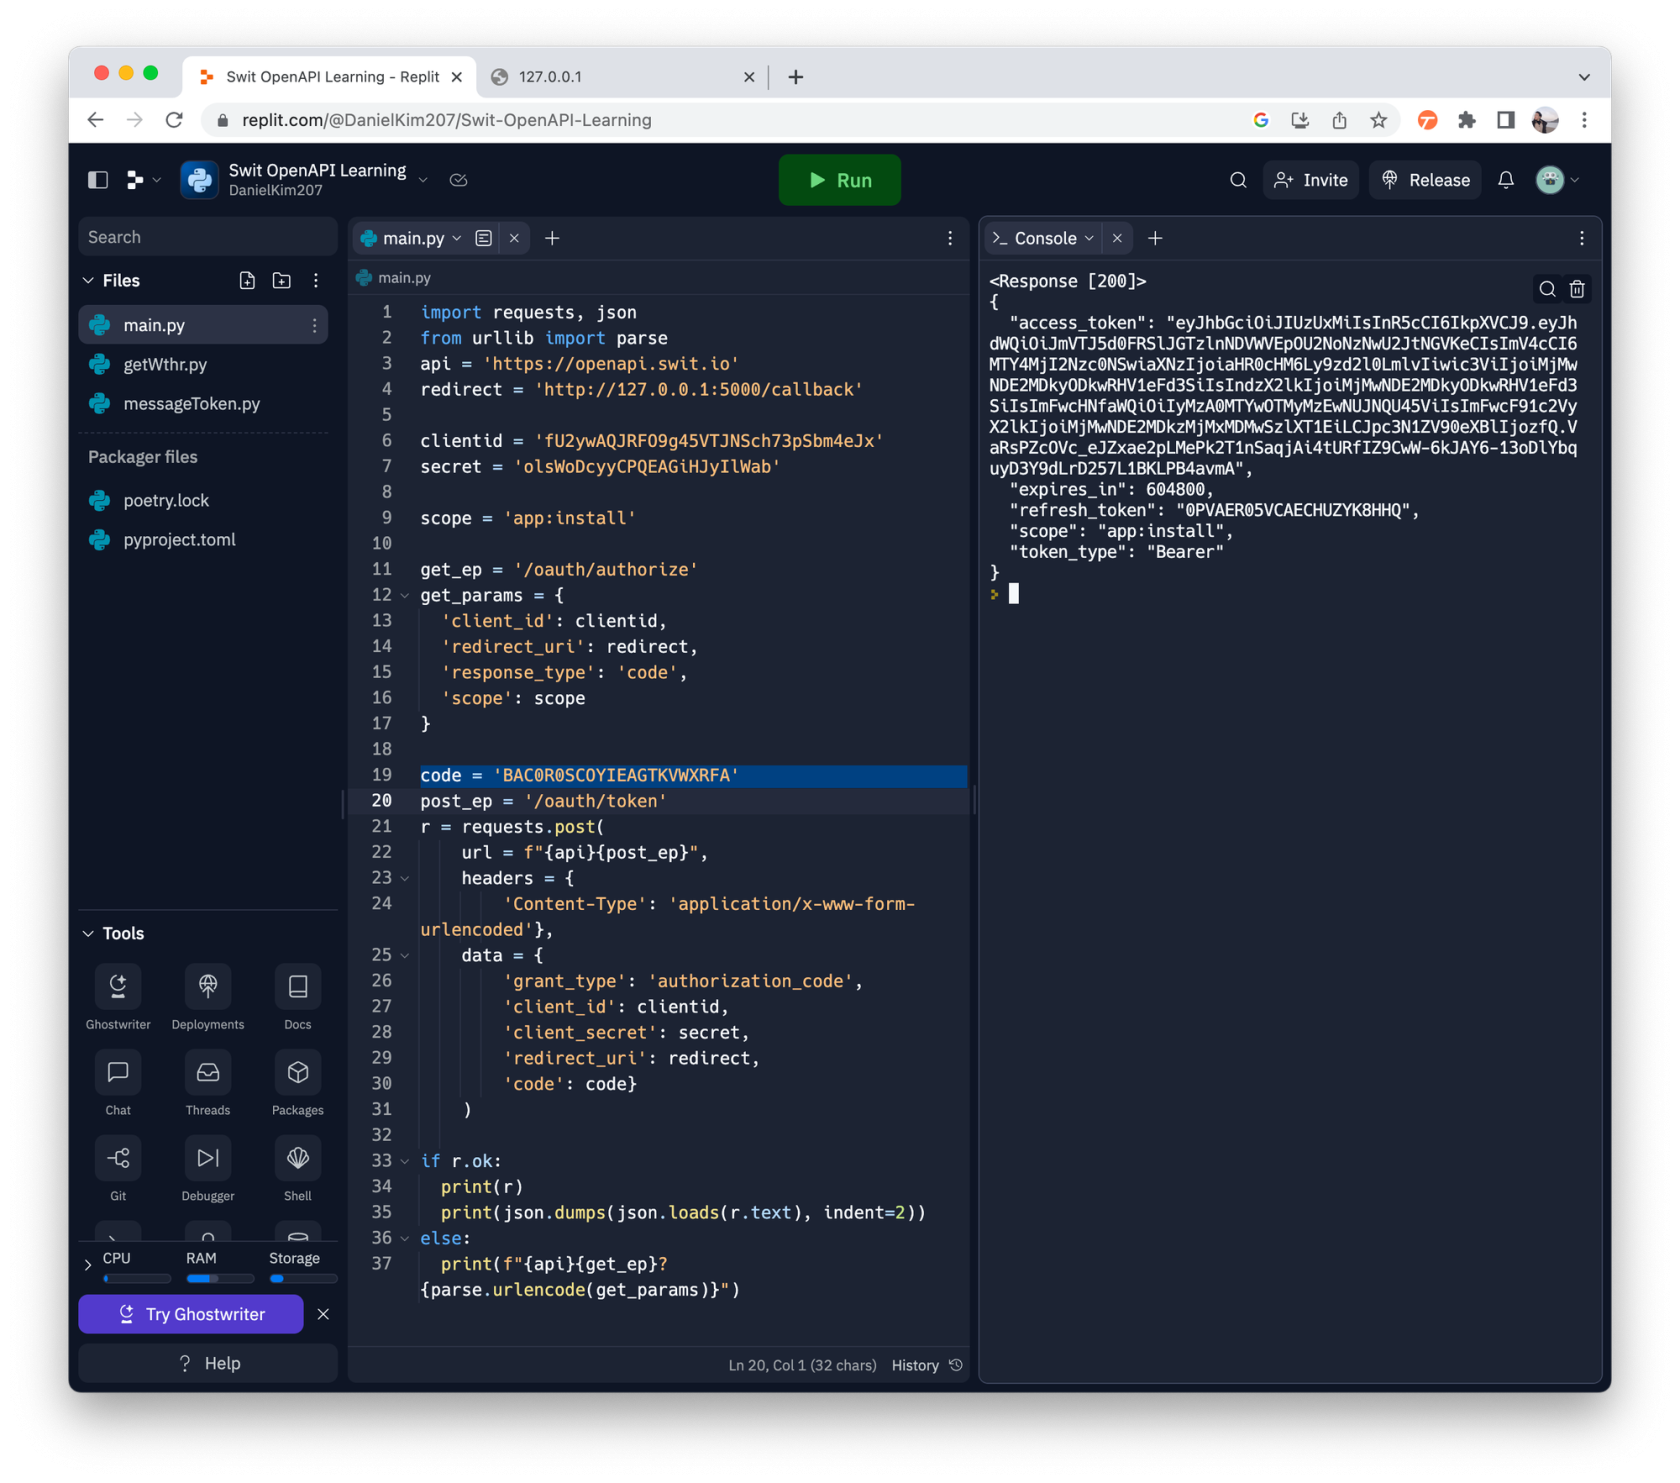](https://tech-support.swit.io/uploads/images/gallery/2024-01/QVG6N293W0zB5gNE-image-1704687385848-6-replit-code-run.png)
###### 1.7 Swit 에서 Store 아이콘 클릭 후 파란색 설치 버튼이 사라지고 "관리" 가 생기면 설치 성공
##### 2. replit사이트 에서 서버 구동하기 (개발자 서버 역할)
###### 2.1 Flask 리플 실행
###### 2.2 Webview 창에서 주소 복사 (Stop 상태라면 Run 후 주소복사)
[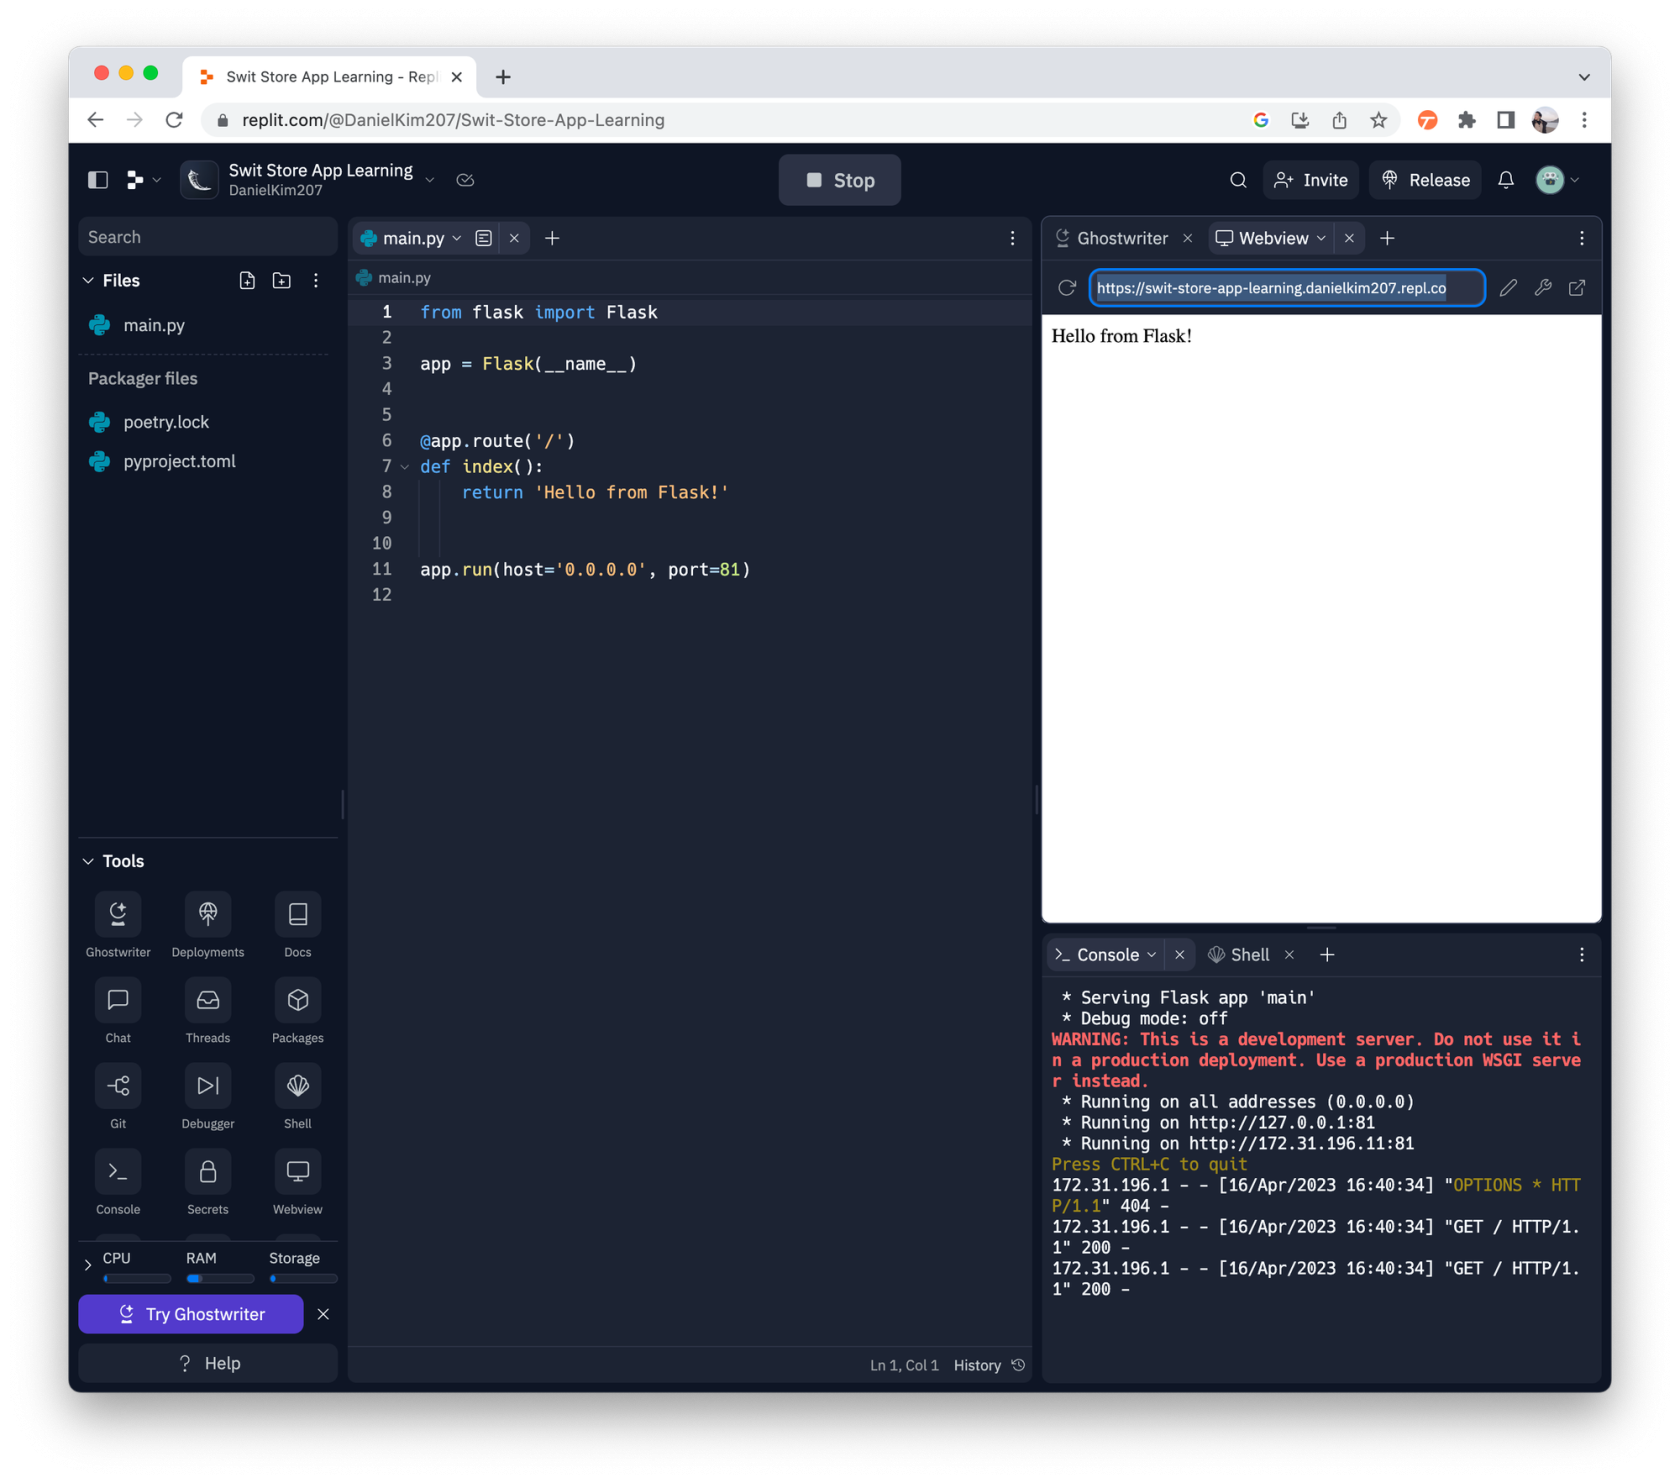](https://tech-support.swit.io/uploads/images/gallery/2024-01/nPoCTOeyhd66lV8l-image-1704687390483-2-webview-stop-run.png)
###### 2.3 새 인터넷 창을 오픈후 주소로 접속하여 서버가 잘 실행되는지 확인 (시간이 조금 오래걸릴수 있음)
[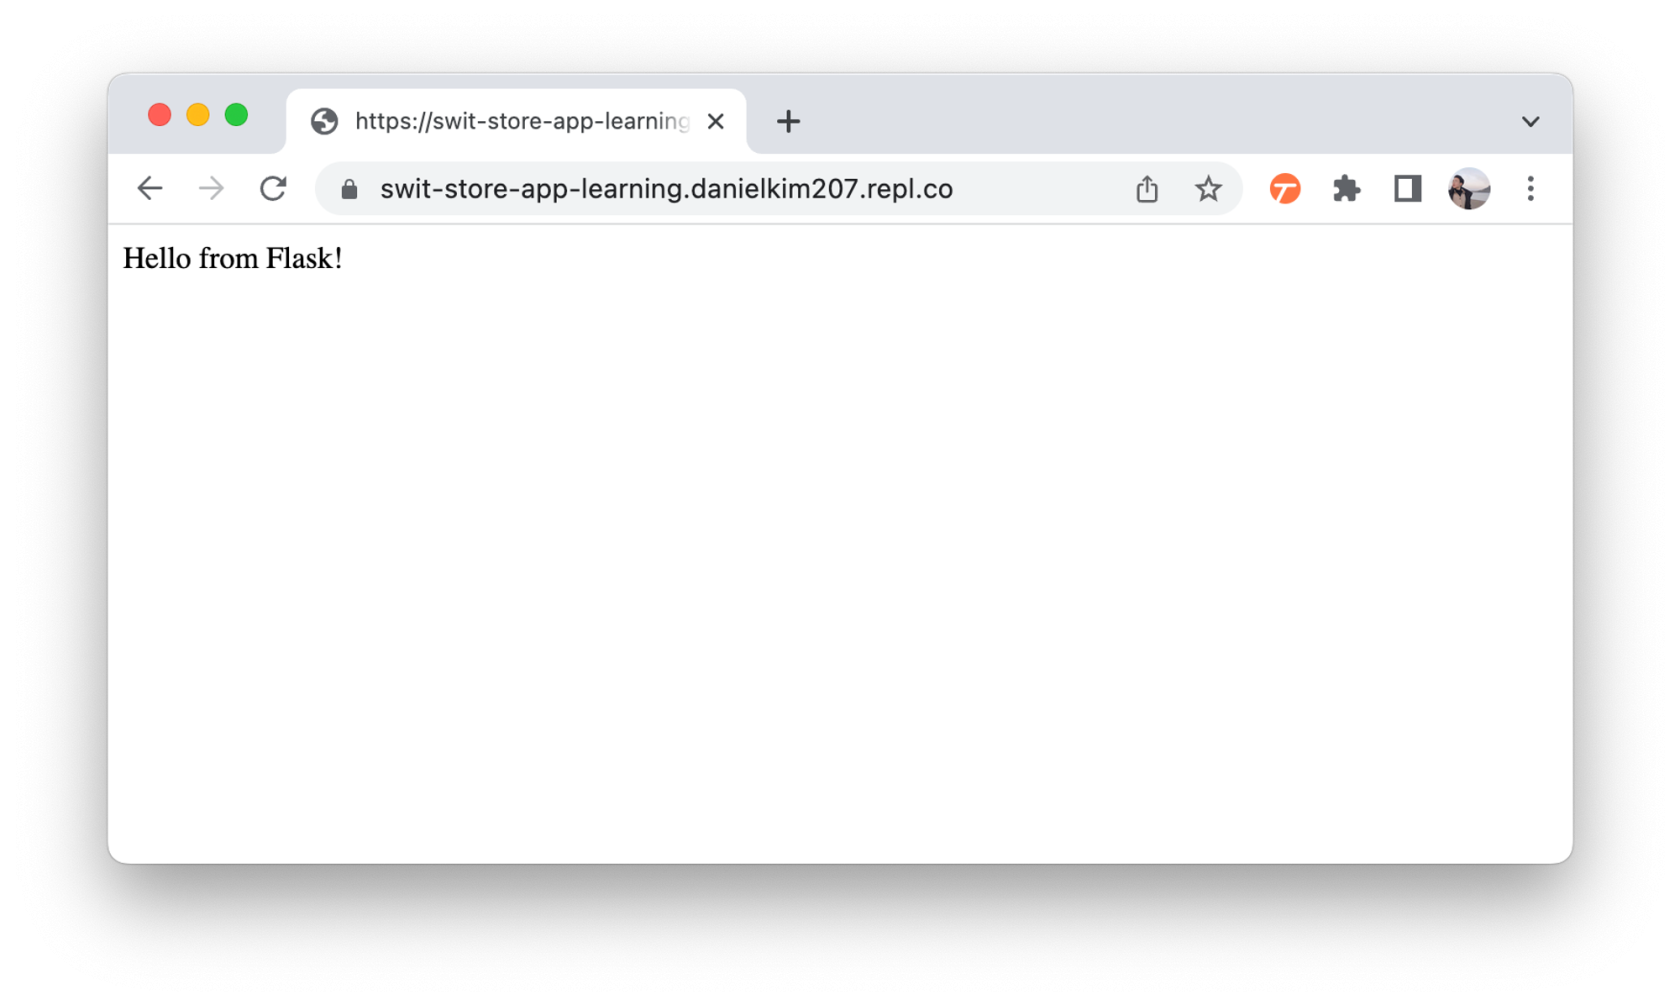](https://tech-support.swit.io/uploads/images/gallery/2024-01/UiM2pxNU6JJ8gyXx-image-1704687395610-3.png)
##### 3. **[Developers사이트](http://developers.swit.io/)** 에서 User action API 요청이 가능하도록 활성화
###### 3.1 My apps > Feature > user actions 탭 에서 활성화 클릭
###### 3.2 Callback URL 에 위에서 복사한 서버주소 + /switlearning 입력
[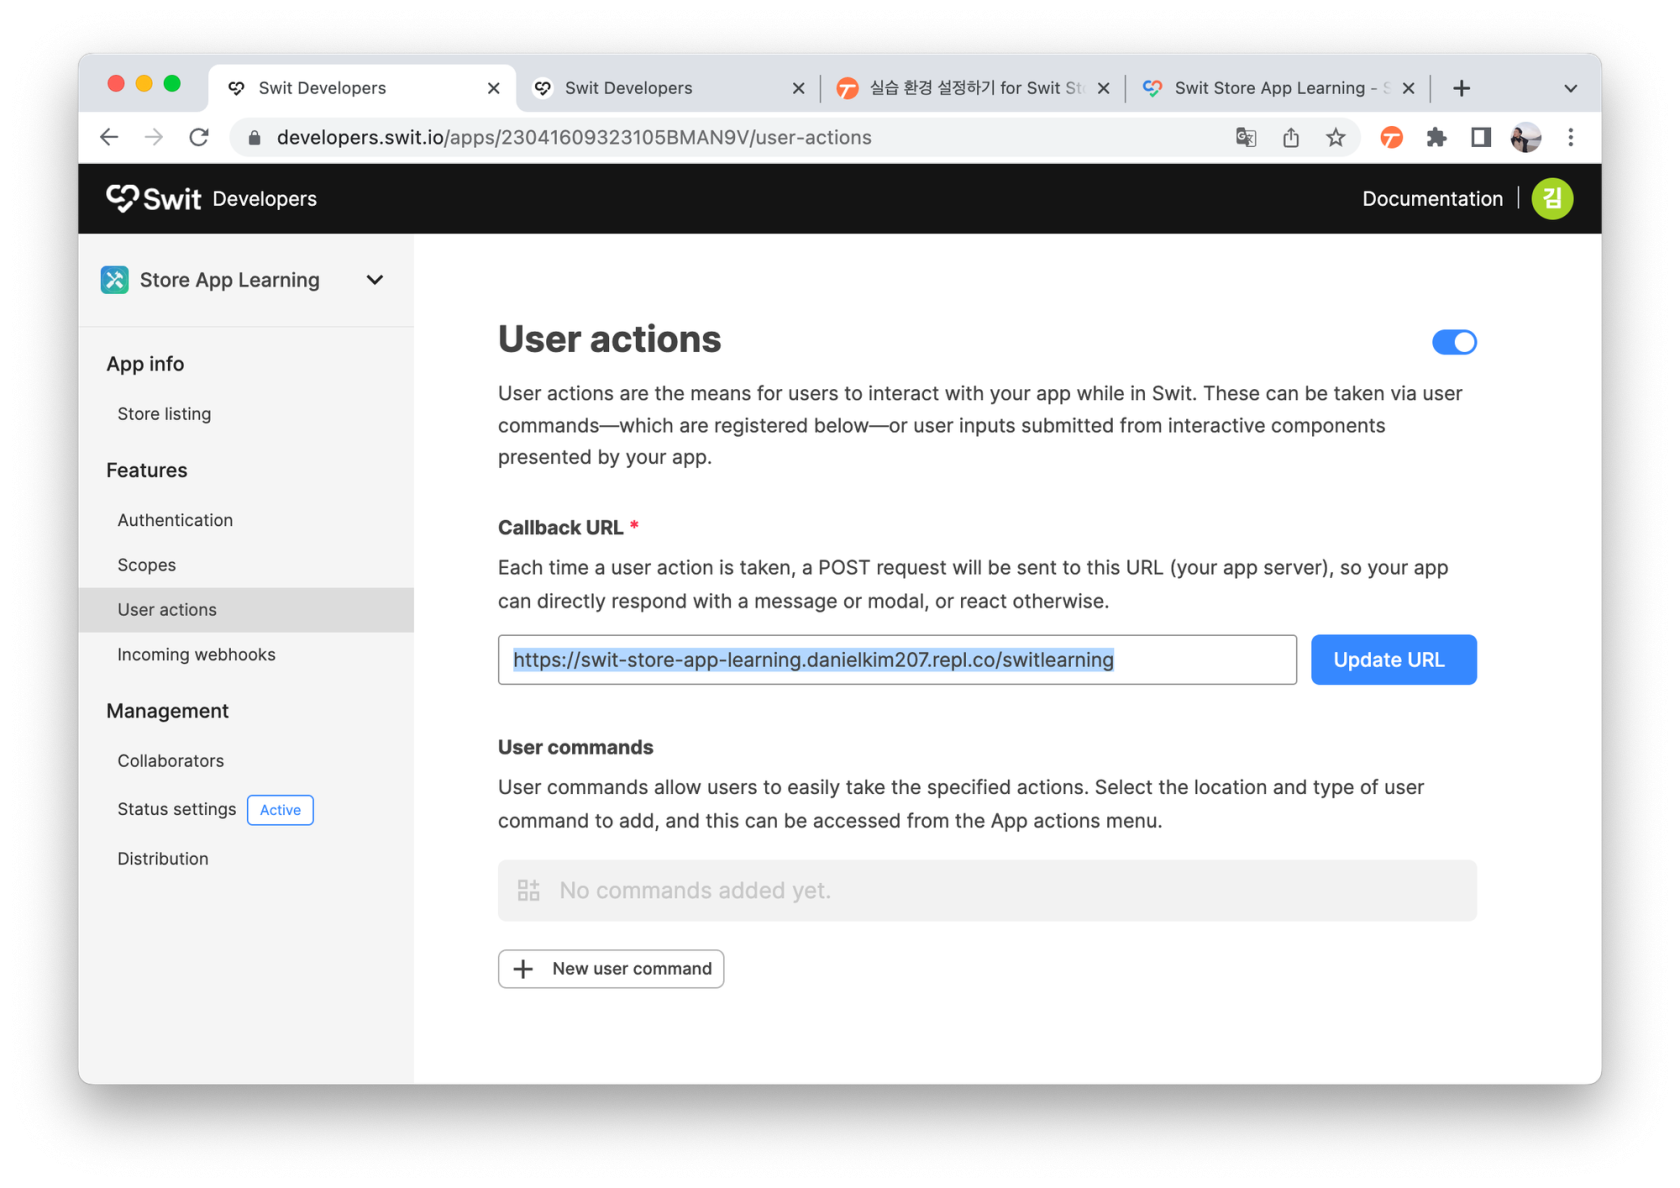](https://tech-support.swit.io/uploads/images/gallery/2024-01/Yv4SmdTZdFqPmuSK-image-1704687400578-2-callback-url-switlearning.png)
###### 3.3 입력후 Update URL 클릭
###### 3.4 +New user command 버튼 클릭
###### 3.5 Command name 및 Command ID 입력
###### 3.6 아래로 스크롤 하여 Extension 에 Channel message 체크
> 필수는 아니지만 /Command alias 활성화 및 Alias name 입력
###### 3.7 Save 클릭
##### 4. User action API 응답을 위한 Callback 데이터를 서버에 입력 (Swit Server에 보낼 정보)
###### 4.1 아래 코드를 복사
```Python
import json
from flask import Flask, request
app = Flask(__name__)
@app.route('/')
def hello_switty():
return 'hello, switty!'
@app.route('/switlearning', methods=['POST'])
def switlearning():
r = request.json
print(json.dumps(r, indent=4))
callback = {
"callback_type": "views.open",
"new_view": {
"view_id": "builder_test",
"header": {
"title": "This is a view title",
"subtitle": "Add a subtitle if needed",
"context_menu": [
{
"label": "Menu item 1",
"action_id": "2fc5573a-c439"
},
{
"label": "Menu item 2",
"action_id": "340d4ae1-0cb2"
}
],
"buttons": [
{
"type": "button",
"icon": {
"type": "image",
"image_url": "https://swit.io/assets/images/lib/emoji/apple-64/1f609.png",
"alt": "Header button icon"
},
"static_action": {
"action_type": "open_link",
"link_url": "https://swit.io"
}
}
]
},
"body": {
"elements": [
{
"type": "select",
"placeholder": "Select an item",
"multiselect": False,
"trigger_on_input": True,
"options": [
{
"label": "Option 1",
"action_id": "eb5c968b-f4fb"
},
{
"label": "Option 2",
"action_id": "8992c582-7b37",
"static_action": {
"action_type": "open_link",
"link_url": "https://swit.io"
}
}
]
},
{
"type": "button",
"label": "Button 1",
"action_id": "eb5c968b-f4fb",
"style": "primary_filled"
},
{
"type": "divider"
},
{
"type": "text",
"markdown": True,
"content": "[Swit](https://swit.io) is *where the magic happens.* Where big, revolutionary ideas jump off the drawing board and into the real world."
}
]
}
}
}
return callback
app.run(host='0.0.0.0', port=81)
```
###### 4.2 main.py 에서 모든 내용을 삭제하고 붙여넣기
###### 4.3 Stop 후 Run 하여 서버 재실행
##### 5. Swit에서 User action command 실행하여 모달 팝업 띄우기
###### 5.1 Swit 채팅창 왼쪽 아래에서 "+"버튼 클릭 > 앱이름 > command 선택
[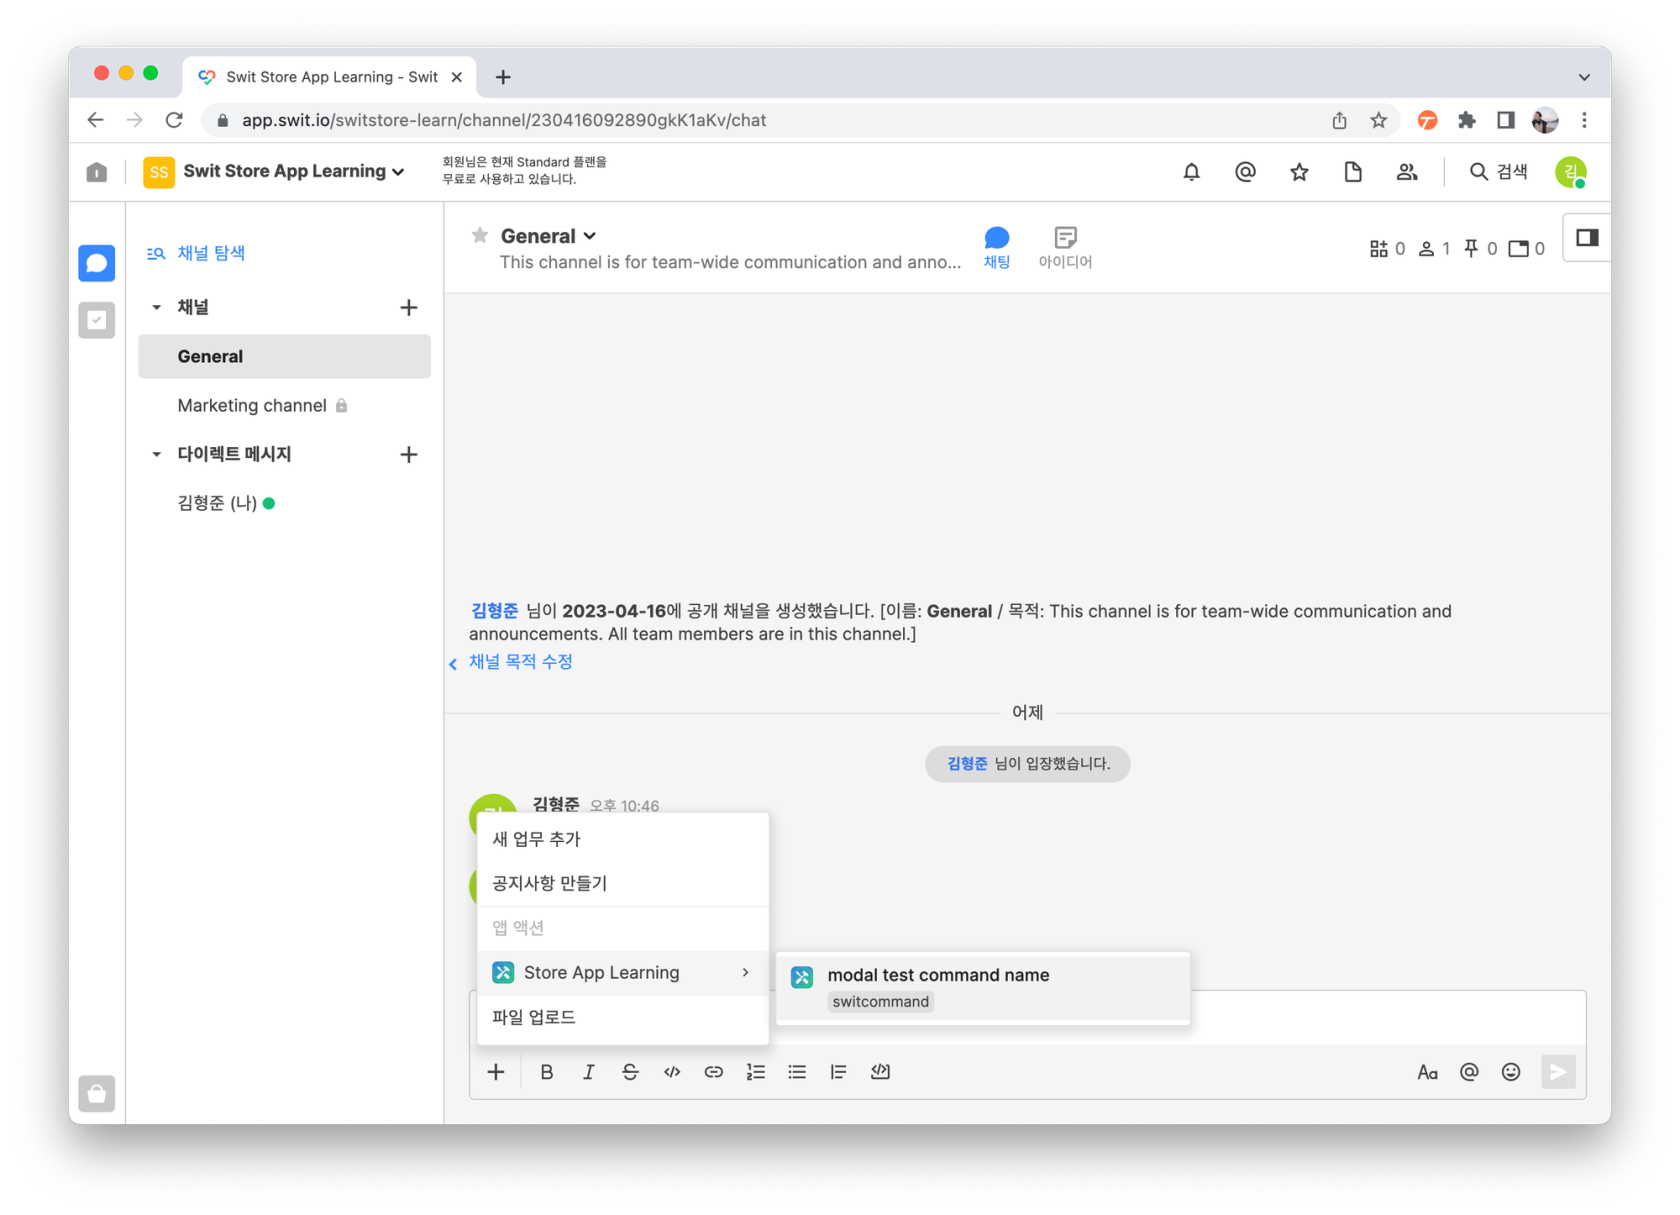](https://tech-support.swit.io/uploads/images/gallery/2024-01/WiaTPSpVQPdABDWh-image-1704687484118-1-swit-2222-command.png)
###### 5.2 Modal 팝업 확인
[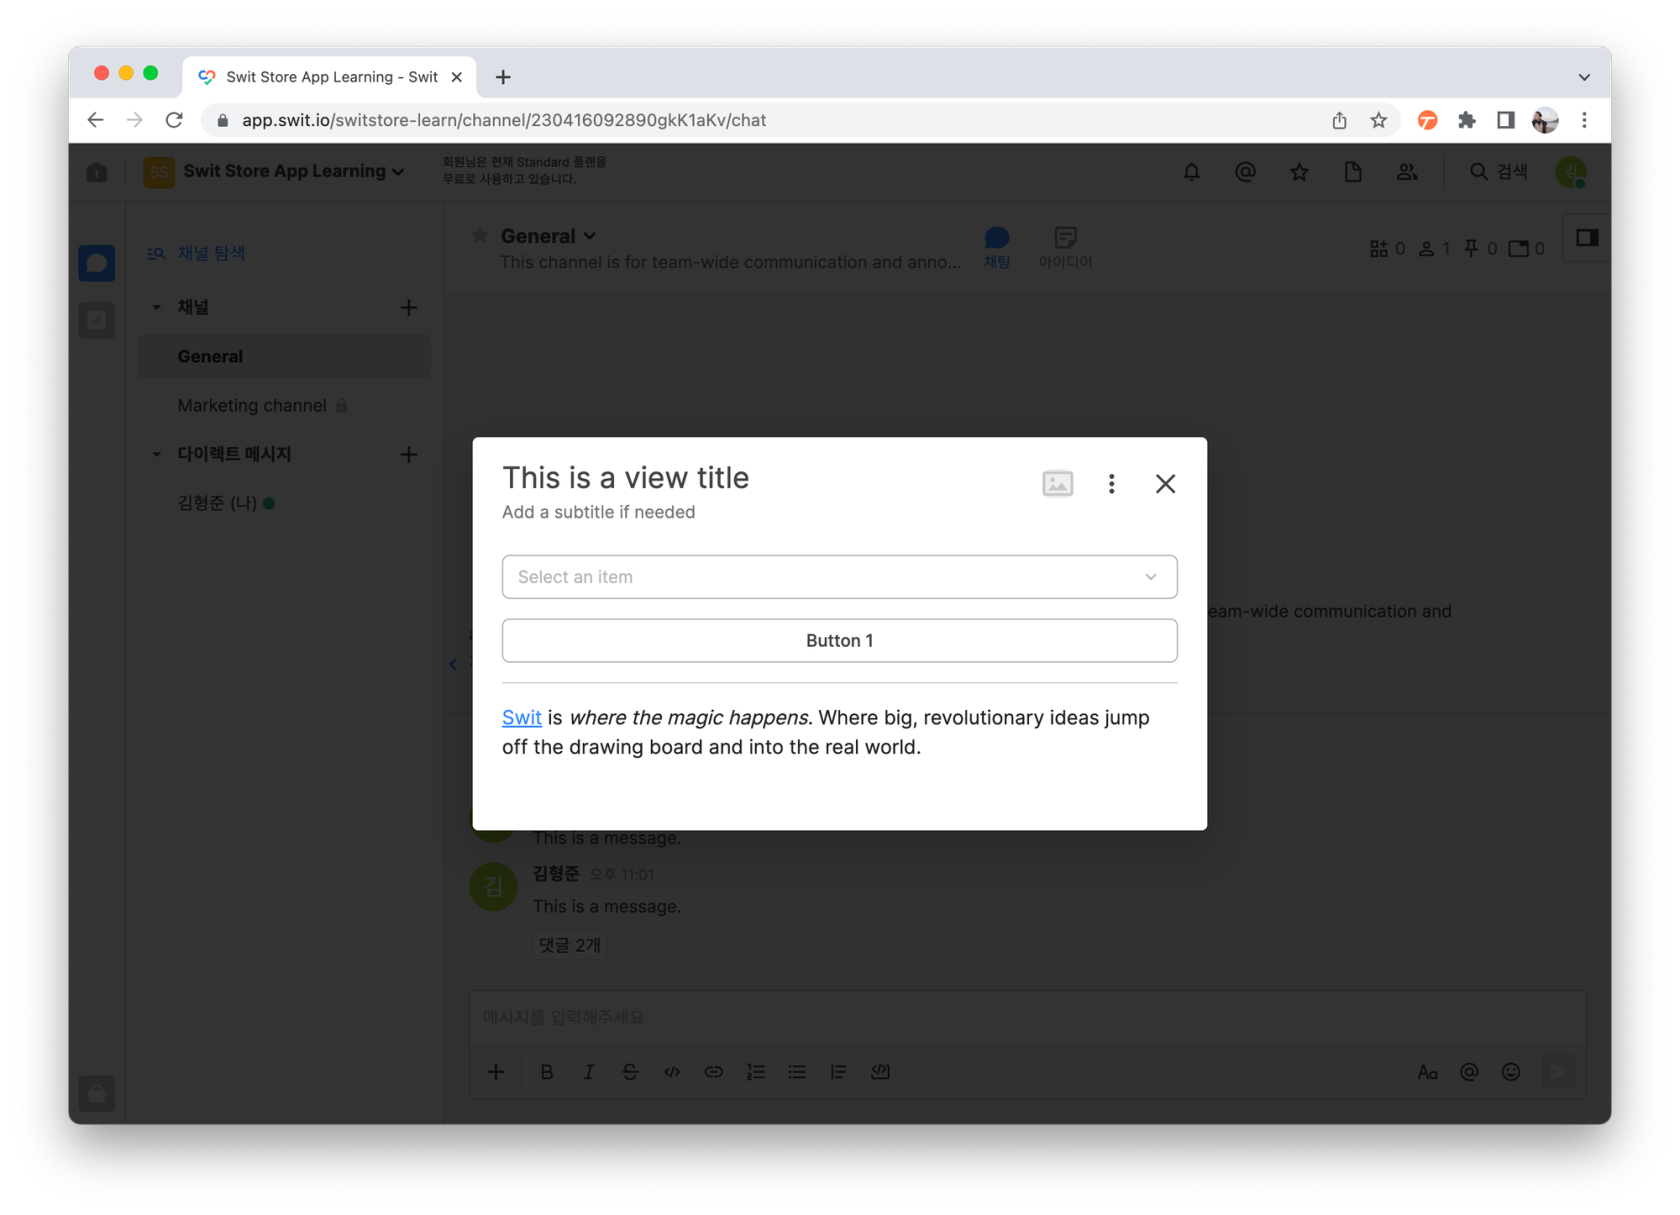](https://tech-support.swit.io/uploads/images/gallery/2024-01/UnYzCz3UA4tbxSRQ-image-1704687414140-2-modal.png)
###### 5.3 replit사이트의 Console 화면 체크
[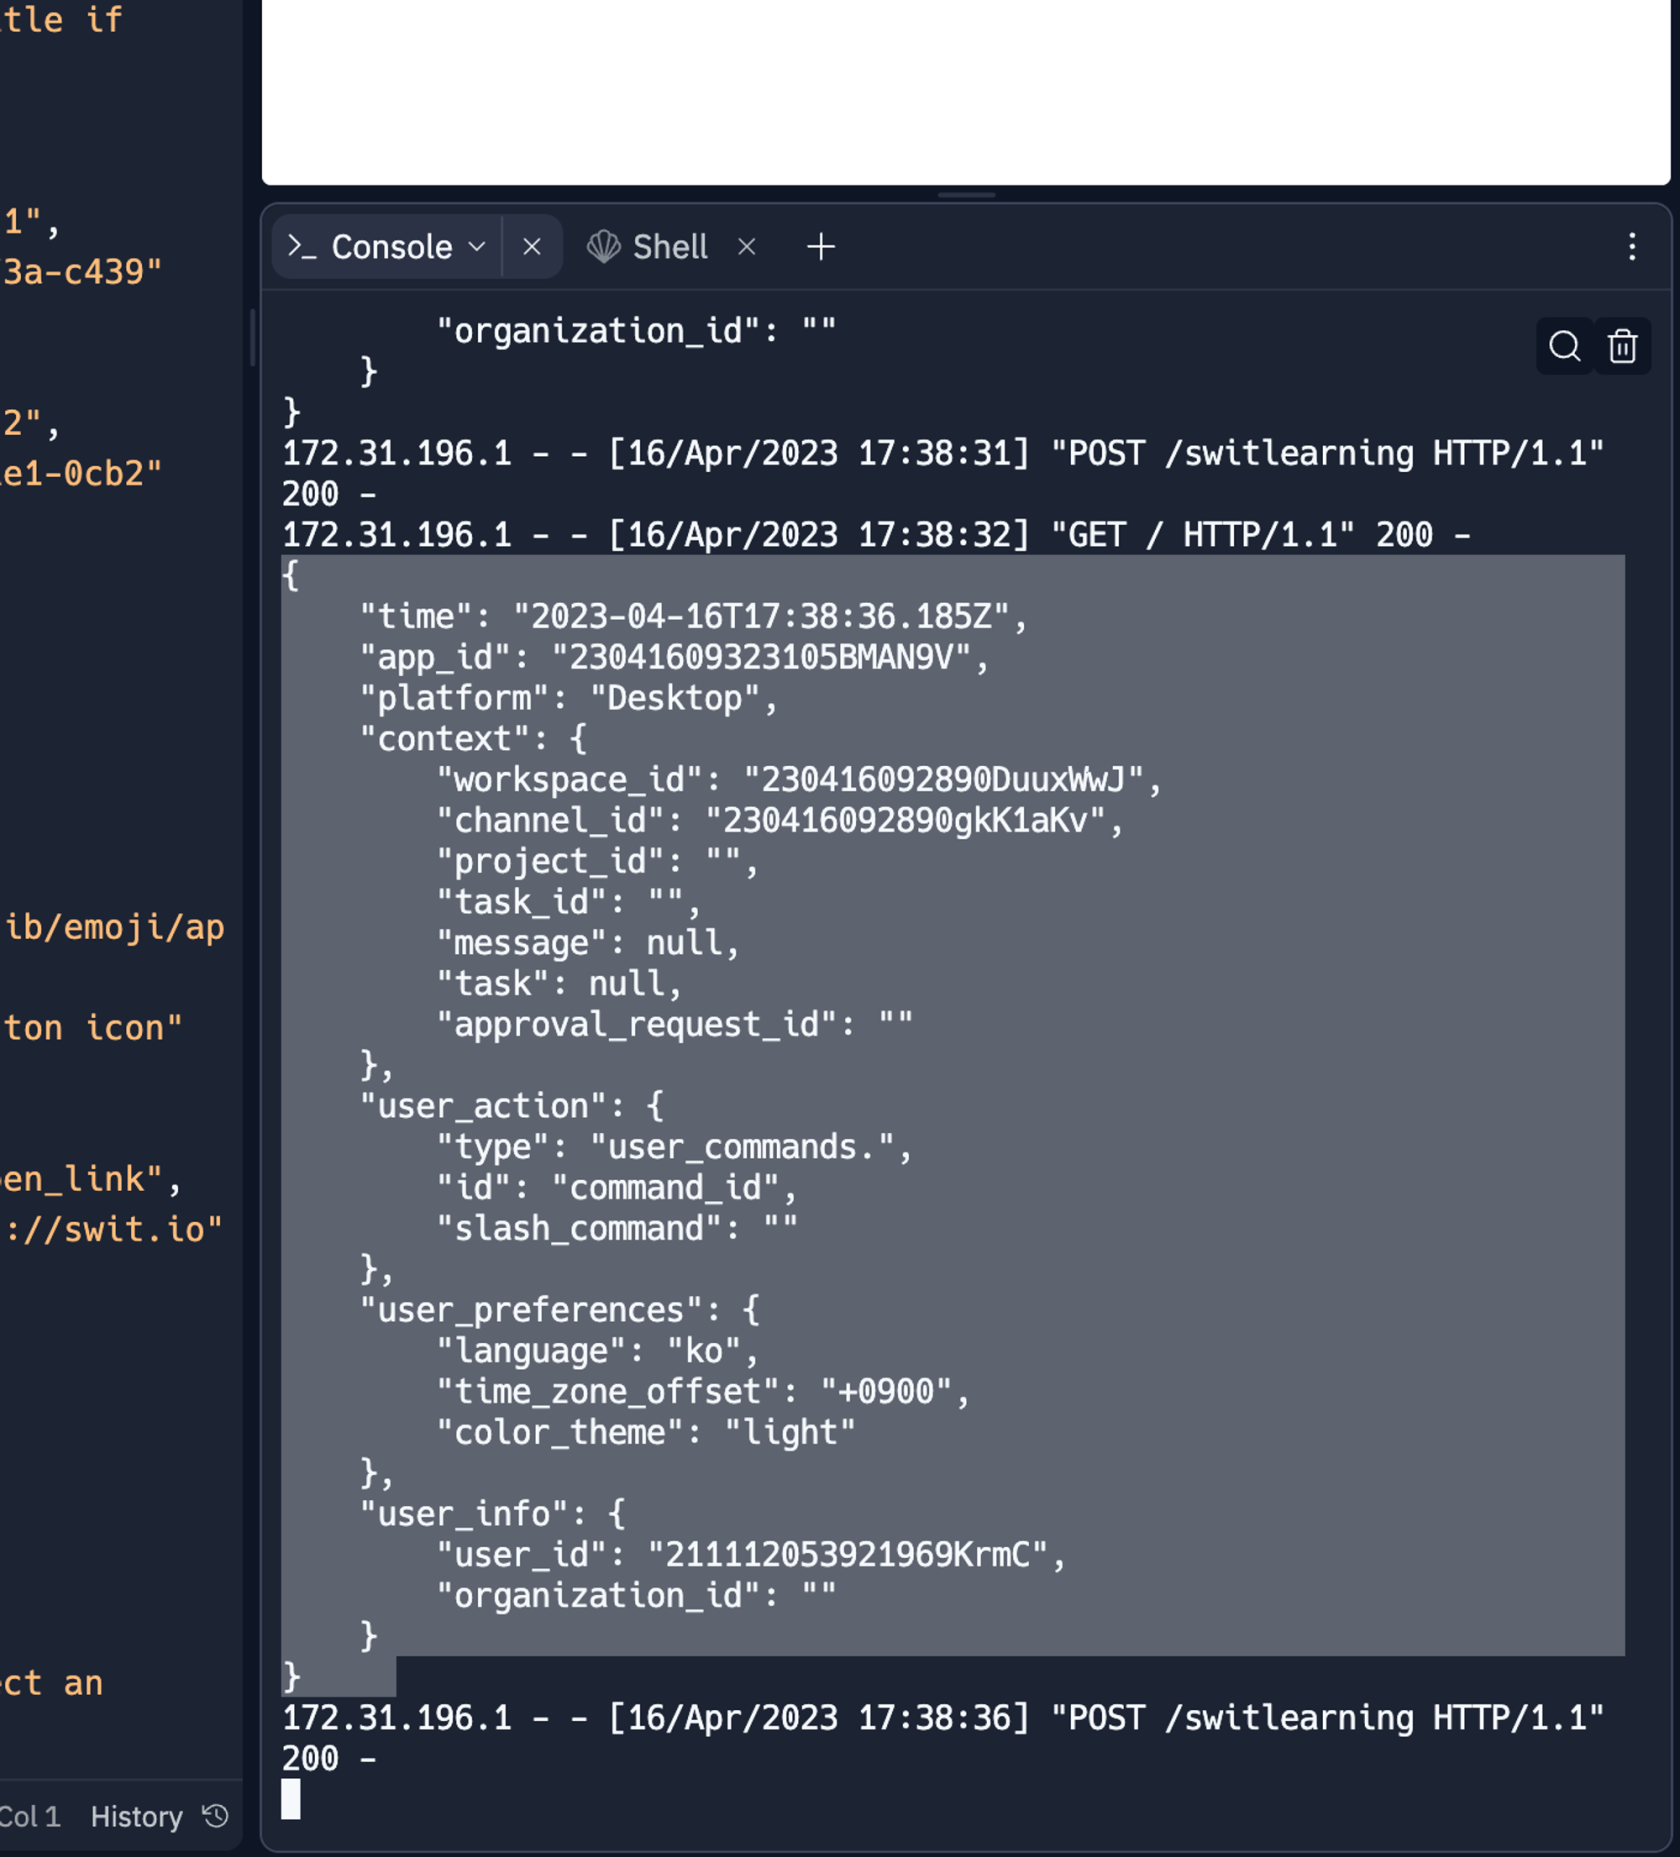](https://tech-support.swit.io/uploads/images/gallery/2024-01/7EU3qN3JXO0Qxtgv-image-1704687418830-3-replit-console.png)
---
##### 6. 원하는 화면의 Modal 창을 만들어서 띄워보기
###### 6.1 **[builder.swit.io](http://builder.swit.io/)** 사이트 들어가기
###### 6.2 왼쪽 위 메뉴에서 "모달" 선택
###### 6.3 만들고 싶은 디자인 자유롭게 만들기
###### 6.4 왼쪽의 Source 코드 복사
###### 6.5 아래 내용에서 16번째 "new\_view" 의 {} 중괄호 안에 복사한 Source 내용을 붙여넣고 main.py 에 복사 붙여넣기
```Python
import json
from flask import Flask, request
app = Flask(__name__)
@app.route('/')
def hello_switty():
return 'hello, switty!'
@app.route('/switlearning', methods=['POST'])
def switlearning():
r = request.json
print(json.dumps(r, indent=4))
callback = {
"callback_type": "views.open",
"new_view": {
"여기에 Source 붙여넣기"
}
}
return callback
app.run(host='0.0.0.0', port=81)
```
###### 6.6 Python 문법오류 수정 (중요)
> - true -> True
> - false -> False
###### 6.7 Stop 후 Run 하여 서버 재실행
###### 6.8 \[5번\] 내용을 수행하여 디자인한 모달창이 생성되는지 확인
---
여기까지 따라하시느라 수고하셨습니다.
이상으로 Swit Store App 가이드를 마치도록 하겠습니다.
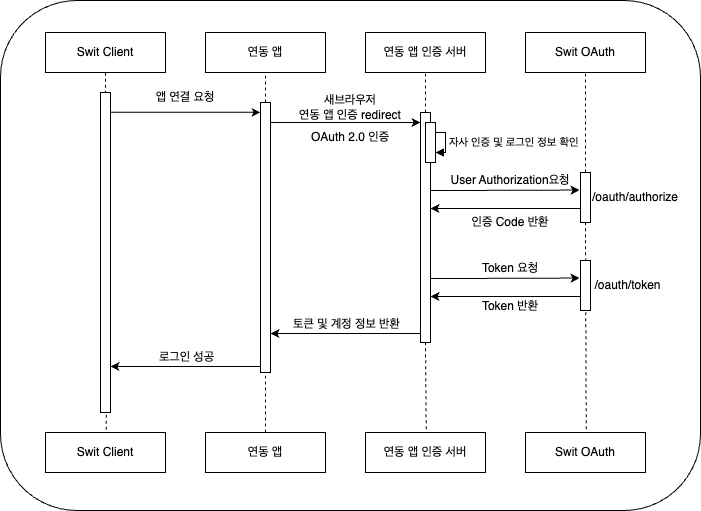
# App User 인증 Sequence
## 연동 App 에서 User 로그인 인증
> - 연동앱 의 자사 인증은 생략된 내용입니다.
> - 유저별 알맞은 scope 를 지정하여 토큰을 발급 및 관리
---
# 우측 패널 앱 만들기
#### 우측패널을 사용하는 APP 실습
> - 모달창을 띄우는 방식과 같습니다.
> - 백엔드 서버가 준비되어 있다는 가정하에 실습을 진행합니다. (본 예제는 fastAPI를 이용함 )
---
##### Swit Store App 생성 및 설정
> - Modal창 띄우기 실습시 사용한 앱을 사용하셔서 설정하셔도 무방합니다.
> - 새로 APP을 생성한다는 기준으로 설명을 진행합니다.
###### 1. **[Swit Developers](https://developers.swit.io/)** 사이트 에서 Swit apps 진입
[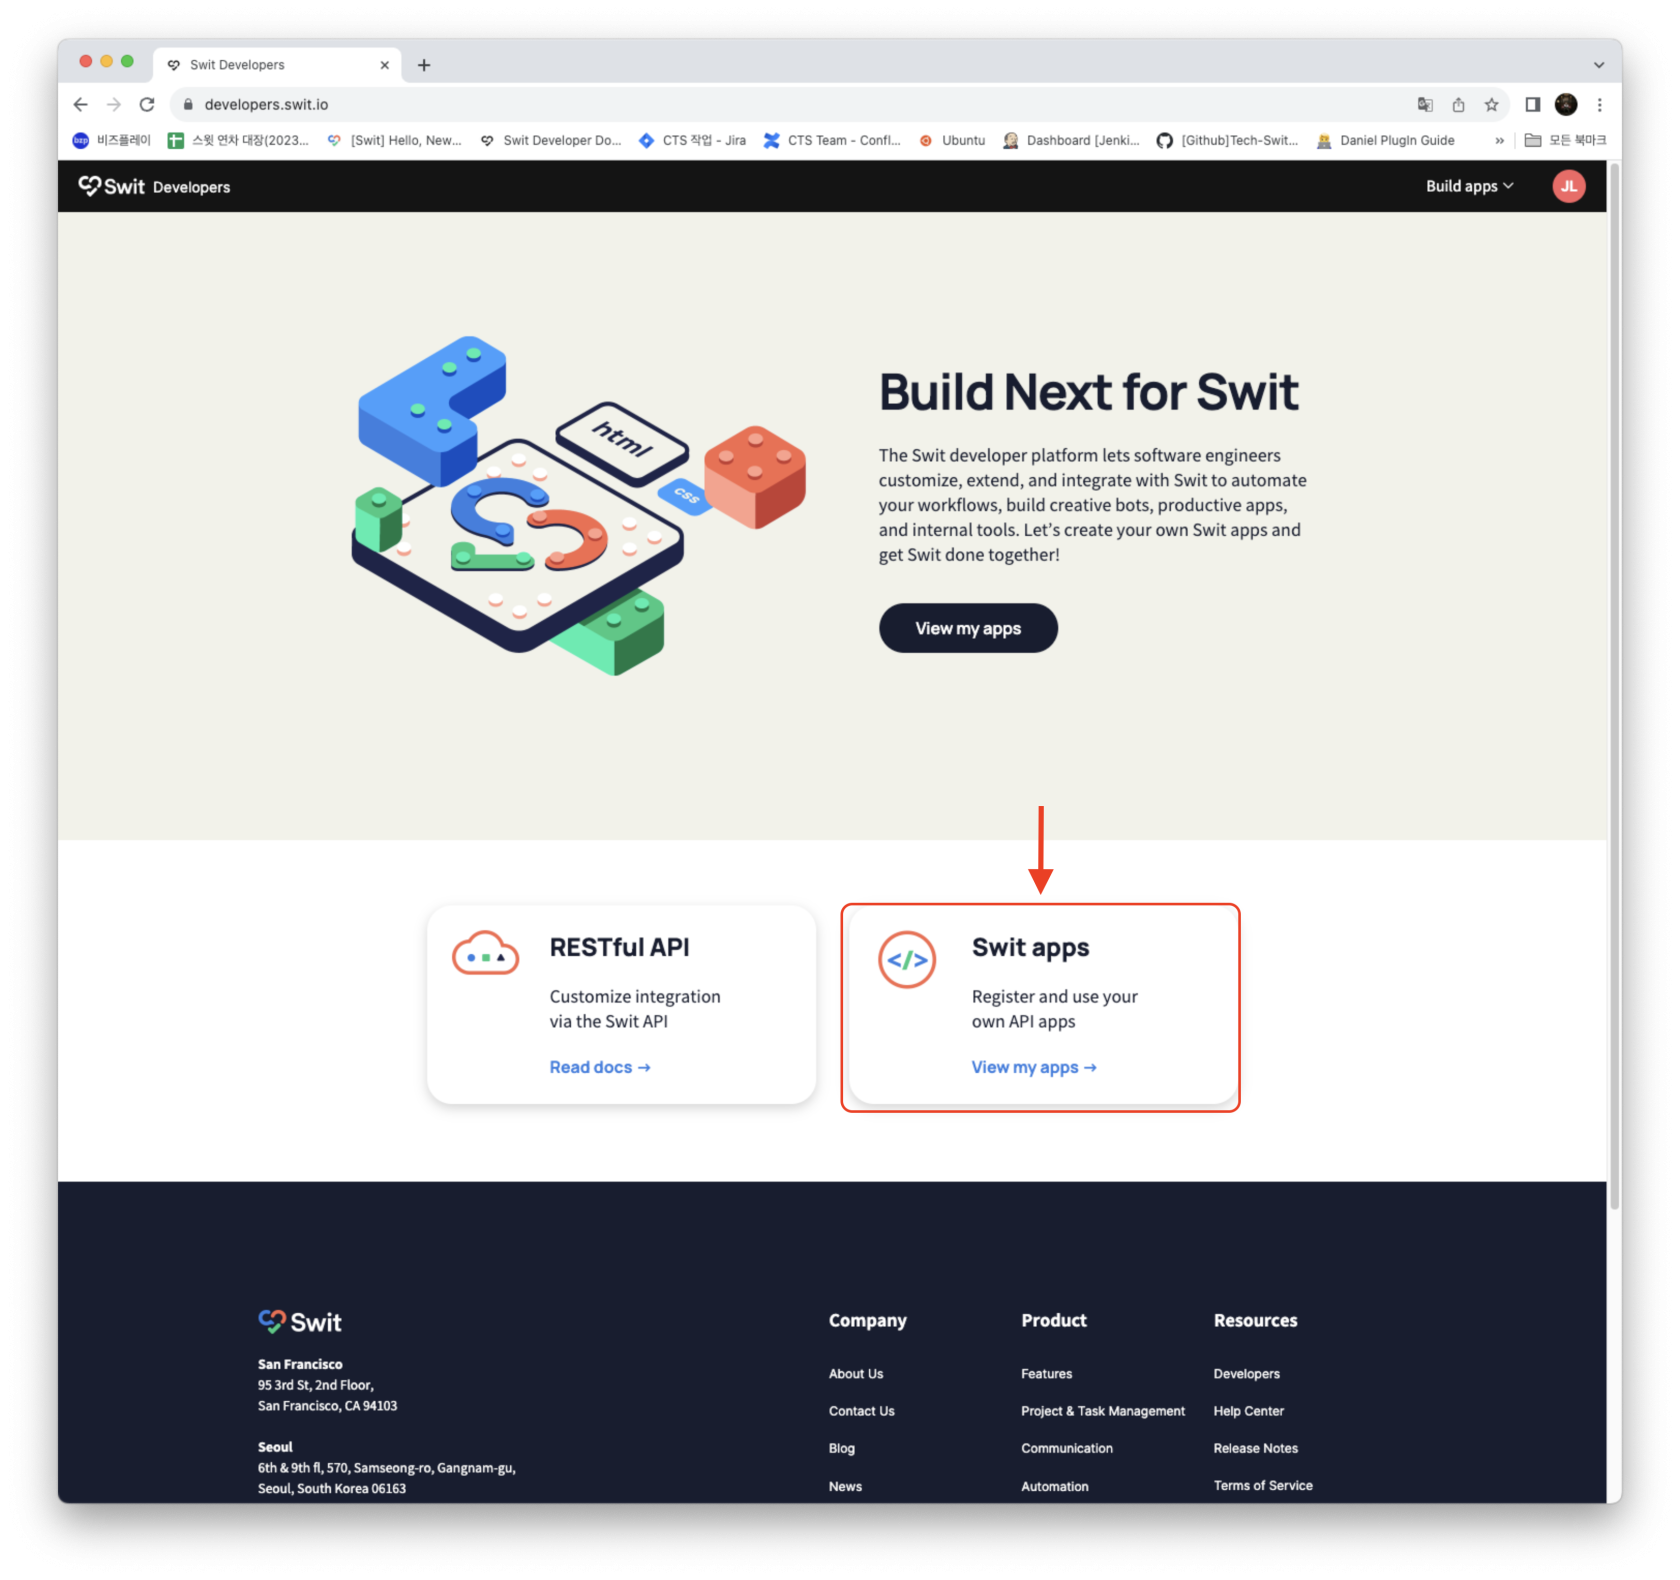](https://tech-support.swit.io/uploads/images/gallery/2024-01/bHni9tEngnun5704-image-1704687555725.png)
###### 2 New app 으로 App name 기입후 생성
[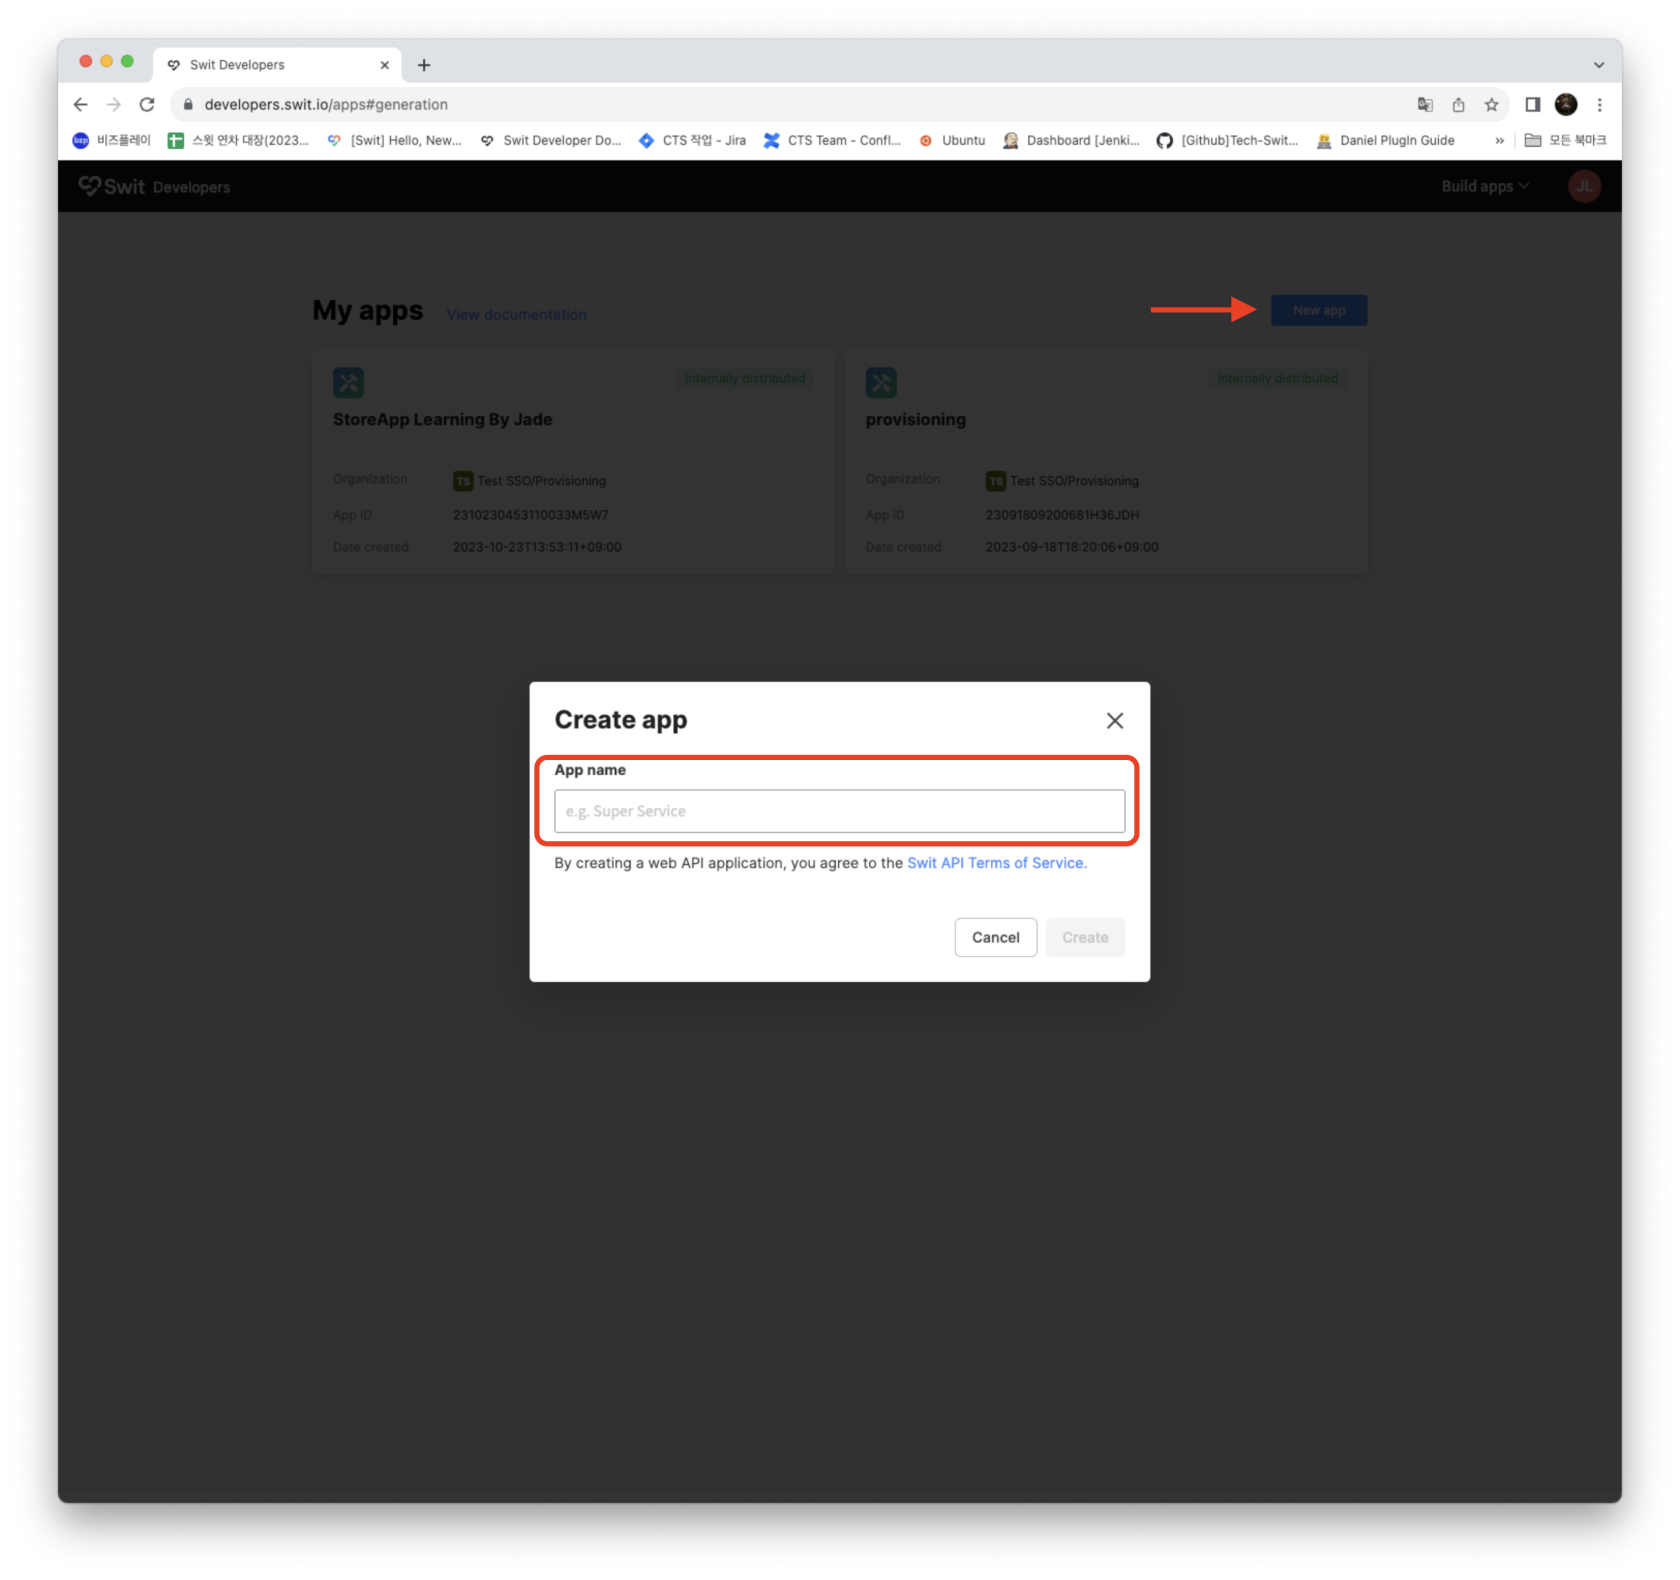](https://tech-support.swit.io/uploads/images/gallery/2024-01/1giKYjgRPyKzpFUo-image-1704687561048.png)
###### 3 우측 메뉴 App info -> Install URL 에 인증 받을 URL 입력
[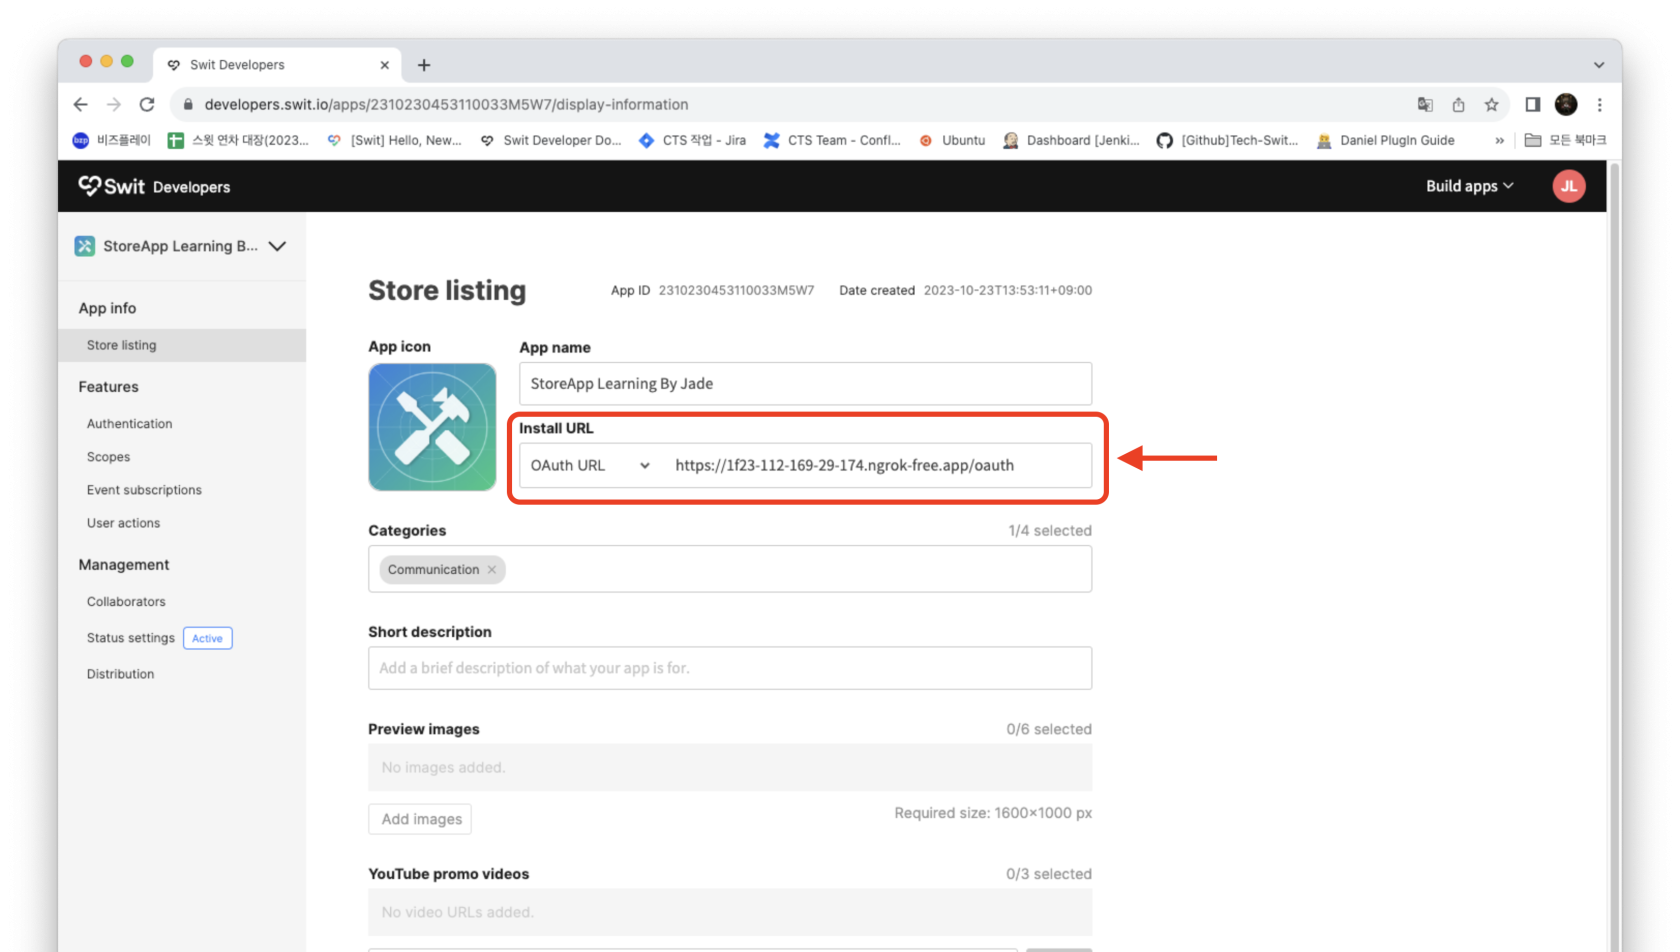](https://tech-support.swit.io/uploads/images/gallery/2024-01/FnQE2c8WlTkQjKkU-image-1704687565052.png)
###### 4 우측 메뉴 Authentication -> Allowed redirect URLs 에 oauth/callback URL 입력 (oauth 인증후 토큰 발급에 사용될 주소)
[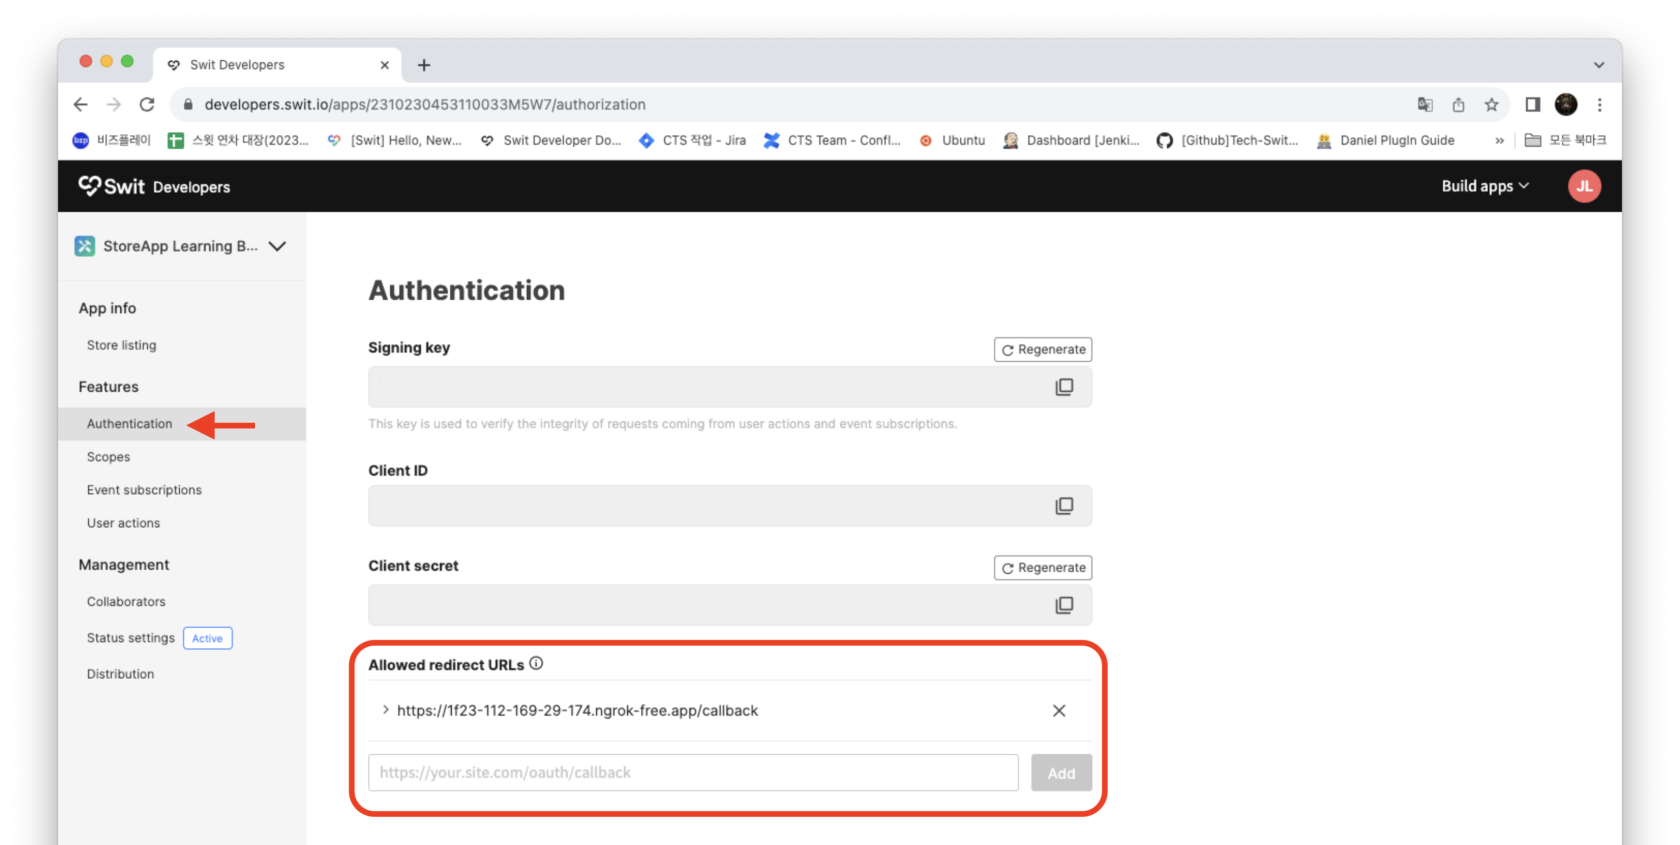](https://tech-support.swit.io/uploads/images/gallery/2024-01/EMWcPhP87vqMeweG-image-1704687570031.png)
###### 5 우측 메뉴 Scopes -> Active scopes 에 app:install 추가 (앱 내에서 필요한 scope 알맞게 추가선택)
[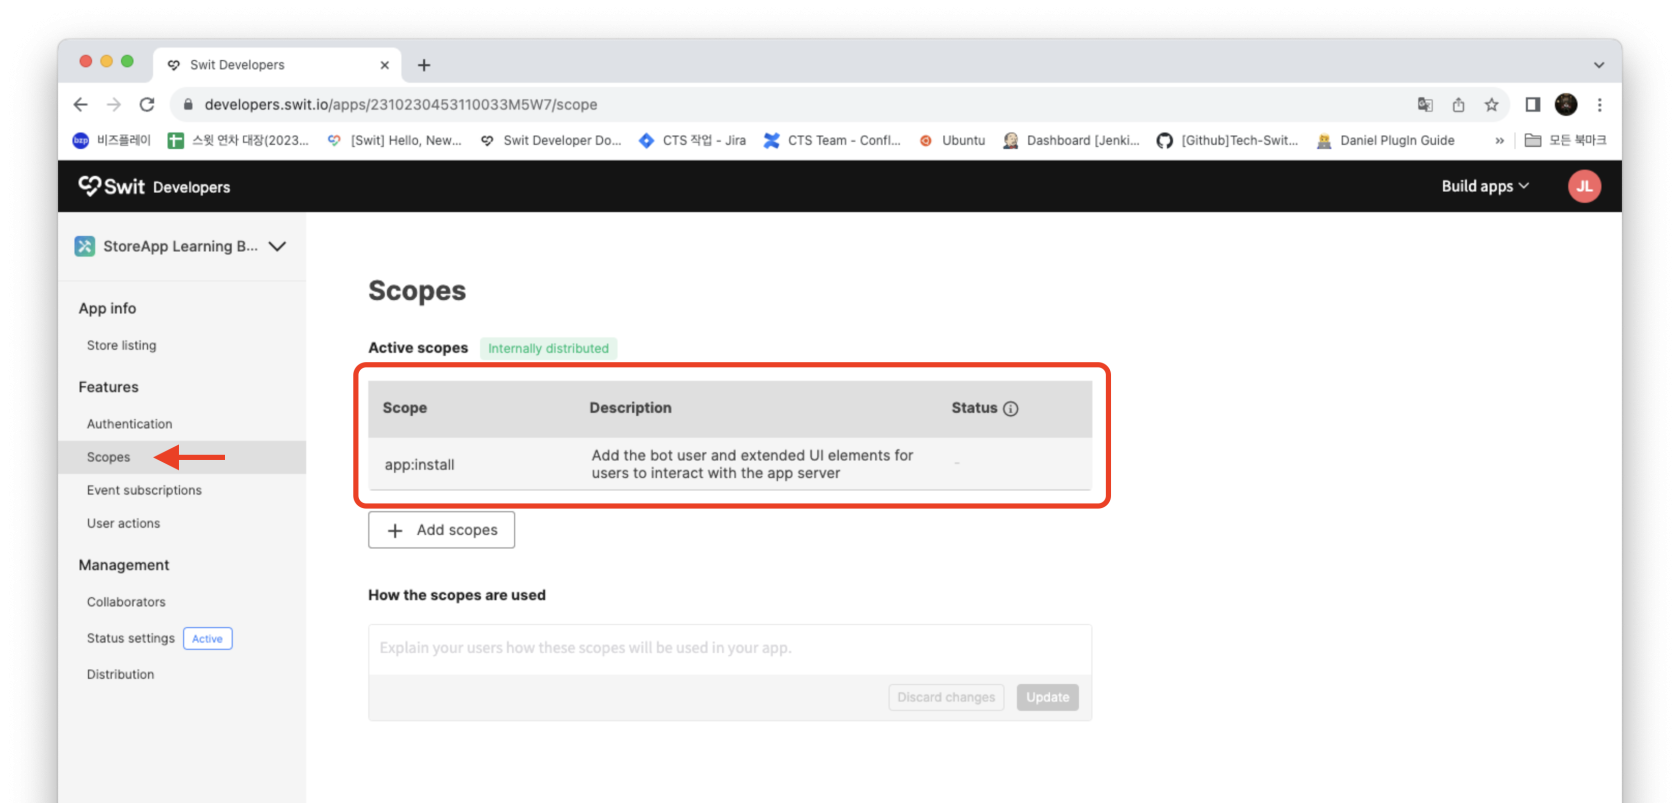](https://tech-support.swit.io/uploads/images/gallery/2024-01/hW0n3AFXwccqJ15q-image-1704687579947.png)
###### 6 우측 메뉴 User actions -> 활성화 체크 -> Callback URL 에 https://{host}/{app-server-path} 기입 -> Right panel launcher 활성화
> - 연관 문서 : **[https://devdocs.swit.io/docs/user-actions/ref%2Foperations%2Fcreate-a](https://devdocs.swit.io/docs/user-actions/ref%2Foperations%2Fcreate-a)**
> - 이 URL 로 Swit에서 모든 정보를 리턴. 필요한 데이터를 추출하여 사용 (연관 문서 에서 Request 에 해당)
> - 이 URL 에서 리턴하는것은 View (연관 문서에서 response 에 해당)
[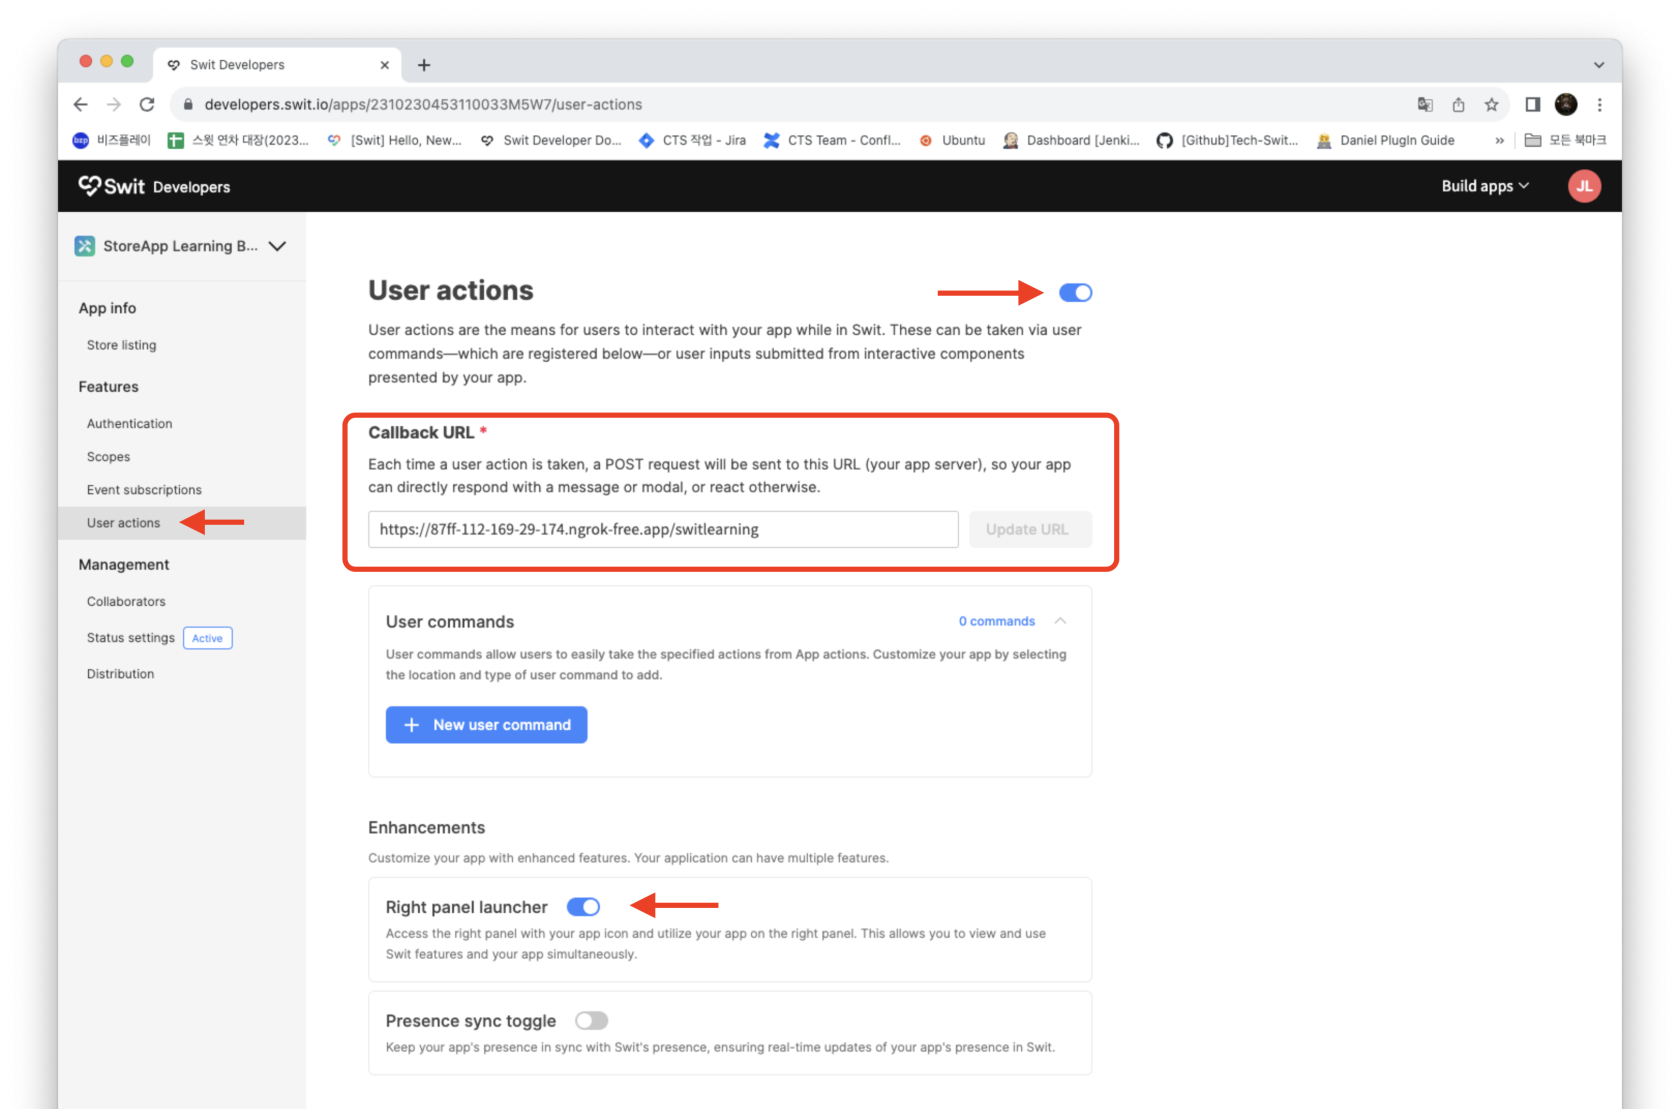](https://tech-support.swit.io/uploads/images/gallery/2024-01/kn3edRXOaA3m3a3z-image-1704687592457.png)
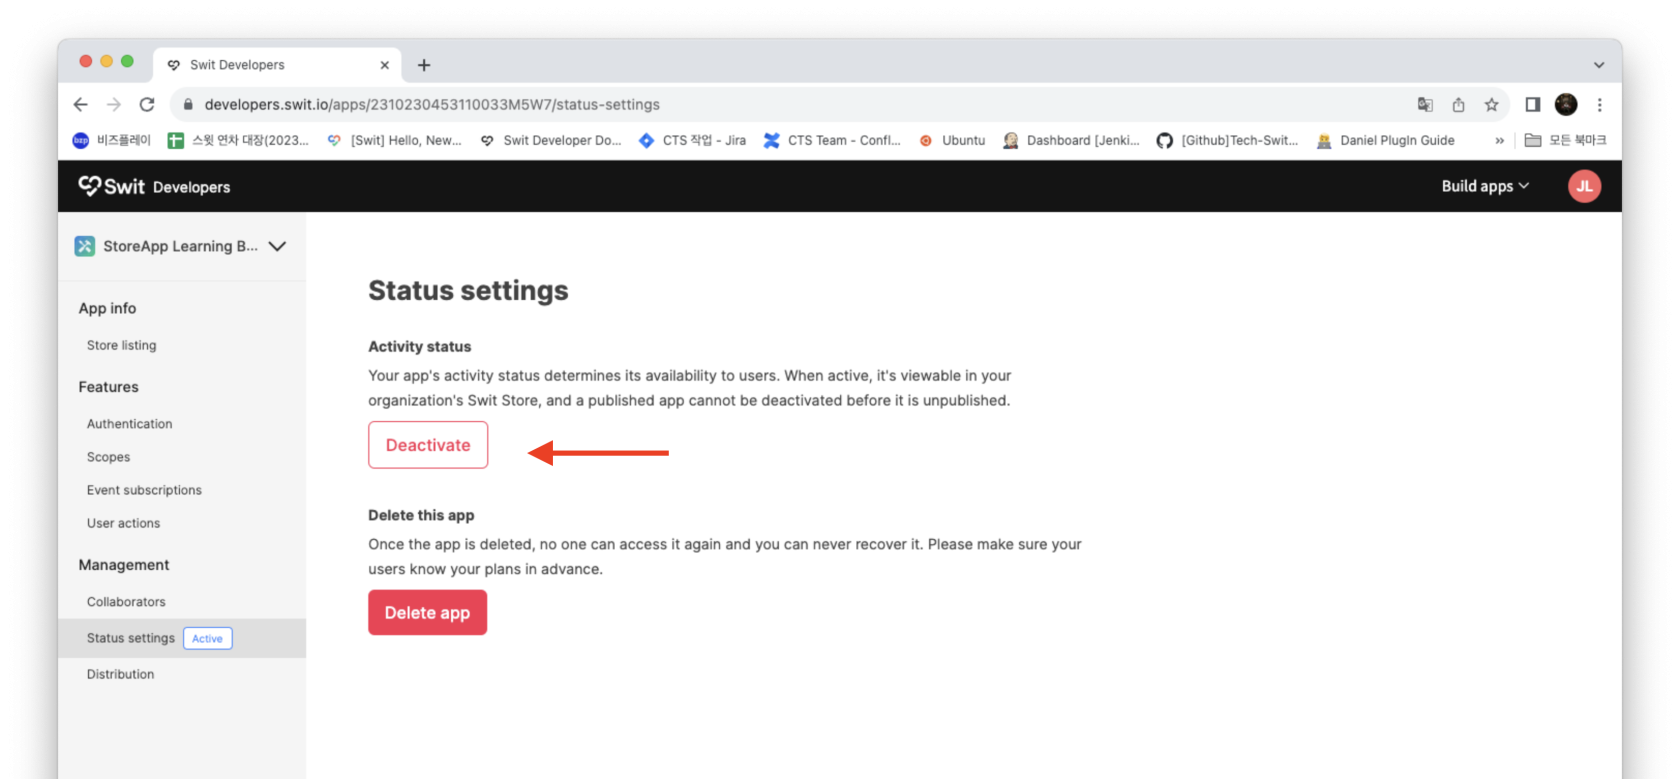
###### 7 우측 메뉴 Status settings -> Activity status 활성화
[](https://tech-support.swit.io/uploads/images/gallery/2024-01/NGBRAMyG7s6KxbgN-image-1704687619952.png)
##### App install 및 관리자 토큰 (봇 토큰) 발급
```
관리자 토큰 (봇 토큰) - 최초 앱 설치 로직 시 발급되는 토큰 (app:install 스콥이 포함된 토큰)
사용자 토큰 - 앱 가입(로그인) 로직 시 사용자별로 발급되는 개별 토큰 (사용자 권한별 스콥이 부여된 토큰)
```
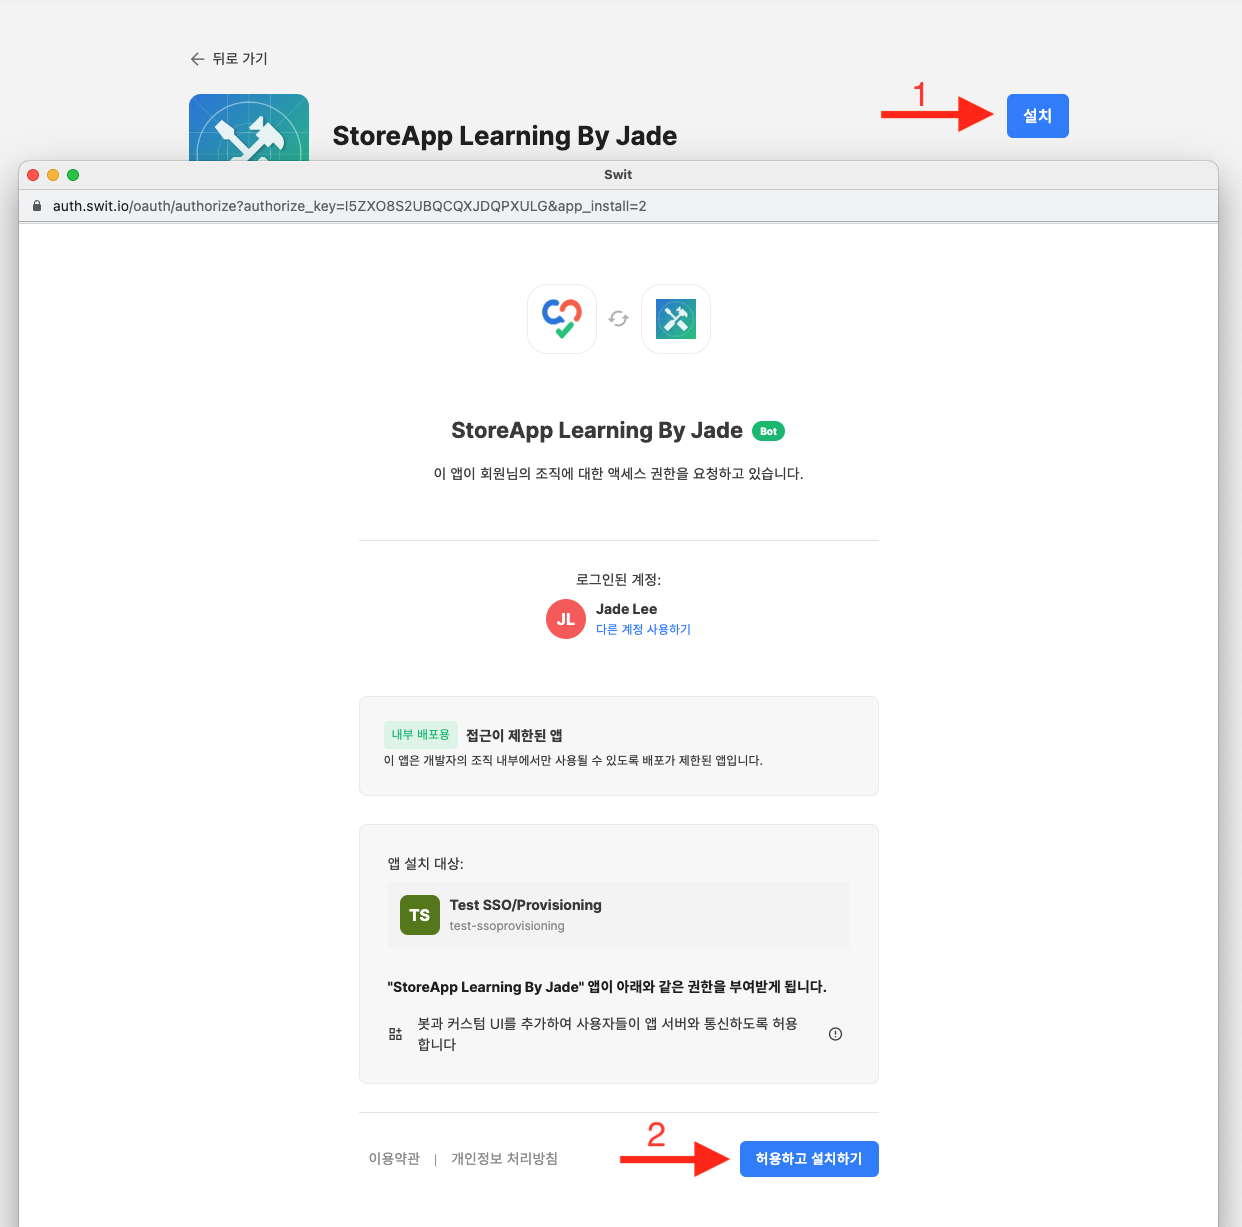
###### 1. Swit Store 에서 해당 앱 설치버튼 클릭
> - 앱 설정시 3 번에서 기입한 install URL 을 가지고 인증 요청 됨
> - 엑세스 요청 화면에서 허용하고 설치하기 누를시 설정 4번 내용에서 등록한 Allowed redirect URL 로 redirect 됨 (인증 요청 하는 메서드에서 redirect 파라미터를 동일한 URL 로 보내야 함)
> - callback URL 에서는 토큰 요청 및 수신 후 앱 설치 완료
```python
@app.get("/oauth")
async def oauth():
get_ep = '/oauth/authorize'
get_params = {
'client_id': clientid,
'redirect_uri': redirect_uri+'/callback',
'response_type': 'code',
'scope': install_scope
}
return RedirectResponse(
url=f"{api}{get_ep}?{parse.urlencode(get_params)}"
)
@app.get("/callback")
async def callback(code: str):
post_ep = '/oauth/token'
r = requests.post(
url=f"{api}{post_ep}",
headers={
'Content-Type': 'application/x-www-form-urlencoded'},
data={
'grant_type': 'authorization_code',
'client_id': clientid,
'client_secret': secret,
'redirect_uri': redirect_uri+'/callback',
'code': code}
)
```
[](https://tech-support.swit.io/uploads/images/gallery/2024-01/C6H4hBX8mCSQWpqG-image-1704687740841.png)
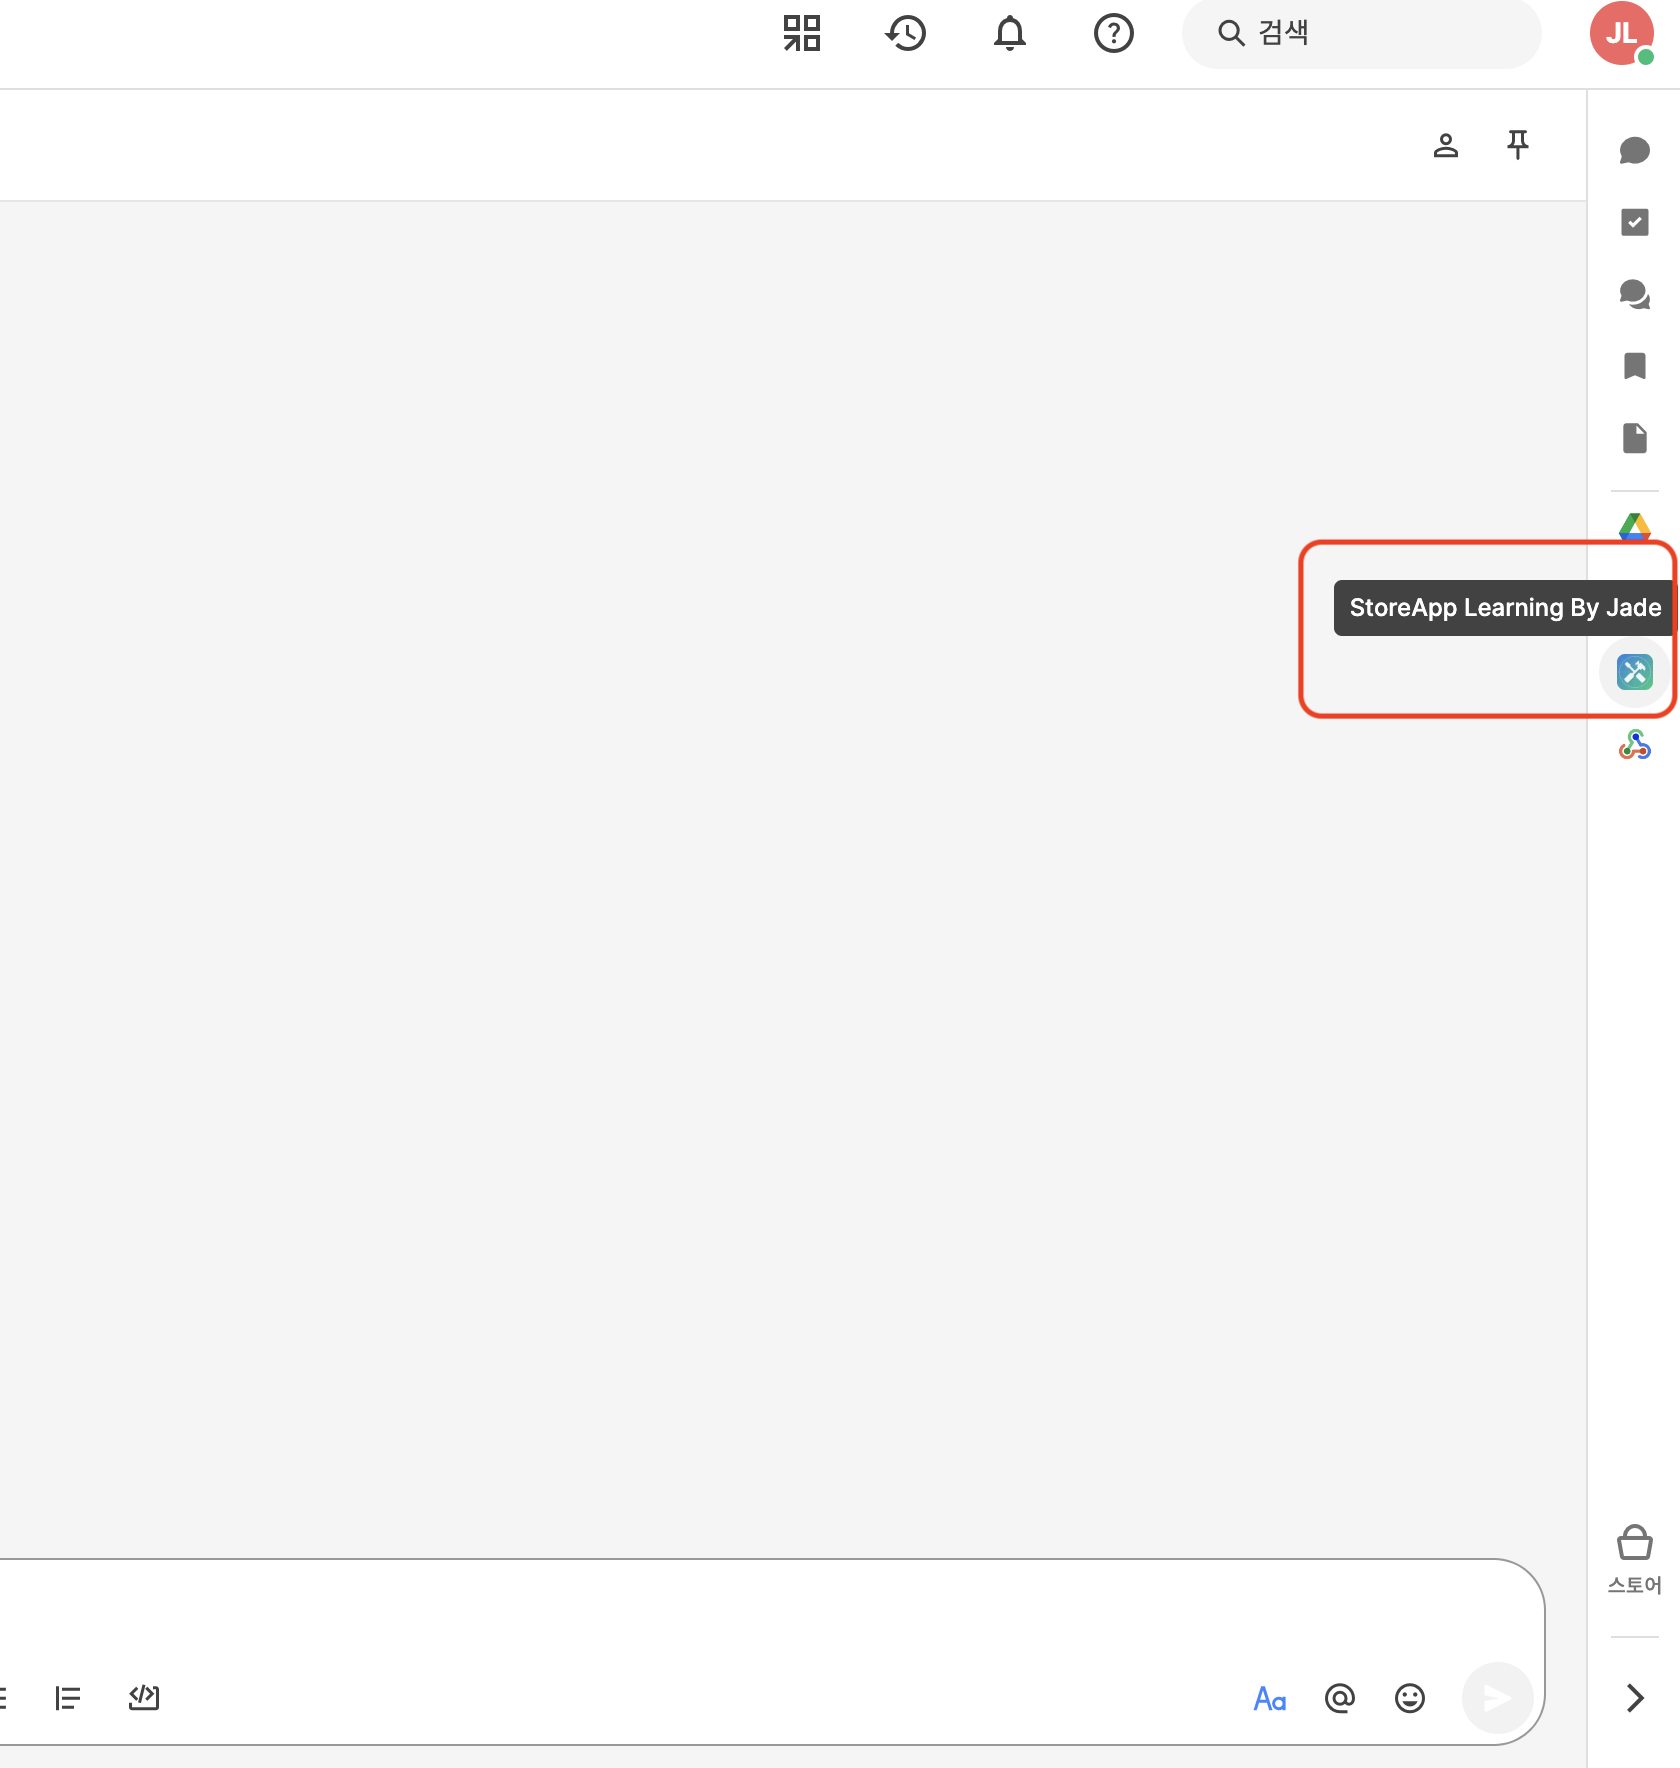
###### 2. Swit 에서 우측 APP List 에 등록한 앱이 있는지 확인
[](https://tech-support.swit.io/uploads/images/gallery/2024-01/Y8sTZ3Ya5bVdrkQu-image-1704687651525.png)
##### 우측 패널 화면 만들기 및 띄우기
> - 연관 문서 : **[https://devdocs.swit.io/docs/user-actions/ref%2Fschemas%2Fcallback-views](https://devdocs.swit.io/docs/user-actions/ref%2Fschemas%2Fcallback-views)**
> - 해당 문서의 callback\_type 에 따라 작동합니다.
> - new\_view 는 **[UI Builder](https://builder.swit.io/)** 에서 제작후 Source 복사 붙여넣기
```python
@app.post('/switlearning')
async def rightPannel(item: Item):
if item.user_action.type == "view_actions.submit":
if item.user_action.id == "jade_collection_entry":
return {"callback_type": "views.push", "new_view": viewPage.entryView("z")}
return {"callback_type": "views.push", "new_view": viewPage.mainView}
```
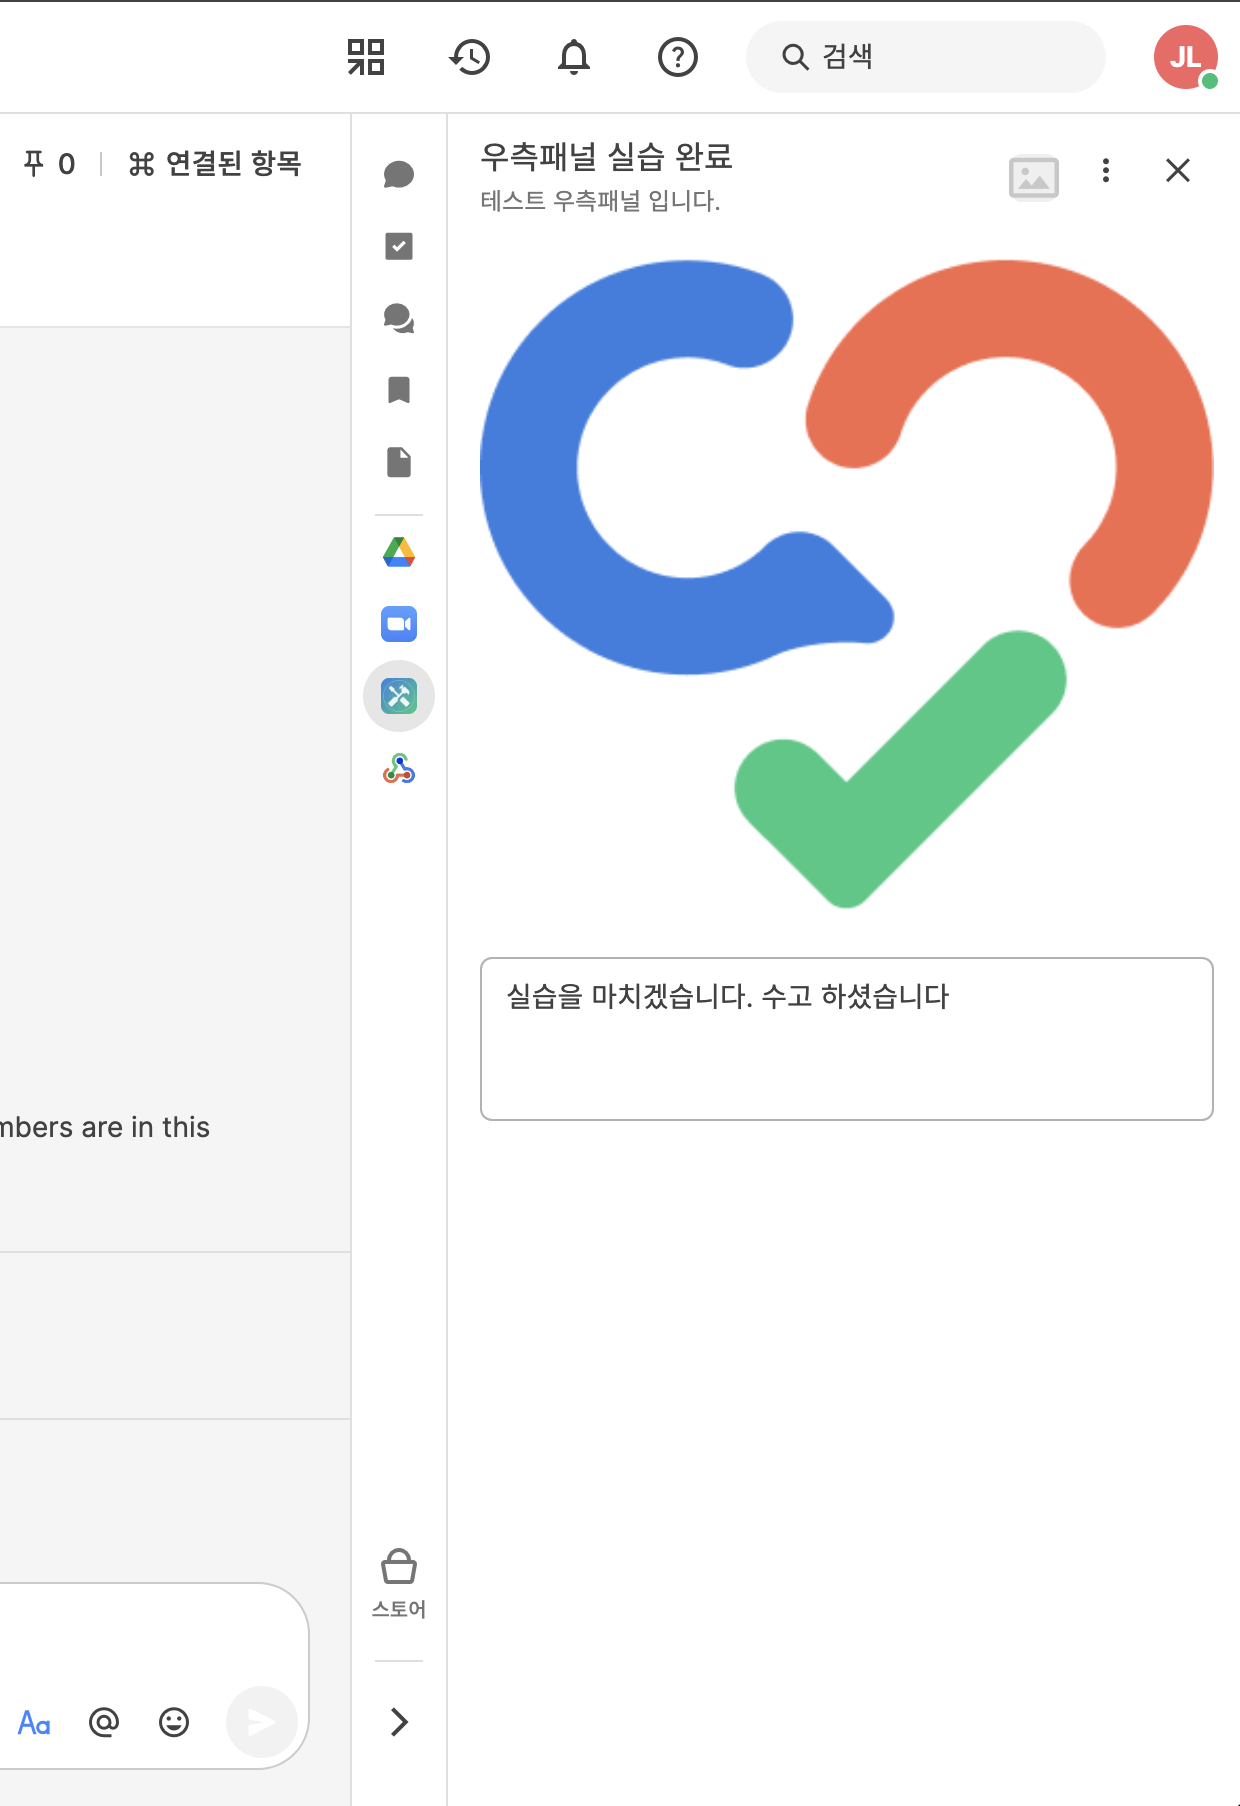
##### 준비 후 Swit 에서 앱 실행해보기
[](https://tech-support.swit.io/uploads/images/gallery/2024-01/UIOj2QcmhwKQvZO4-image-1704687752375.png)