# Swit App 을 이용한 모달팝업 띄우기
#### App을 활용하여 Swit에서 모달팝업 실습해보기
> * UI 디자인 요소는 **[Swit builder](http://builder.swit.io/)** 를 통해 만들수 있습니다.
> * 기능적 요소는 **[SwitAPI](https://switapi.stoplight.io/)** 에 API가 있어야 합니다.
> * 이 실습은 **[테스트를 위한 간편 환경설정](http://34.64.168.32:8000/books/swit-store-app/page/f61d6)** 이 선행되어야 합니다.
---
##### 1. Swit 워크스페이스에 앱 설치 하기
###### 1.1 **[replit사이트](http://replit.com/)** 에서 main.py 파일에 지난 실습내용 확인 ( 없다면 **[토큰생성](http://34.64.168.32:8000/books/swit-store-app/page/switapi)** 참조 )
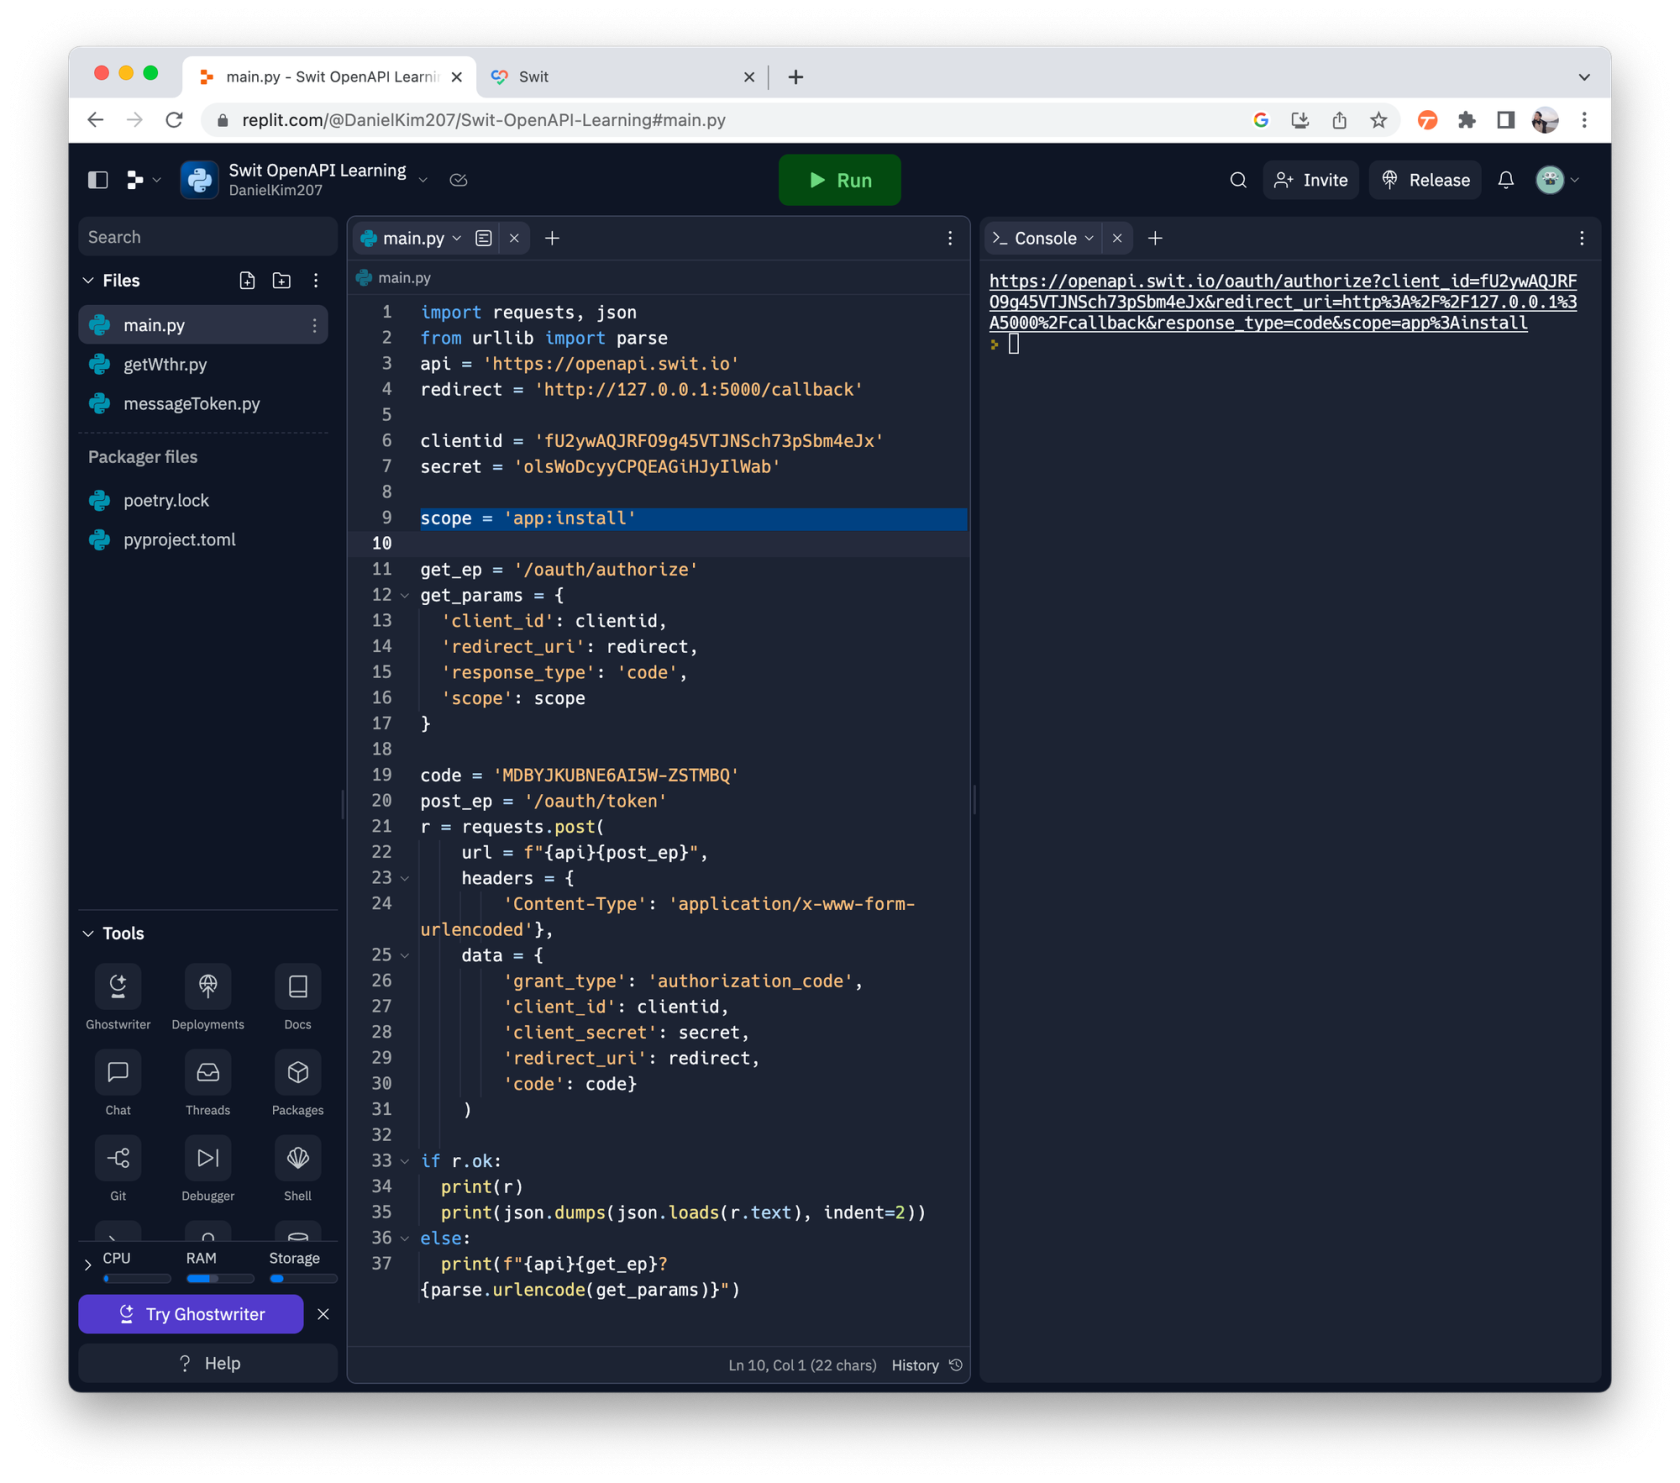
###### 1.2 9번째 라인의 scope 를 app:install 로 수정후 Run
[](https://tech-support.swit.io/uploads/images/gallery/2024-01/OJzciJGE7H0pWrlM-image-1704687369680-2-9-scope.png)
###### 1.3 Console 창의 링크 클릭
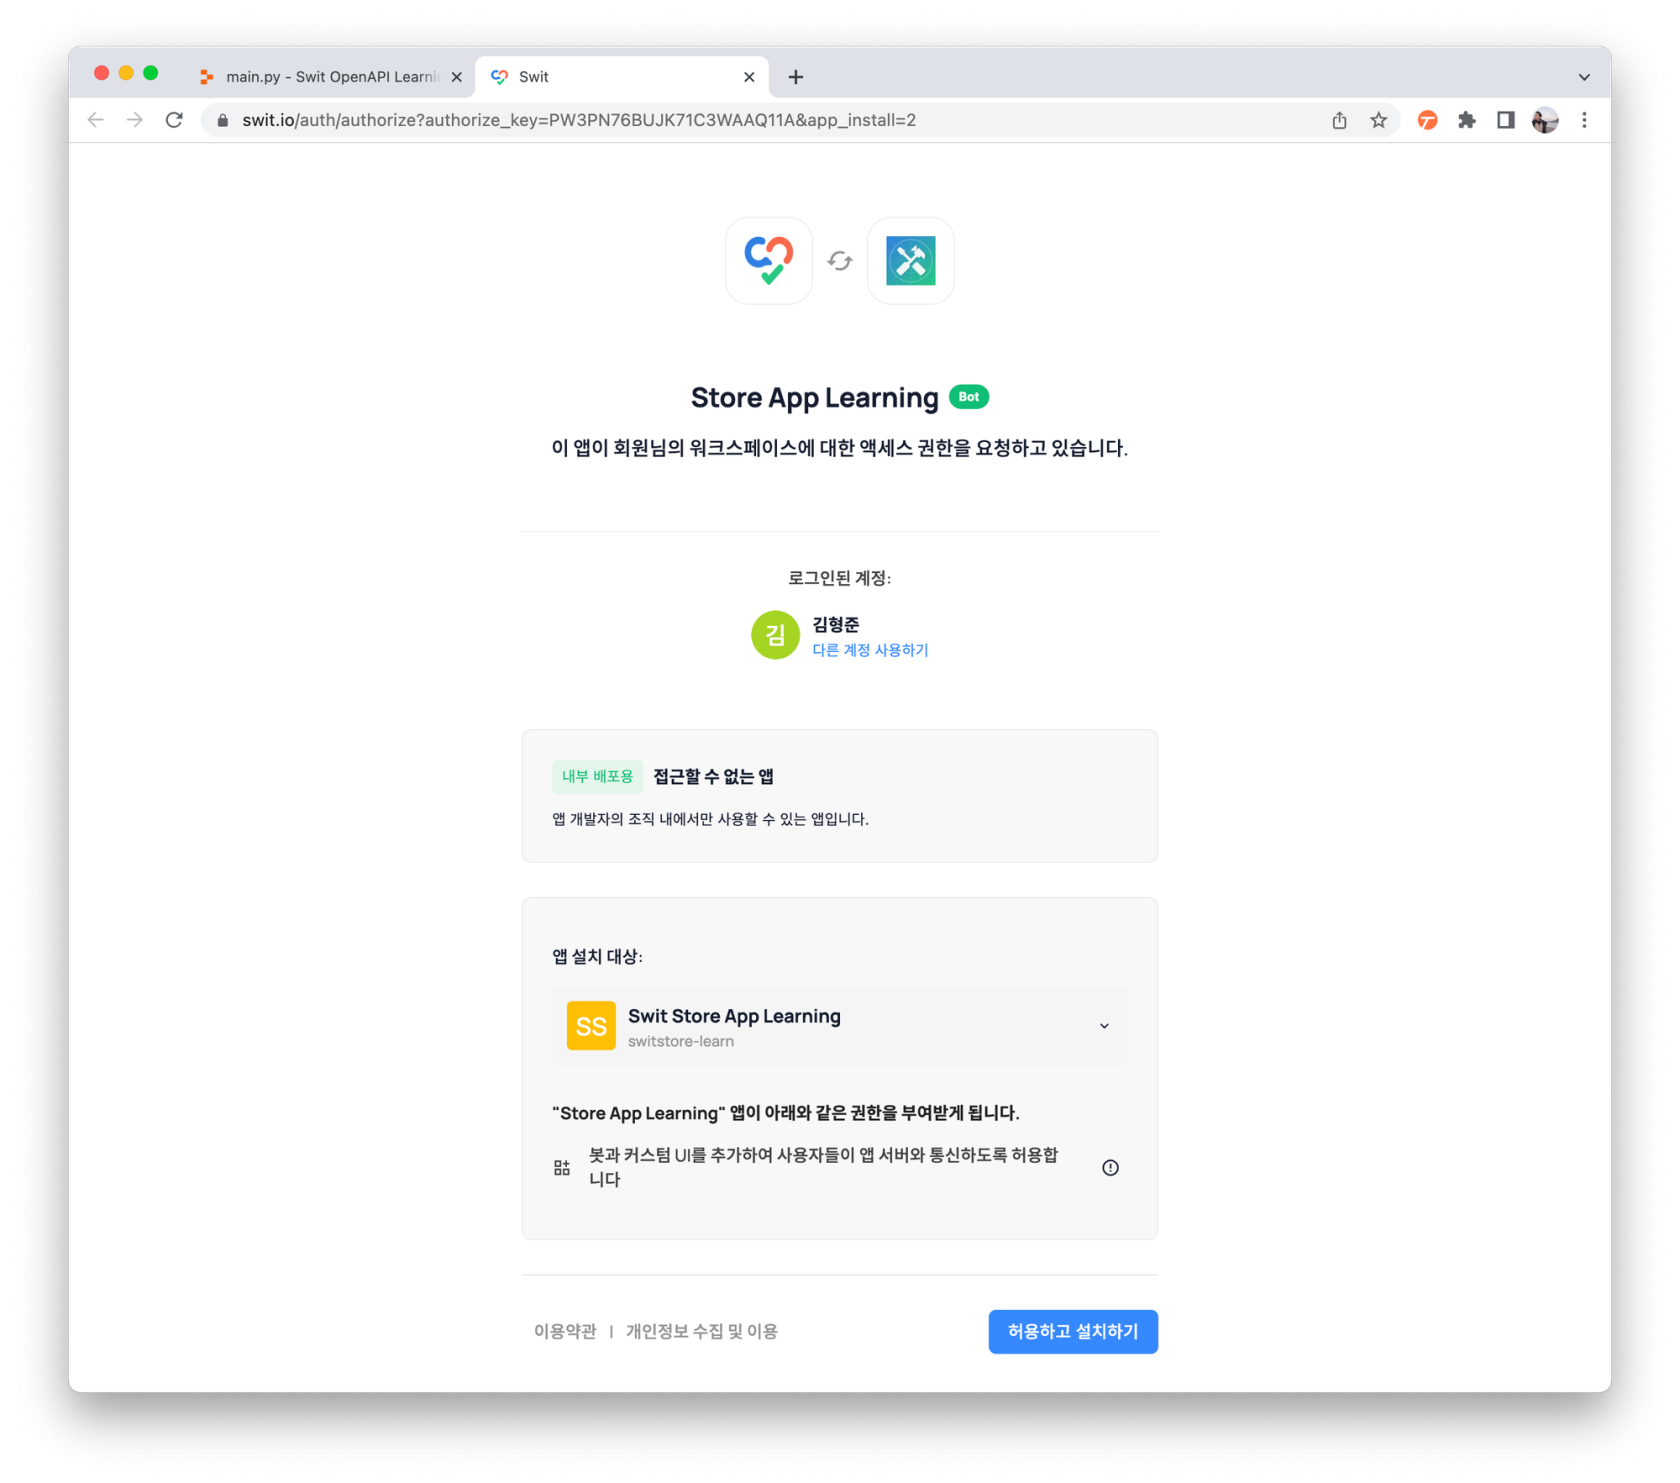
###### 1.4 허용하고 설치하기 클릭
[](https://tech-support.swit.io/uploads/images/gallery/2024-01/3OwTAqgVVusAN4Px-image-1704687374836-4.png)
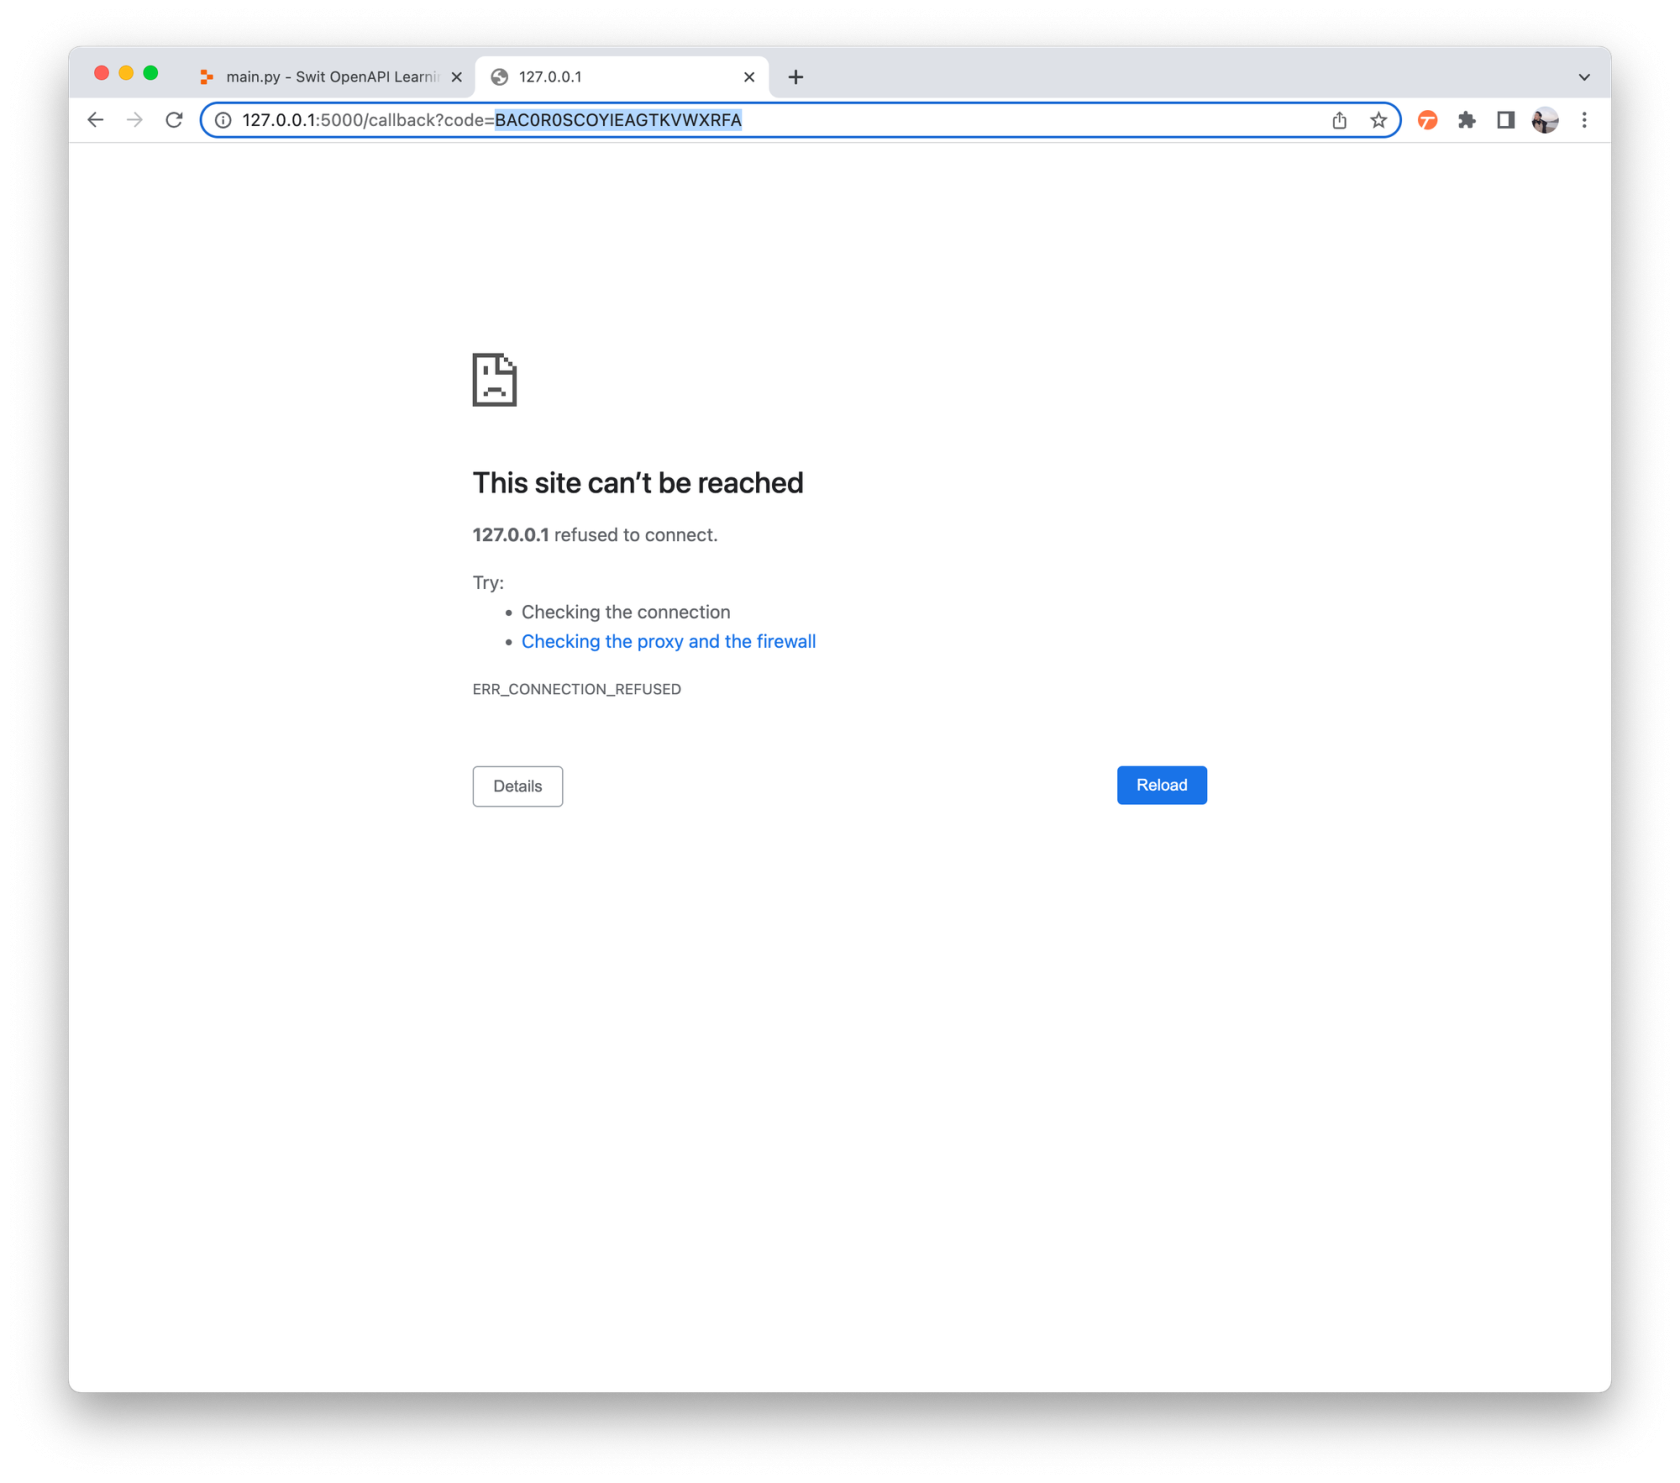
###### 1.5 오류 창 URL 에서 맨뒤 code값만 복사 ( 오류가 아닙니다! )
[](https://tech-support.swit.io/uploads/images/gallery/2024-01/jQ2pnZbDTT8r5LxN-image-1704687380837-5-url-code.png)
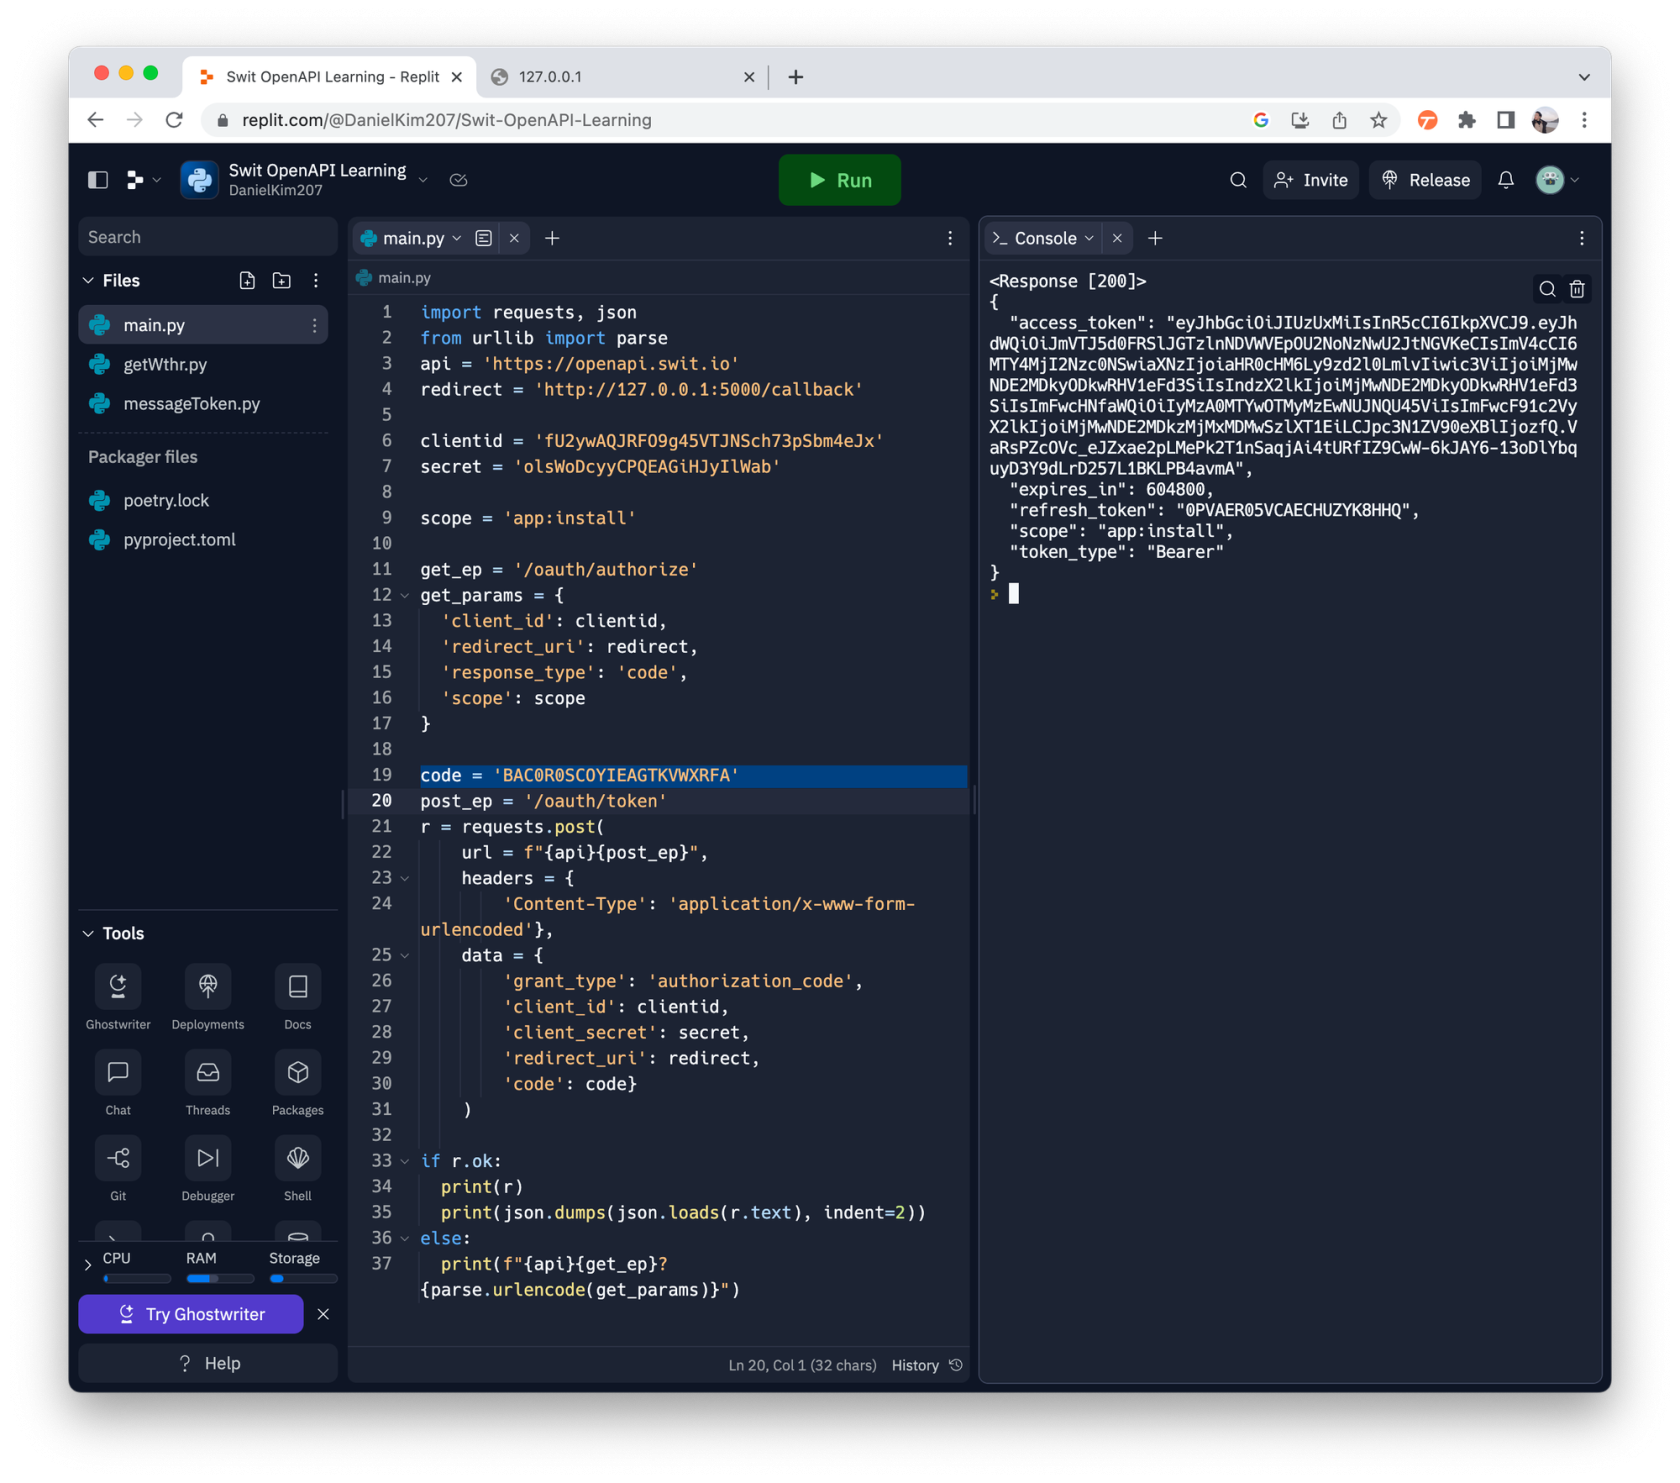
###### 1.6 replit사이트 에서 code 값에 붙여넣고 Run
[](https://tech-support.swit.io/uploads/images/gallery/2024-01/QVG6N293W0zB5gNE-image-1704687385848-6-replit-code-run.png)
###### 1.7 Swit 에서 Store 아이콘 클릭 후 파란색 설치 버튼이 사라지고 "관리" 가 생기면 설치 성공
##### 2. replit사이트 에서 서버 구동하기 (개발자 서버 역할)
###### 2.1 Flask 리플 실행
###### 2.2 Webview 창에서 주소 복사 (Stop 상태라면 Run 후 주소복사)
[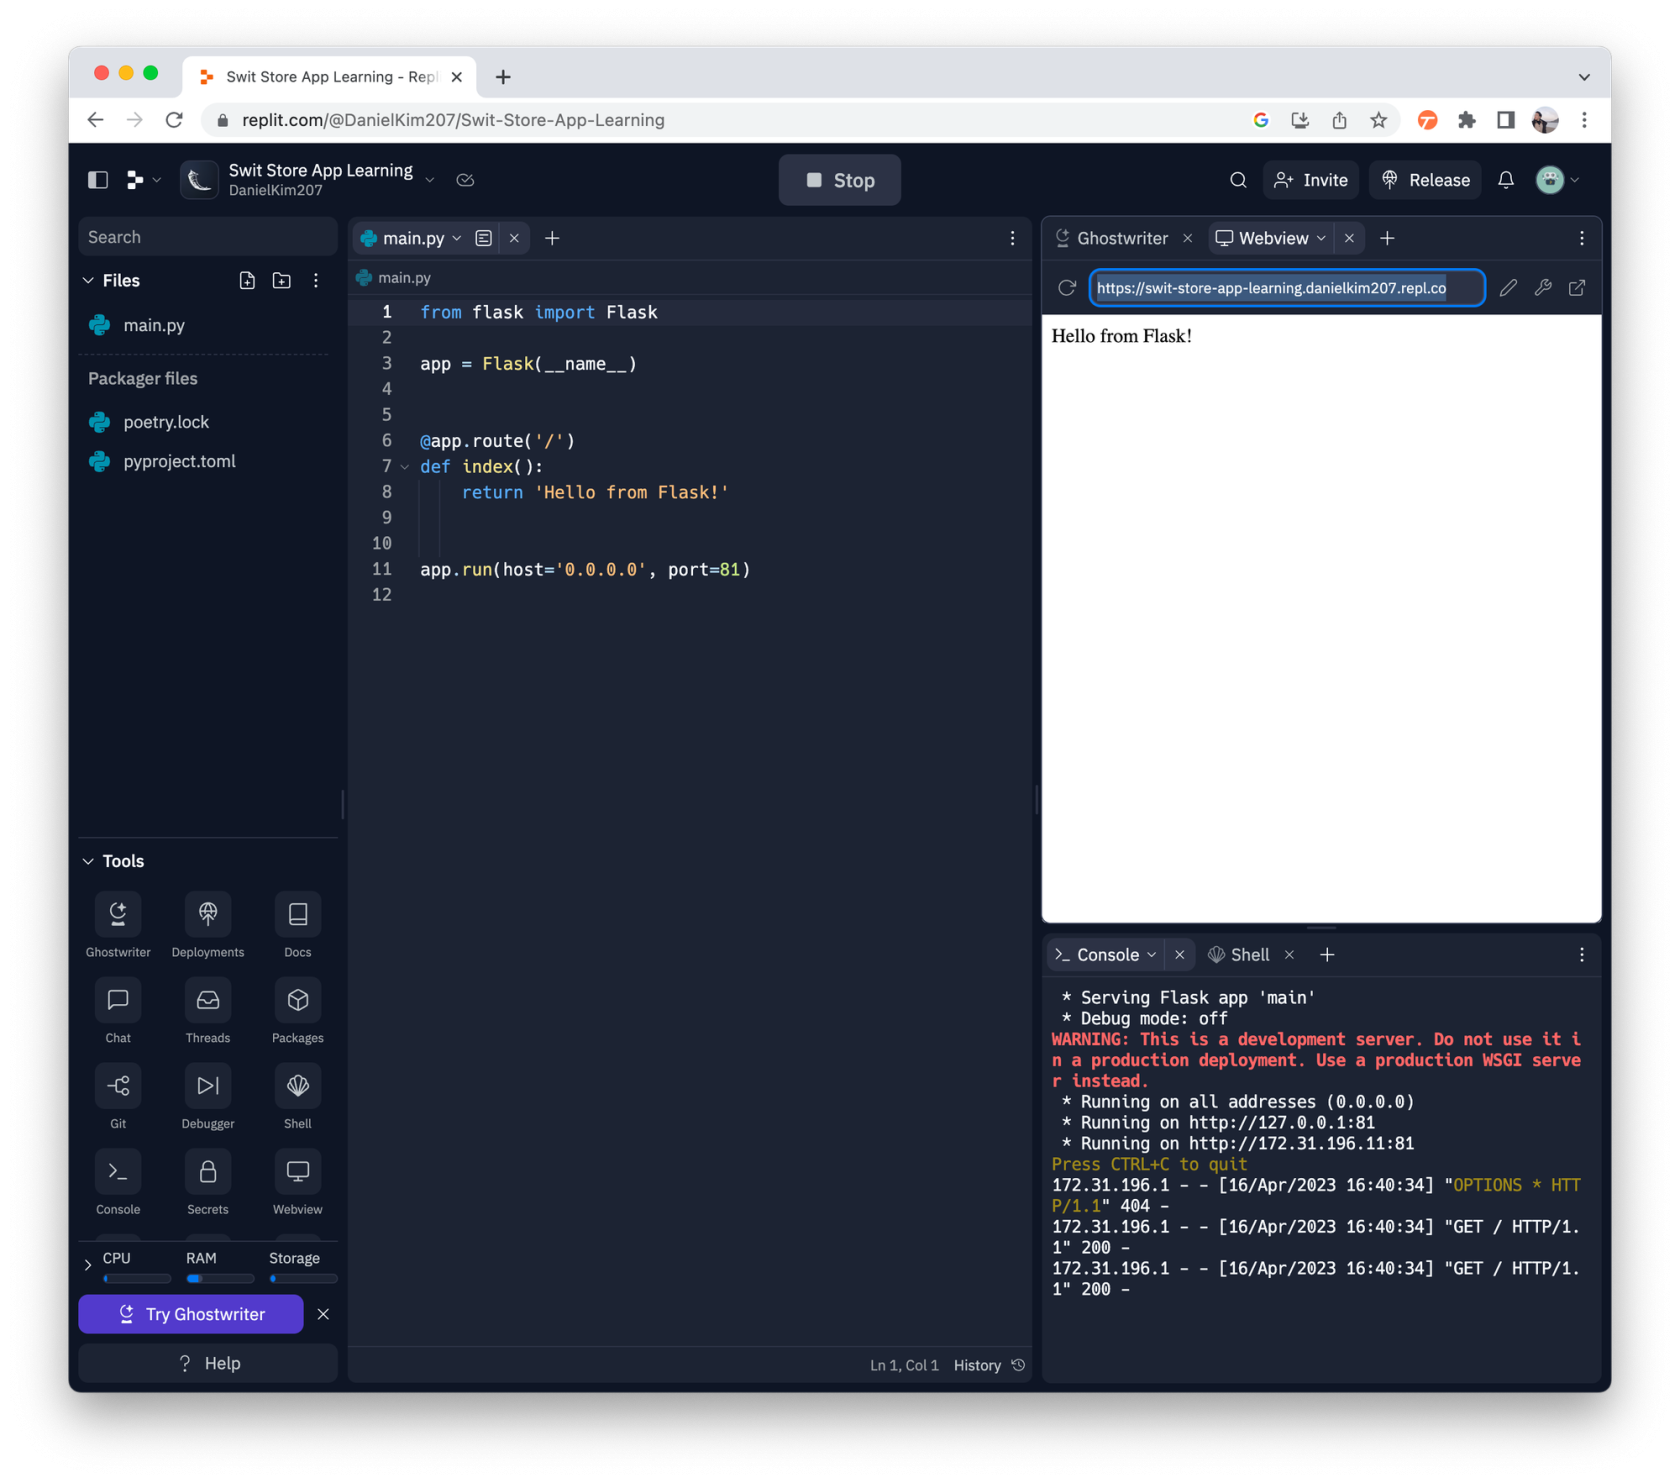](https://tech-support.swit.io/uploads/images/gallery/2024-01/nPoCTOeyhd66lV8l-image-1704687390483-2-webview-stop-run.png)
###### 2.3 새 인터넷 창을 오픈후 주소로 접속하여 서버가 잘 실행되는지 확인 (시간이 조금 오래걸릴수 있음)
[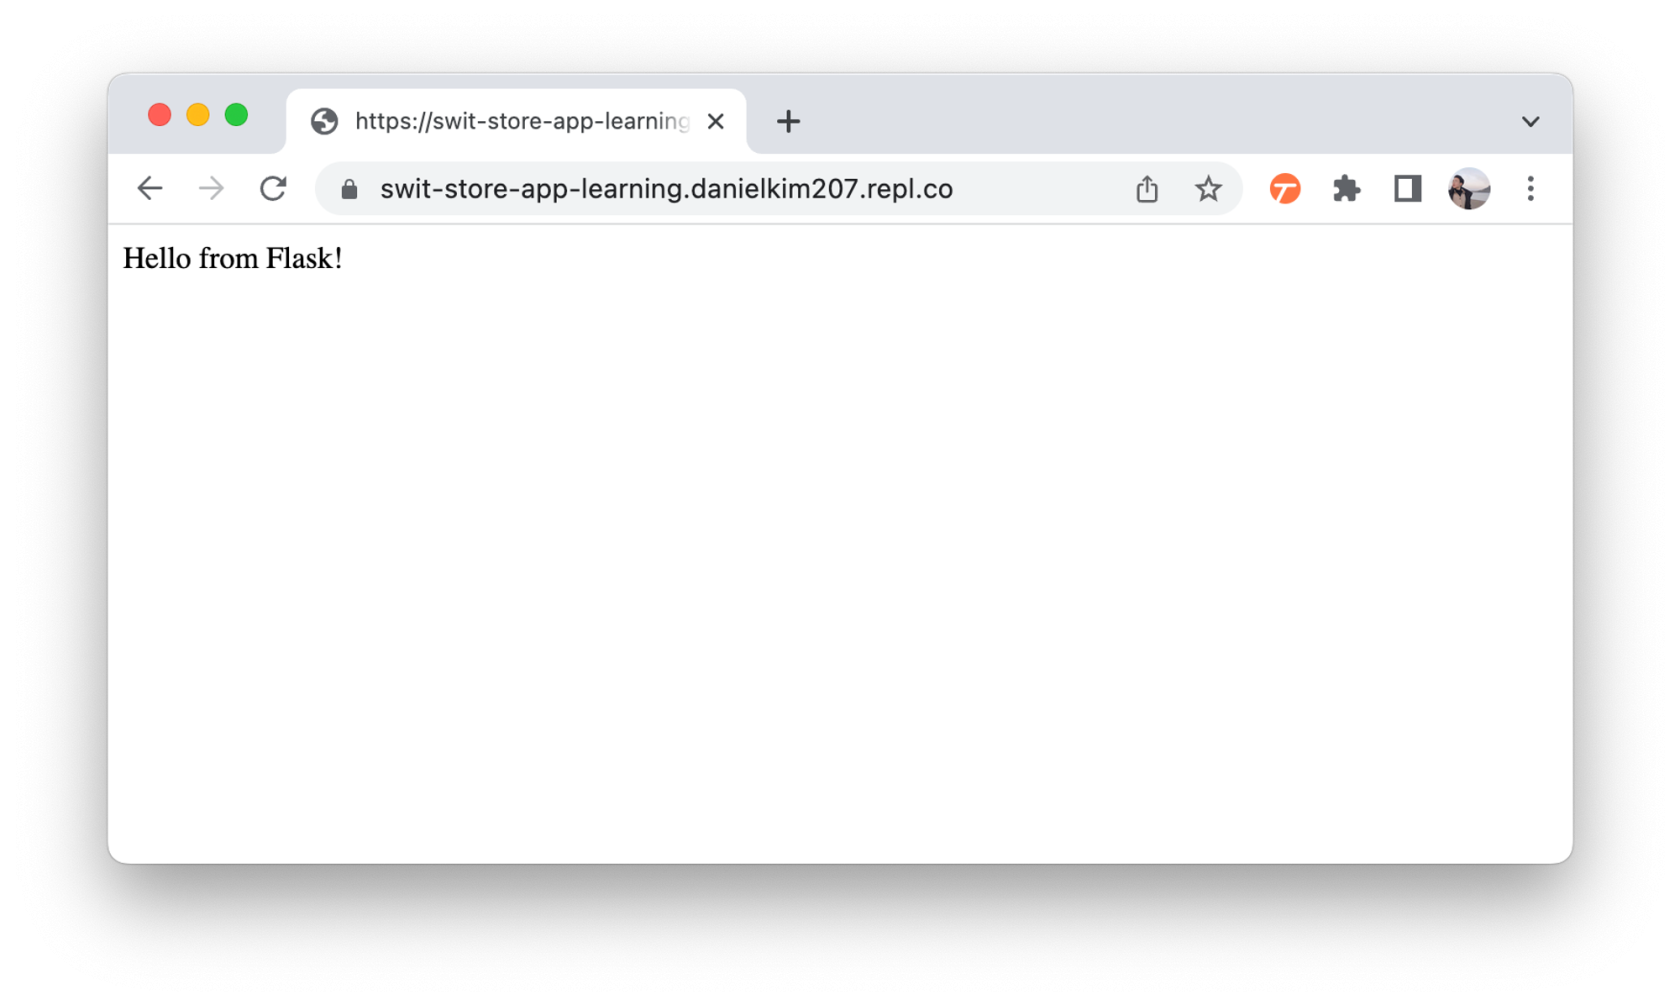](https://tech-support.swit.io/uploads/images/gallery/2024-01/UiM2pxNU6JJ8gyXx-image-1704687395610-3.png)
##### 3. **[Developers사이트](http://developers.swit.io/)** 에서 User action API 요청이 가능하도록 활성화
###### 3.1 My apps > Feature > user actions 탭 에서 활성화 클릭
###### 3.2 Callback URL 에 위에서 복사한 서버주소 + /switlearning 입력
[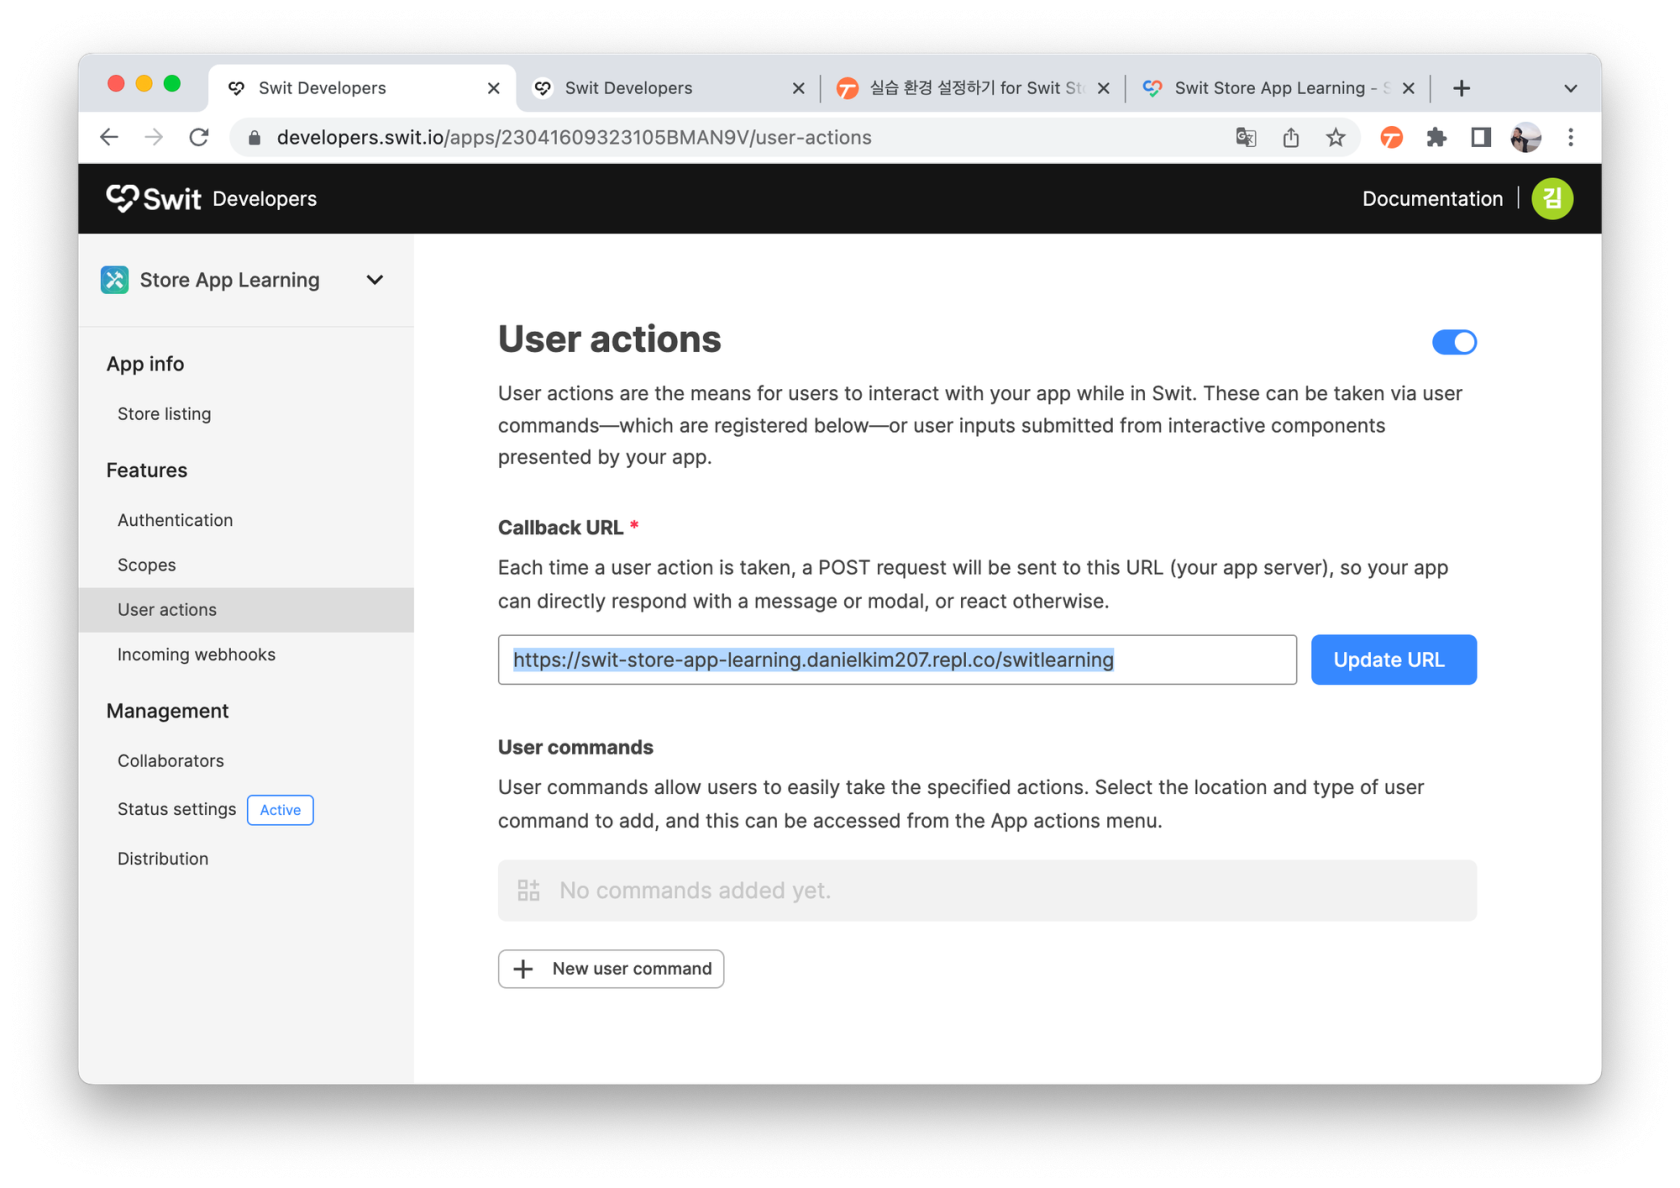](https://tech-support.swit.io/uploads/images/gallery/2024-01/Yv4SmdTZdFqPmuSK-image-1704687400578-2-callback-url-switlearning.png)
###### 3.3 입력후 Update URL 클릭
###### 3.4 +New user command 버튼 클릭
###### 3.5 Command name 및 Command ID 입력
###### 3.6 아래로 스크롤 하여 Extension 에 Channel message 체크
> 필수는 아니지만 /Command alias 활성화 및 Alias name 입력
###### 3.7 Save 클릭
##### 4. User action API 응답을 위한 Callback 데이터를 서버에 입력 (Swit Server에 보낼 정보)
###### 4.1 아래 코드를 복사
```Python
import json
from flask import Flask, request
app = Flask(__name__)
@app.route('/')
def hello_switty():
return 'hello, switty!'
@app.route('/switlearning', methods=['POST'])
def switlearning():
r = request.json
print(json.dumps(r, indent=4))
callback = {
"callback_type": "views.open",
"new_view": {
"view_id": "builder_test",
"header": {
"title": "This is a view title",
"subtitle": "Add a subtitle if needed",
"context_menu": [
{
"label": "Menu item 1",
"action_id": "2fc5573a-c439"
},
{
"label": "Menu item 2",
"action_id": "340d4ae1-0cb2"
}
],
"buttons": [
{
"type": "button",
"icon": {
"type": "image",
"image_url": "https://swit.io/assets/images/lib/emoji/apple-64/1f609.png",
"alt": "Header button icon"
},
"static_action": {
"action_type": "open_link",
"link_url": "https://swit.io"
}
}
]
},
"body": {
"elements": [
{
"type": "select",
"placeholder": "Select an item",
"multiselect": False,
"trigger_on_input": True,
"options": [
{
"label": "Option 1",
"action_id": "eb5c968b-f4fb"
},
{
"label": "Option 2",
"action_id": "8992c582-7b37",
"static_action": {
"action_type": "open_link",
"link_url": "https://swit.io"
}
}
]
},
{
"type": "button",
"label": "Button 1",
"action_id": "eb5c968b-f4fb",
"style": "primary_filled"
},
{
"type": "divider"
},
{
"type": "text",
"markdown": True,
"content": "[Swit](https://swit.io) is *where the magic happens.* Where big, revolutionary ideas jump off the drawing board and into the real world."
}
]
}
}
}
return callback
app.run(host='0.0.0.0', port=81)
```
###### 4.2 main.py 에서 모든 내용을 삭제하고 붙여넣기
###### 4.3 Stop 후 Run 하여 서버 재실행
##### 5. Swit에서 User action command 실행하여 모달 팝업 띄우기
###### 5.1 Swit 채팅창 왼쪽 아래에서 "+"버튼 클릭 > 앱이름 > command 선택
[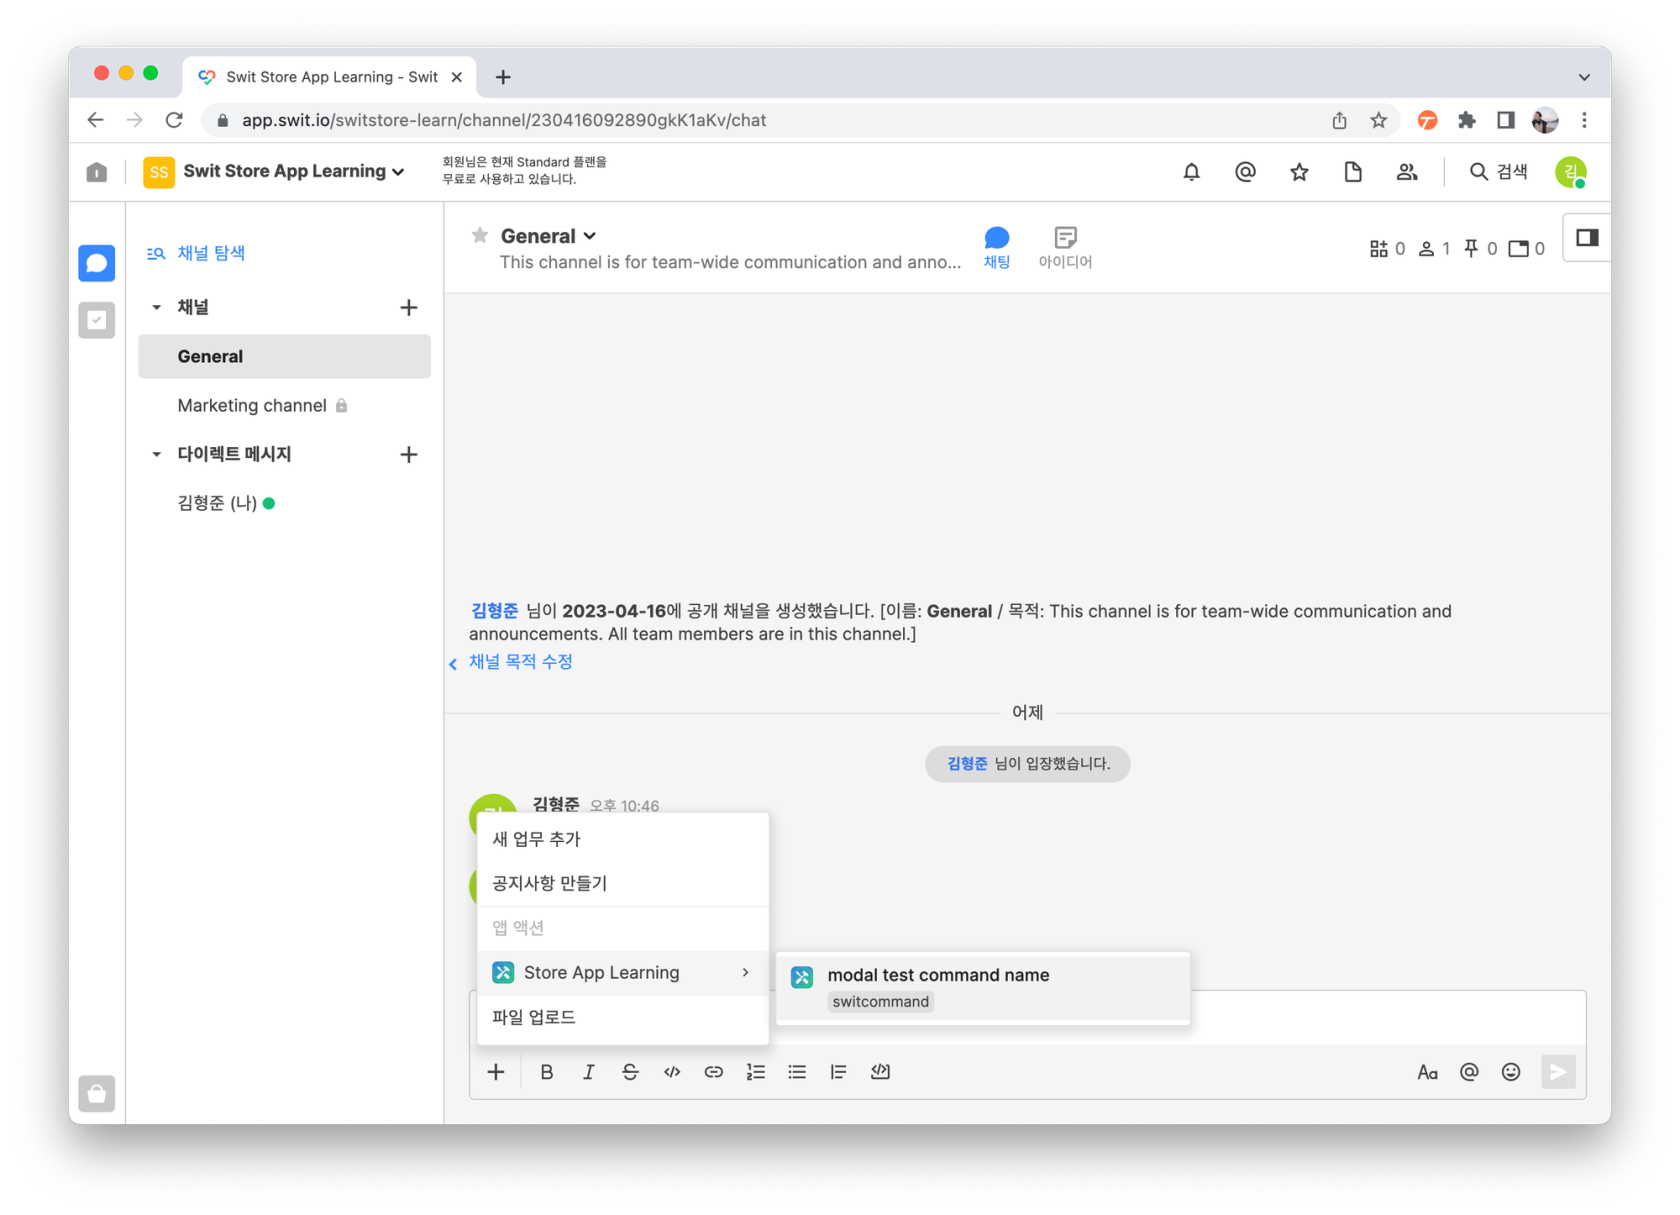](https://tech-support.swit.io/uploads/images/gallery/2024-01/WiaTPSpVQPdABDWh-image-1704687484118-1-swit-2222-command.png)
###### 5.2 Modal 팝업 확인
[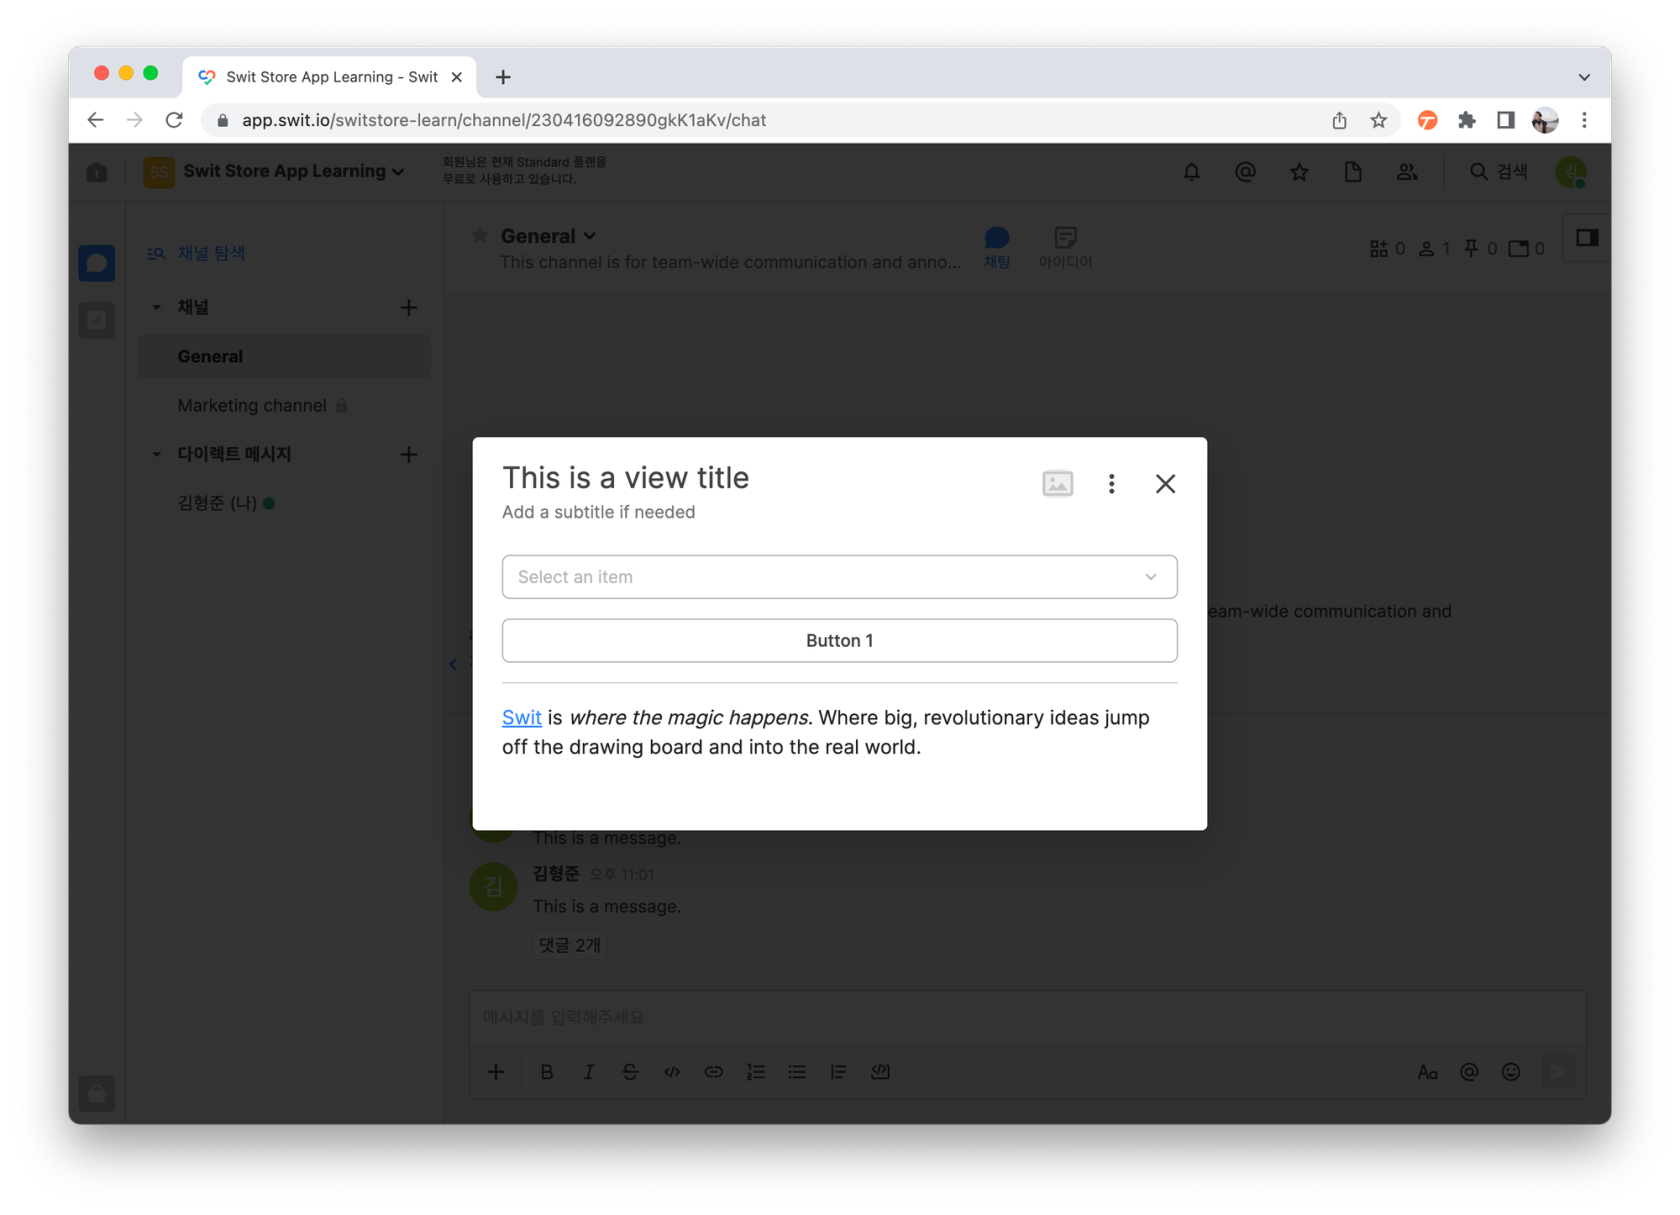](https://tech-support.swit.io/uploads/images/gallery/2024-01/UnYzCz3UA4tbxSRQ-image-1704687414140-2-modal.png)
###### 5.3 replit사이트의 Console 화면 체크
[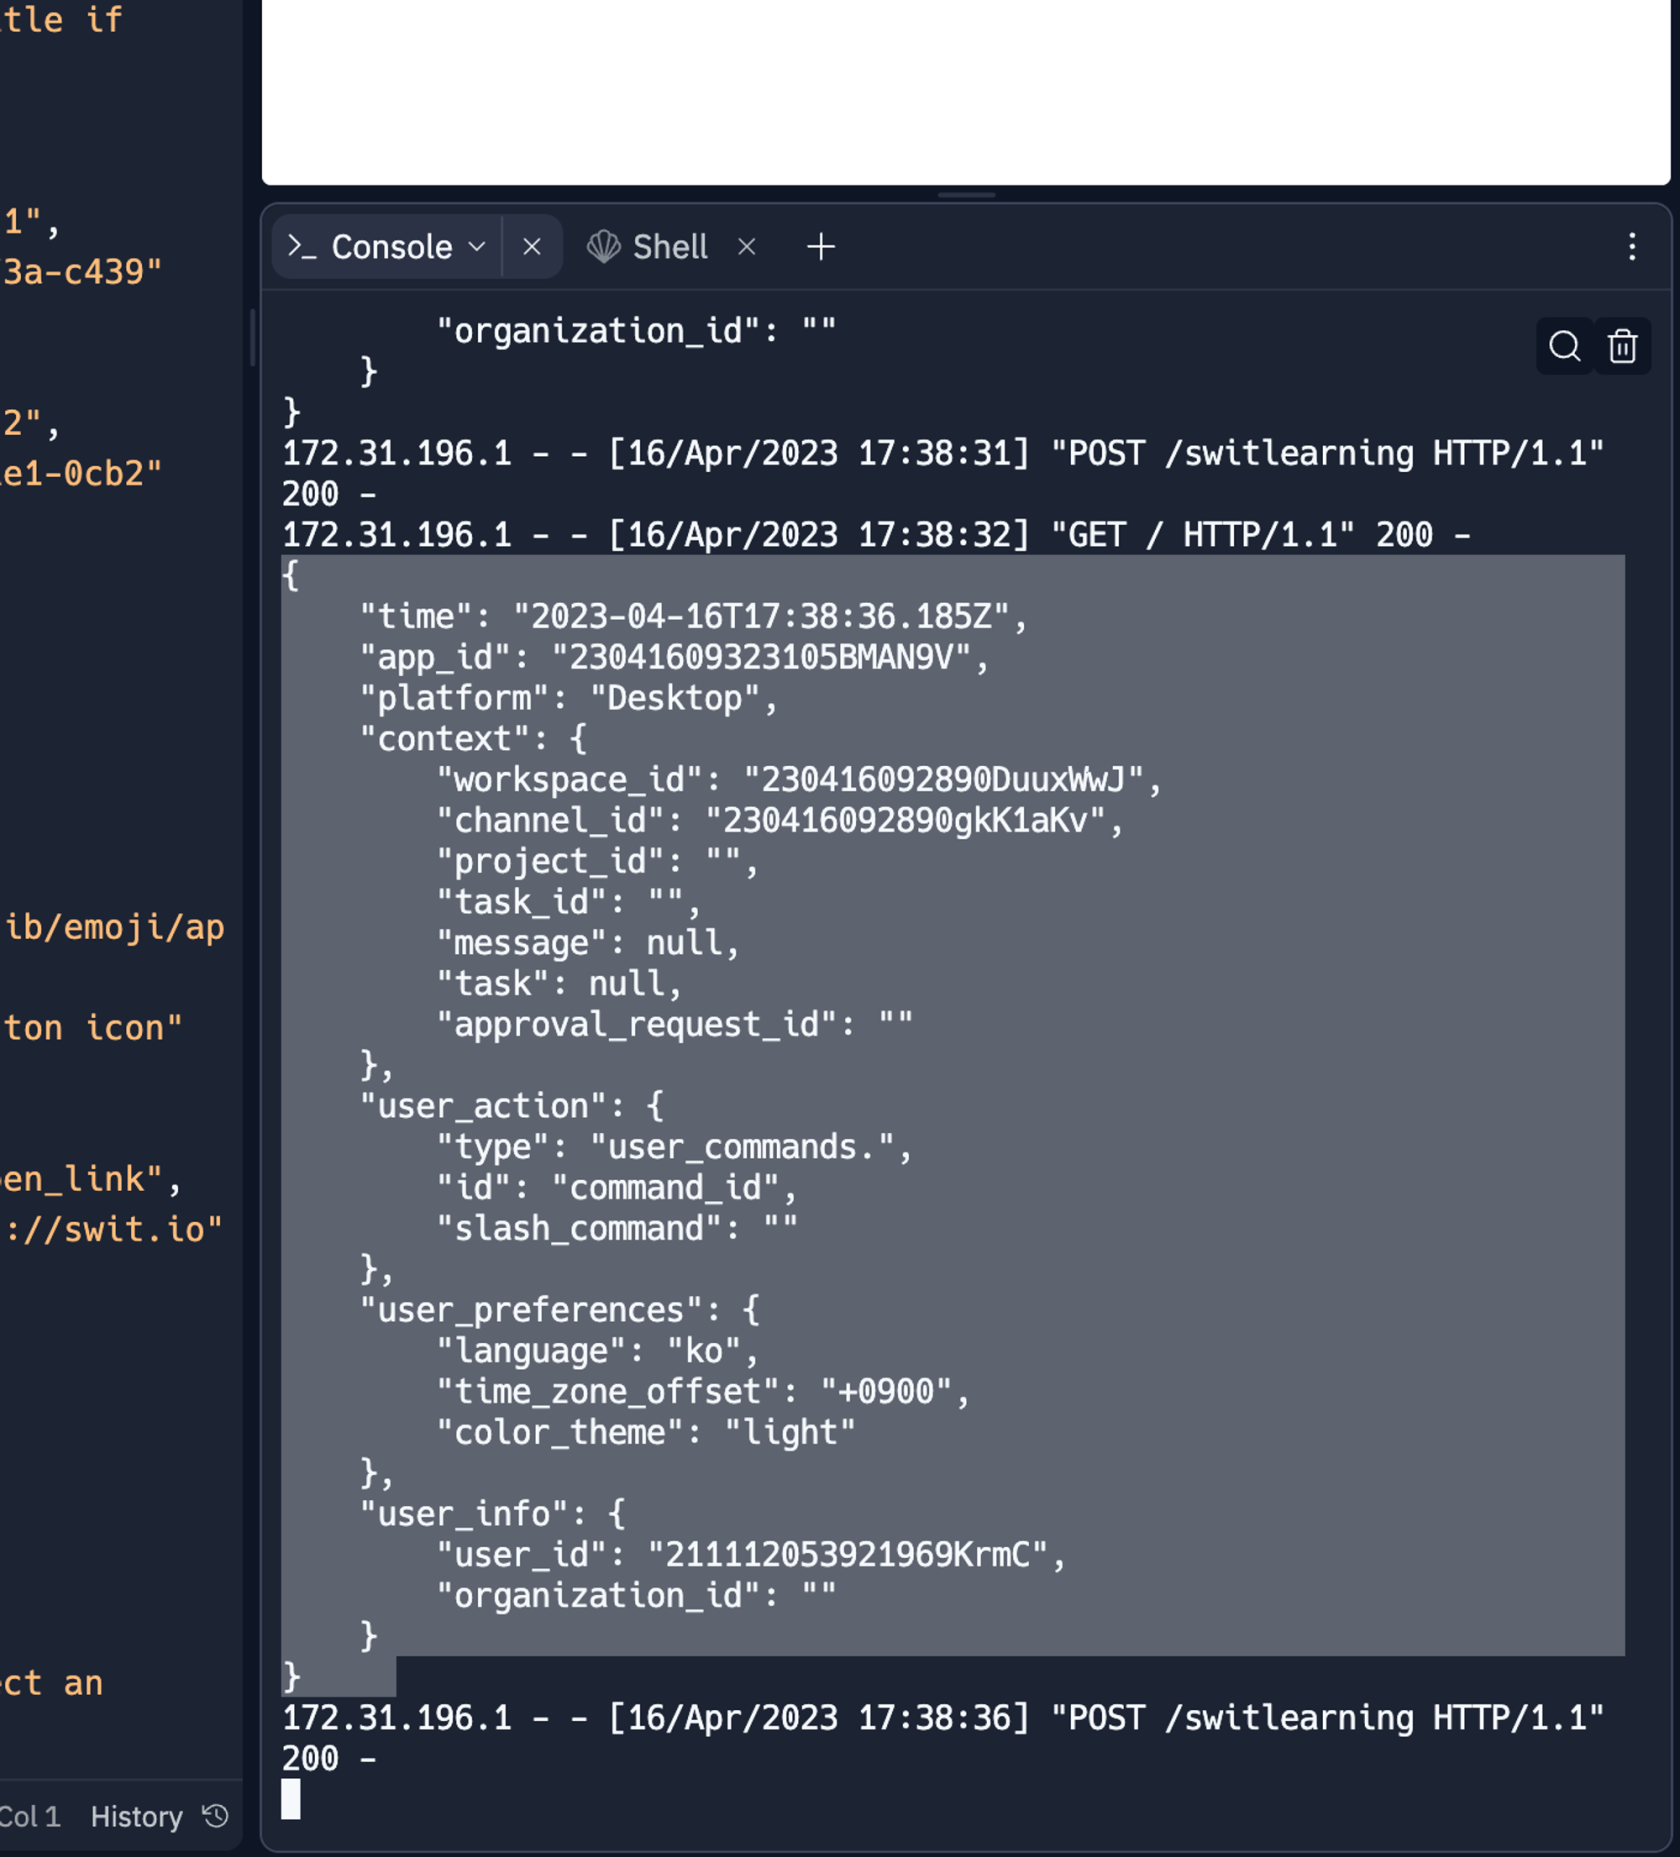](https://tech-support.swit.io/uploads/images/gallery/2024-01/7EU3qN3JXO0Qxtgv-image-1704687418830-3-replit-console.png)
---
##### 6. 원하는 화면의 Modal 창을 만들어서 띄워보기
###### 6.1 **[builder.swit.io](http://builder.swit.io/)** 사이트 들어가기
###### 6.2 왼쪽 위 메뉴에서 "모달" 선택
###### 6.3 만들고 싶은 디자인 자유롭게 만들기
###### 6.4 왼쪽의 Source 코드 복사
###### 6.5 아래 내용에서 16번째 "new_view" 의 {} 중괄호 안에 복사한 Source 내용을 붙여넣고 main.py 에 복사 붙여넣기
```Python
import json
from flask import Flask, request
app = Flask(__name__)
@app.route('/')
def hello_switty():
return 'hello, switty!'
@app.route('/switlearning', methods=['POST'])
def switlearning():
r = request.json
print(json.dumps(r, indent=4))
callback = {
"callback_type": "views.open",
"new_view": {
"여기에 Source 붙여넣기"
}
}
return callback
app.run(host='0.0.0.0', port=81)
```
###### 6.6 Python 문법오류 수정 (중요)
> * true -> True
> * false -> False
###### 6.7 Stop 후 Run 하여 서버 재실행
###### 6.8 [5번] 내용을 수행하여 디자인한 모달창이 생성되는지 확인
---
여기까지 따라하시느라 수고하셨습니다.
이상으로 Swit Store App 가이드를 마치도록 하겠습니다.